Maybeboard

Death Trigger (49)

Draw (17)

Ramp (7)

Buff (5)

Tokens (35)

Sacrifice (25)

Drain (13)

Combo With Untap (1)

Teysa Orzhov Scion Combo (1)

Recursion (29)

Control (26)

Utility (15)

Other (6)


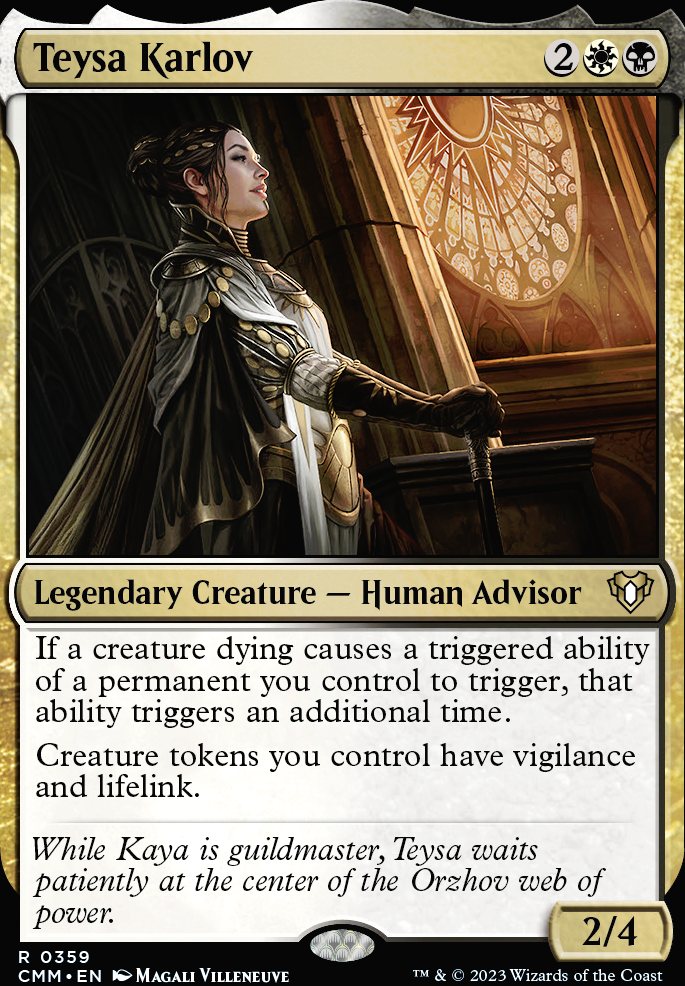
Teysa Karlov by Magali Villeneuve


Teysa waits patiently at the center of the Orzhov web of power


Hello, and welcome to my Teysa Karlov EDH primer. The purpose of this guide is to serve as a starting point for those trying to make her work as their commander. My goal is to show card choices, interactions, combos, rulings, and options for making a deck with Teysa. The primary gameplan and archetype of this deck is aristocrats⁠—a "death engine" of killing creatures, getting value, playing more creatures, and draining our opponents' life.

Before reading the primer, please note that everything in here is just my subjective opinion, and if you disagree with me, I welcome all constructive criticism in the comments. Also, keep in mind that some of the cards mentioned in the primer are outdated. I update this deck almost every set release, and I update the primer on a less frequent basis. While some cards are no longer in the deck, the philosophy and gameplan are still the same, so it should make sense. For insight into which cards I've swapped and why, look through the "Updates" backlog. If you happen to like the primer or deck, feel free to leave an upvote .

Huge thanks to everyone for making this deck the #1 Teysa Karlov EDH deck on tappedout. More importantly, the great discussion on this page has made it become a forum for theory-crafting and general information on Teysa or any aristocrats commanders. If there's anything for aristocrats that I don't have in the mainboard or maybeboard, be sure to tell me in the comments.

New Teysa provides us with several things, all of which we want.

  1. "If a creature dying causes a triggered ability of a permanent you control to trigger, that ability triggers an additional time." This is the namesake of the deck, an ability like Panharmonicon but for death triggers, hence 'Necronomicon.' Now, cards like Skullclamp or Grave Pact trigger twice off of one dead creature while we have Teysa on board. We try to abuse this with as many good death triggers as possible for maximum value, but we get value nonetheless by having only one of them in conjunction with Teysa.

  2. Her second ability grants Lifelink and Vigilance to all of our tokens. This usually won't make or break a game, but it will provide us with extra blockers and some incremental lifegain. We take advantage of it with our token-producers like Requiem Angel or Liliana, Dreadhorde General.

  3. She has kick-ass art. Magali Villeneuve really outdid herself with this one.

Pros

  • Orzhov . Personally, these are my favorite colors thematically and aesthetically, so this is a huge pro for me. In terms of what the colors do mechanically, there is a lot of sacrificing, lifegain, lifeloss for our opponents, and cards that care about creatures dying. If you're into that, welcome to the syndicate.

  • Currently, Teysa is the only card in all of magic that allows you to double death triggers, so it makes the deck quite unique. It also means we kill our opponents twice as fast with aristocrats!

  • The deck is resilient. We play a lot of tokens, creatures that don't care about dying, and creature recursion, so we don't care much if our opponents kill our creatures or force us to sacrifice them.

  • In contrast, we have many ways to deal with our opponent's creatures. W/B provides us with the BEST REMOVAL IN ALL OF MAGIC. Cards like Anguished Unmaking, Swords to Plowshares, and Despark can all kill things with unrivaled efficiency. In addition, Grave Pact, Dictate of Erebos, and more allow us to keep our opponents' creatures at a minimum. If you're facing a lot of creature decks, you'll have a good time, but even if you aren't, this deck is self-sufficient enough to remain unhindered.

  • The combo strategy is very proactive yet retains good control elements. Often we can draw massive amounts of cards, drain our opponents for a lot of life, or make an army of tokens from only a few permanents. Our strategy also doesn't require our commander, and we can function fine without her, but she definitely helps when on board.

  • There are a lot of ways to gain life, including our commander. Therefore, cards that cost life like Ancient Tomb or even Necropotence are pretty insignificant. This gives us a lot of breathing room and makes playing with life-costing cards a lot smoother. It even allows for some Razaketh, the Foulblooded chaining that I get into in the combo section.

  • The deck, the commander, and the colors are very flexible. Because aristocrats care about quantity of multiple cards on the board at once over quality of individual cards, there are millions of ways to build the deck. This is only one of them.

  • Aristocrats are a very fun and rewarding archetype. If you like creatures, looping creatures, resiliency to boardwipes, combos that aren't super fast or unfair, and your whole deck having a lot of consistency, then you'll like aristocrats.

  • Skullclamp.

Cons

  • Without green and the heavy amount of black mana we'll be needing for many cards like Necropotence and Dark Prophecy, we can't afford to run efficient colorless artifact ramp like Worn Powerstone or Thran Dynamo. This makes ramping more difficult. As someone who greatly appreciates green, this is a definite con for me, but depending on what you're used to, it might not matter.

  • If you don't like or don't know how to deal with complicated board-states or multiple triggered abilities on the stack, this deck might not be for you. Many of this deck's interactions rely on your knowledge of more obscure rules.

  • The deck's hard to play. In addition to it's required rules-knowledge, you need to be good at knowing what to do and how to do it. If you're familiar with storm, it's similar in that you'll have turns which need a very specific line of play to be done right. This is mostly because you'll need to be casting multiple combo pieces in the same turn with little to no mana in order to get other combo pieces.

  • Graveyard hate, exile, and especially Rest in Peace makes us cry. Our creatures function off of dying, so if they're removed without dying, we get no value. Against cards like RIP, all we can really do is pray for some removal and not waste our cards. It's not impossible to deal with, and if you're in a heavy grave-hate meta, I recommend opting in some more enchantment removal like Mortify or Return to Dust.

  • Some cards do nothing on their own like Reassembling Skeleton or even our commander. Against heavily disruptive control decks, you may find yourself in this position more than otherwise. Since this is a combo deck, we are always going to be prone to disruption.

75%, Optimized but not Competitive

This deck and primer is meant to serve as a guideline for a 75% deck meaning it is not competitive. The reason for this is metagame and fun. Personally, I have more fun playing casually, and my playgroup does the same, so I kept from making the deck function at its peak performance which would likely include combos to try to win the game as early as turn 3 or 4. However, being a 75% deck doesn't mean I'm not trying to make it function well or win.

From what I can tell, Teysa Karlov isn't the most pushed commander competitively and likely won't be able to compete with the top tier cEDH decks out there. If you wish to build her as a cEDH deck, I say go for it, but you won't find much in this primer except for inspiration.

Death triggers are the name of the game with Teysa's first ability. I use the term "Death Triggers" to denote an ability that triggers off the death of a creature. These cards make up the majority of the combos and synergy between each other and our commander. I recommend playing at least 20 of them. We don't need a million to attain value with Teysa and can often be content with just a couple on board, especially those that draw us cards. These are the death trigger cards I chose due to a multitude of factors including mana cost, value, and power-level, but there are definitely others that could go in and may find a slot in the future.

  • Archon of Justice: A very powerful death trigger that we can hopefully repeat through recursion. It hits lands btw.

  • Blood Artist, Zulaport Cutthroat, and Cruel Celebrant: These drain effects add up when multiple creatures or creature tokens of ours are dying, especially with double death triggers. We could even set up a kill with enough creatures and a sac outlet.

  • Grave Pact and Dictate of Erebos: Delivering some justice for our dead creatures is always welcome, especially when they're sacrificing two creatures for our one. With a sac outlet, we can force our opponents to sac really whenever we want.

  • Dark Prophecy, Grim Haruspex, Midnight Reaper, Liliana, Dreadhorde General: These death triggers draw us cards. Simple and effective. Unfortunately, Haruspex and Reaper say nontoken, but luckily we have a myriad of nontoken creatures that will die. Be careful not to die from the lifeloss of Dark Prophecy or Midnight Reaper since they don't give you an option. You can sac the reaper when you need to, but prophecy's a bit trickier. I once had to Anguished Unmaking it.

  • Doomed Traveler, Hunted Witness, Ministrant of Obligation: Their only function is to provide extra death triggers by making a bunch of creatures. With Teysa on board, each provides 3 creatures. Use these creatures and tokens as sacrifices to make mana with altars, to force our opponents to sac their creatures with Grave Pact, etc.

  • Elenda, the Dusk Rose: A death trigger that triggers off of our dead creatures to make more creatures to trigger death triggers. Beautiful.

  • Hallowed Spiritkeeper and Hangarback Walker: Small creatures that make many creatures are perfect fuel for the engine of death. Even if they end up being a glorified Doomed Traveler, we can't really complain.

  • Kokusho, the Evening Star: With this once-banned card's death trigger happening twice now, it drains the table for 10 each and giving us usually 30+ life.

  • Massacre Wurm: Another good drain card/win condition that has synergy with Teysa and acts as a semi-board wipe. Hitting our opponents for 4 each time one of their creatures dies starts getting out of hand very fast. It also combos very well with our repeatable removal effects like Grave Pact.

  • Nether Traitor: While the traitor is in your graveyard, any of your creatures dying triggers his self-reanimation. If you have enough creatures and a sac outlet, he's a better Reassembling Skeleton.

  • Nightmare Shepherd: This guy provides insane value and kind of acts like a second Teysa. Since almost all of our creatures have death-triggers, the 1/1s he spawns will also have those death triggers. He doesn't stack with Teysa since his death trigger requires you to exile the dying creature, and since you can't exile it twice, no doubling. He can even give you a copy of Teysa when Teysa dies, and you can send her back to the command zone instead of exiling her.

  • Sifter of Skulls, Pawn of Ulamog, and Pittiless Plunderer: Mana is a scarce resource, so having at least one of these guys out is almost mandatory. They combo great with Phyrexian Altar and Ashnod's Altar.

  • Requiem Angel: The angel is special since she triggers off our other token-creatures. She can stack a lot with Teysa in this case.

  • Skullclamp: Skullclamp

  • Solemn Simulacrum: Land ramp is invaluable with our lack of green. The death trigger is only icing on the cake.

These rulings all come from the official gatherer.

  • Teysa affects a creature’s own “when this creature dies” triggered abilities as well as other triggered abilities that trigger when that creature dies. Such triggered abilities start with “when” or “whenever.”

  • Teysa’s effect doesn’t copy the triggered ability; it just causes the ability to trigger twice. Any choices made as you put the ability onto the stack, such as modes and targets, are made separately for each instance of the ability. Any choices made on resolution, such as whether to pay a cost for that triggered ability, are also made separately.

  • The trigger event doesn’t have to specifically refer to “creatures.” In these cases, the trigger event may also refer to something being “put into a graveyard from the battlefield.” For example, an ability that triggers “whenever an artifact is put into a graveyard from the battlefield” would trigger twice if an artifact creature dies while Teysa Karlov is on the battlefield.

  • An ability that triggers when a creature “leaves the battlefield” will trigger twice if that creature leaves the battlefield by dying.

  • An ability that triggers on an event that causes a creature to die doesn’t trigger twice. For example, an ability that triggers “whenever you sacrifice a creature” triggers only once.

  • Look at each creature as it exists on the battlefield, taking into account continuous effects, to determine whether any triggered abilities will trigger multiple times. For example, if a land that has become a creature dies, an ability that triggers when it dies triggers twice.

  • If a creature dying at the same time that another permanent you control leaves the battlefield causes a triggered ability of that permanent to trigger, that ability triggers an additional time.

  • If a creature dying at the same time as Teysa (including Teysa itself dying) causes a triggered ability of a permanent you control to trigger, that ability triggers an additional time.

  • If you somehow control two Teysas, a creature dying causes abilities to trigger three times, not four. A third Teysa causes abilities to trigger four times, a fourth causes abilities to trigger five times, and so on. This also means that if you control Teysa and cast a second one, an ability that triggers when it dies due to the “legend rule” triggers three times.

  • An ability of a permanent that triggers when a card is put into a graveyard “from anywhere” triggers twice only if Teysa and that permanent are both still on the battlefield immediately after the creature has died.

Some additional quirks:

  • Some cards' death triggers require you to sacrifice them or exile things like Promise of Bunrei or Nightmare Shepherd. With these cards, the trigger itself is the exile/sacrifice prompt, so that's what Teysa doubles. For example, when a creature you control dies with Promise of Bunrei out, you can sacrifice it, but Teysa also allows you to sacrifice it. Since you can't sacrifice it twice, you only get 4 tokens. Nightmare Shepherd works in the same way, but he's good enough in spite of that to have a place in the deck.

  • Tokens do enter the graveyard for a brief second after the die, before they disappear.

These pieces can be mixed and matched to create a near infinite combination of different engines. Some cards can count as multiple combo pieces, like Pawn of Ulamog as a token maker and mana maker. While some combos require these, adding more onto each combo makes them better. If you add an artist onto an infinite combo, you'll win; with an additional token maker you'll make infinite tokens, witha mana maker, infinite mana, etc.

All of these result in infinite death triggers. They do nothing on their own, but if you have anything else that triggers off of creatures dying, you can trigger it infinite times. The two main combo lines either require Nether Traitor or Reassembling Skeleton to go infinite.

  1. Nether Traitor + Token Maker + Sac Outlet + Colored Mana Maker: Sac traitor to altar, make a token and a mana, sac the token for another mana, bring back traitor, repeat for infinite death triggers.

  2. Reassembling Skeleton + Mana Maker + Sac Outlet + Colored Mana Maker: Sac skeleton, make two mana, bring back skeleton, repeat for infinite death triggers. The only exception is that you can't use the two altars as the mana makers since you can't sac skeleton twice per reanimation.

  1. Token Maker + Requiem Angel + Your Dying Creature: The angel triggers on any non-spirit creature, so she goes well with any other token maker. For example, Angel + Pawn of Ulamog yields 2 tokens when your creature dies and an additional spirit when the other token dies. It gets pretty crazy if you also add on Teysa and/or Nightmare Shepherd.

  2. Nightmare Shepherd + Creature with Death Trigger: Shepherd stacks really well with other death triggers since he'll bring the creature back to have it's trigger happen again. For example, Shepherd will bring your Archon of Justice back as a token to exile another thing.

  3. Recruiter of the Guard > Ranger of Eos: Recruiter into ranger into two one drops gives a lot of creatures for only recruiter's trigger. Ranger can get Doomed Traveler, Hunted Witness, Viscera Seer, and Carrion Feeder. Get both fodder guys unless you need a sac outlet. I wouldn't get both sac outlets unless you think you really need them both.

  4. Blood Artist + Grave Pact or Dictate of Erebos: Blood artist triggers off of opposing dead creatures as well, so with Grave Pact effects. For example, if we have three opponents with two creatures each and Teysa out, we can get up to 14 blood artist triggers from a single death trigger of one of our own creatures (2 triggers from our own creature, 2 triggers from each of the opponents' creatures).

  5. Cabal Coffers + Urborg, Tomb of Yawgmoth: All of our lands become swamps with urborg, so coffers produces mana equal to the amount of lands we control which is a lot for one land.

  6. Necropotence + Reliquary Tower: Draw as many as you like, as long as you have life.

  7. Skullclamp + 1 Toughness Creature: Draw 2 cards for 1 mana or 4 with Teysa. Skullclamp can go near infinite with a token maker and a mana maker.

  8. Vampiric Tutor, Demonic Tutor, Diabolic Intent, or Enlightened Tutor > Necropotence or Skullclamp: Skullclamp and necro are our best standalone cards, so they're the best to tutor for most of the time. If you're doing fine with card advantage, tutor for a combo piece you need instead.

  9. Elenda, the Dusk Rose + Grave Pact or Dictate of Erebos: Elenda likes it a lot when everything's dying. She can get really big and give you a bunch of tokens really quickly if you protect her while she's small. I've never lost a game when I've gotten Elenda to 10+ power.

  10. Kokusho, the Evening Star + Phyrexian Reclamation: Repeatedly recurring Kokusho, while mana intensive, is a slow but steady way to end games.

  11. Sac Outlet + Living Death: Normally, living death will kill your board and bring back your graveyard, but if you have a sac outlet, you can kill your board first to bring it all back.

  12. Command the Dreadhorde + Stuff in Opponents' Graveyards: You can grab opponents stuff with command for sac-fodder or to just have them. I once cast this spell to steal It That Betrays and Keldon Firebombers at the same time.

  13. Yawgmoth, Thran Physician + Liliana, Dreadhorde General: You won't often find yourself using Yawg's proliferate, but this is one of the rare scenarios where you will. Lili's ult is pretty much a game-ender, and Yawg can help you get to it in 1-2 turns.

  14. Vilis, Broker of Blood + Any Self-Lifeloss: This deck has 26 cards including Vilis himself that can cause self-lifeloss. The best one is Necropotence since it's repeatable at-will.

  1. Razaketh, the Foulblooded + Deathrender: This allows us to use Razaketh to sacrifice a creature equipped with Deathrender, place a creature from our hand into play and search for a creature with Razaketh. Our next sac will allow us to place the creature we just searched into play and loop. Each loop loses you 2 life, but this is negligible since Kokusho, the Evening Star is searchable. Looping this will allow us to search for every creature in our deck and sac them for a death trigger, eventually ending the game with a combination of Blood Artist and friends.

  2. Teysa, Orzhov Scion + Darkest Hour: This causes old Teysa's abilities to trigger off of themselves. Once everything is black, our tokens create more tokens which sac to Teysa to exile our opponent's whole boards. It also causes infinite death trigger which wins the game in some cases in this deck.

  3. Sanguine Bond + Exquisite Blood: With these two, any life loss or lifegain causes an infinite loop that kills our opponents. They're expensive though and an old combo that everyone sees coming.

  4. Marionette Master + Mycosynth Lattice: Once lattice makes all of our creatures into artifacts, marionette master kills our opponents very quickly.

  5. Reveillark + Karmic Guide + sac outlet: They infinitely resurrect each other, causing infinite death triggers and small infinite creatures from our graveyard with reveillark. Like sanguine bond + exquisite blood, this is a well known combo that people will see from a mile away.

  6. Divine Visitation + Requiem Angel + sac outlet: This is an infinite combo that provides infinite creatures to sac. Requiem Angel makes a spirit, visitation makes it an angel, when it dies, make a spirit that becomes an angel, repeat. This is a very powerful effect that can win games with a sac outlet and Blood Artist and friends in play.

With your starting hand, the priorities are cheap card draw, ramp, and cheap creatures to sac later. I wouldn't keep a hand that doesn't have at least some of this. Ramp is good early in general, but especially in this deck. A lot of decks in EDH have green to help them ramp, and because of it, they can usually snowball the game in their favor. To keep up, I play a lot of ramp, especially land ramp since it's harder to disrupt, in this deck. However, the cheap ramp is quite a bit worse when you play it late-game when you're behind, so make sure to have it for the early turns when it matters more. Card draw is good early to refill your hand and keep up momentum, but most card draw in the deck requires you to have creatures dying, so you need fodder. Sac fodder is necessary to keep the whole deck running, and early turns are the best time to play them so you can use your mana as efficiently as possible.

Remember never to play first with this deck because we have cards like Land Tax and Knight of the White Orchid that work from an opponent having more lands than us. Some cards to look out for early:

  • Mana Maker + Sac Outlet + Sac Fodder: Don't count mana makers as early ramp unless you have the fodder and outlets to back them up.

  • Skullclamp: Because this is the best card in the deck, it makes starting hands very good. It's great in starting hands since you know you'll have it eventually, but don't actually play it until you know you can get value out of it. Experienced players will kill it on sight.

  • Burnished Hart: This card is amazing early but quite slow. Land ramp early, is very good for setting up later, but unfortunately we have to settle for hart since we don't have green.

  • Fellwar Stone, Talisman of Hierarchy, Arcane Signet, and Orzhov Signet: These are premium artifacts that act like lands for two mana and don't count toward your land drop for turn.

  • Sol Ring: The best early ramp in the deck. However, be careful about playing it on turn 1 since it paints an early target on your back.

  • Solemn Simulacrum: Like burnished hart, land ramp is hard to come by in our colors, so any is appreciated, especially if it comes with a death trigger. He's faster than hart though and helps refill your hand when he dies.

  • Grim Haruspex, Dark Prophecy, and Midnight Reaper: These guys need creatures to get running, but when you inevitably get creatures, they'll usually be able to refuel your hand adequately so you can get more creatures and ramp. Playing them early alone won't usually attract any removal either, so they're a pretty safe keep. Prophecy and reaper are the best to play early because if prophecy's harder to kill and reaper at least cycles if he dies.

  • Necropotence: Landing this early is amazing if you have the mana for it. Being able to refuel your hand with your life total (since you won't be taking damage early) is invaluable. Just don't go crazy with it until you have enough mana to actually play the cards you draw. If you see yourself having triple black early, necro makes almost any hand good.

  • Knight of the White Orchid and Wayfarer's Bauble: Like burnished hart, these two provide priceless land ramp in non-green. Early, they're amazing. Knight's search clause is a bit weird, and I recommend going second most of the time in order to make sure knight will always work because when he does, he's basically just Nature's Lore, the best 2 mana green ramp, on a creature (which matters in a creatures matter deck like this).

  • Demonic Tutor, Vampiric Tutor, Enlightened Tutor, and Diabolic Intent: The best early tutors are Skullclamp, Necropotence, and Land Tax if you need it.

  • Land Tax: This is an amazing way to pull lands out of our deck and make sure we never miss a land drop early. Because of it and Knight of the White, never play first. Playing second is our best bet. The existence of this card in our deck makes a hand with a tutor and a few lands keepable even if the other cards are duds.

  • Sack fodder that's good to develop early: Nether Traitor, Reassembling Skeleton, Hangarback Walker, Doomed Traveler, Hunted Witness, Pawn of Ulamog, Ministrant of Obligation, Elenda, the Dusk Rose, Recruiter of the Guard, and Ranger of Eos.

Conditional early cards:

  • Bolas's Citadel: It's almost as good a necro but even harder to cast. It's good to see early only if you know you can hit your land drops and have ramp.

  • Phyrexian Reclamation: This can be good, depending on what creatures you have and if you actually want to loop them. I've used it quite well in the early turns to loop Doomed Traveler or other cheap creatures, but without good targets, it's pretty useless.

  • Anguished Unmaking, Despark, Swords to Plowshares, and Path to Exile: These can be good depending on how fast your opponents are snowballing. Despark is the worst and swords is the best early.

  • Cabal Coffers: It's pretty bad unless you have at least 3 swamps.

  • Toxic Deluge: Good early vs fast creature decks.

Some bad cards to see early:

Keeping that in mind, I want to go over some hands that I would keep versus hands I wouldn't. I'm not going to go over obvious hands. Obviously, if you have no lands, all lands, only expensive cards, etc. those are obvious mulligans.

This is a good hand. Some may hesistate to keep it since it only has 3 lands, but we know Recruiter of the Guard can search for Burnished Hart if we end up in a pinch. Orzhov Signet really makes this hand work, without it, I'd be a lot more skeptical. Hangarback Walker and recruiter's body give us a good board pressence to use with our engine later, and to top it off, it has Bolas' Citadel to draw us cards later. I think this is a hand where citadel doesn't hurt. The only dud is Rally the Ancestors, so I'd keep this hand.

This hand is good and bad. Land Tax and Fellwar Stone smooth our mana out in the early turns, but otherwise, it doesn't have much going for it. Kokusho, the Evening Star,