
Gitrog Dredge Combo [Primer]
Commander / EDH BG (Golgari) Competitive Dredge Infinite Combo Loam Multiplayer
Land (34)
-
1x
Ancient Tomb

- 1x Bayou
- 1x Bazaar of Baghdad
-
1x
Bloodstained Mire
- 1x Cavern of Souls
-
1x
City of Brass
- 1x City of Traitors
-
1x
Command Tower
-
1x
Crystal Vein
-
1x
Dakmor Salvage
-
1x
Emergence Zone
-
1x
Forest
- 1x Gaea's Cradle
-
1x
Gemstone Caverns
-
1x
Homeward Path
- 1x Lake of the Dead
-
1x
Llanowar Wastes
-
1x
Mana Confluence
- 1x Marsh Flats
- 1x Misty Rainforest
-
1x
Nurturing Peatland
-
1x
Overgrown Tomb
- 1x Phyrexian Tower
-
1x
Polluted Delta
-
1x
Prismatic Vista
-
1x
Snow-Covered Forest
-
1x
Snow-Covered Swamp
-
1x
Swamp
- 1x Twilight Mire
- 1x Undergrowth Stadium
-
1x
Urborg, Tomb of Yawgmoth
- 1x Verdant Catacombs
-
1x
Windswept Heath
-
1x
Wooded Foothills
Creature (22)
- 1x Allosaurus Shepherd
-
1x
Birds of Paradise
-
1x
Collector Ouphe
-
1x
Dark Confidant
-
1x
Deathrite Shaman
-
1x
Elves of Deep Shadow
-
1x
Elvish Mystic
- 1x Elvish Spirit Guide
-
1x
Fyndhorn Elves
-
1x
Golgari Grave-Troll
-
1x
Joraga Treespeaker

-
1x
Kozilek, Butcher of Truth
-
1x
Llanowar Elves
-
1x
Noose Constrictor
- 1x Opposition Agent
-
1x
Priest of Titania
-
1x
Putrid Imp
-
1x
Ramunap Excavator
- 1x Skirge Familiar
-
1x
Sylvan Safekeeper
-
1x
Ulamog, the Infinite Gyre
-
1x
Wild Mongrel
Artifact (9)
-
1x
Chrome Mox
- 1x Grim Monolith
- 1x Jeweled Lotus
-
1x
Lion's Eye Diamond
-
1x
Lotus Petal
-
1x
Mana Crypt
- 1x Mana Vault
-
1x
Mox Diamond
- 1x Sol Ring
Enchantment (7)
Commander (1)
Instant (19)
-
1x
Abrupt Decay
-
1x
Ad Nauseam
-
1x
Assassin's Trophy
-
1x
Autumn's Veil
-
1x
Cabal Ritual
-
1x
Crop Rotation
- 1x Culling the Weak
-
1x
Dark Ritual
-
1x
Darkblast
-
1x
Entomb
-
1x
Nature's Claim
-
1x
Noxious Revival
-
1x
Plunge into Darkness
- 1x Rain of Filth
-
1x
Summoner's Pact
-
1x
Tainted Pact
-
1x
Vampiric Tutor
-
1x
Veil of Summer
- 1x Worldly Tutor
Sorcery (8)
Gitrog Dredge Combo - A Competitive EDH Deck Primer by Leptys
THIS PRIMER IS HUGELY OUTDATED AS PER THE ERA FROM THRONE OF ELDRAINE ONWARDS (FALL 2019).
PLEASE TAKE NOTE OF THIS WHEN YOU READ THE PRIMER, AS MANY OF THE WRITINGS ARE A PRODUCT OF THEIR TIME.
READ THE "LATEST CHANGES" TAB AT THE BOTTOM OF THE PRIMER FOR THE MOST UP-TO-DATE INFORMATION (Latest covered set: Commander Legends)
Preface - Enter The Frog

Me: "I really shouldn't be playing things like Dakmor..."
Me to me: "Do it"
The Gitrog Monster is a card that has enjoyed a lot of popularity as one the top Golgari commanders all the way since its printing in Shadows Over Innistrad during the spring of 2016. All sorts of EDH enthusiasts immediately commenced brewing upon the reveal of the card as it had both a fresh build-around theme and a high competitive potential. After several iterations of the deck with the efforts of /r/CompetitiveEDH's Brewsday, MTG Salvation users such as razzliox, DTrain5742, bobthefunny as well as the /r/CompetitiveEDH's subreddit users JimWolfie, ShaperSavant and SaladTurtle, the deck has had a fairly consistent combo-oriented core for the past two years it has been in use, evolving from the cEDH Brew 1: Hypnotoad, the Gitgud Frog to razzliox's tuned and lauded Getgood Monster Dredge.
Not counting the huge card advantage that Gitrog enables by just being on the field, her combo with Dakmor Salvage and a discard outlet (a permanent that can be used to discard cards for free at will) makes her a threat that needs to be answered in all stages of the game. This coupled with the deck's high winning speed, resiliency against conventional stax cards and inevitability even in longer games makes her a very dangerous opponent to have in most competitive metagames. The deck's winning record in the /r/CompetitiveEDH's Winter 2017 tournament also speaks volumes about its power level and adaptability in the variety of tables that it faced in the tournament.
This primer is primarily created to complement the already great writeups created by Razzliox on the same subject, as well as some other great Gitrog Monster guides out there such as kiebitzen's Just Froggin' Around - The Gitrog Monster Primer. If you're looking for a more concise, well laid out step-by-step guide on tricks you can do with Gitrog in conjunction with Dakmor Salvage, I highly recommend to check his guide out, as well as Razzliox's guides if you're looking for a great jump start on Gitrog in general. To add to the former sources, forgottenkane has also done very extensive work on contemporary Gitrog combo packages strategies, the primers on his traditional and "Double Titan" lists, as well as several budget variations being notable examples.
Who Am I?
Before we begin with the details I'd like to talk a bit about myself and my history with Magic to ease you into who I am, where I come from and why you should/should not listen to me in the first place. Feel free to skip this part if you want.
I'm known in most MtG community hubs as "Leptys" (or as Leptys207). I live in Finland, I'm in my mid-twenties and I started seriously playing Magic relatively recently, in the summer of 2014. At the time I quickly hopped from the topical Ravnica-Theros Standard to Modern due to Standard set rotation and the consequent appeal of eternal formats. I mainly played and learned the game via Magic Online due to a lack of contacts in the local area, playing mostly fringe decks like Loam, Tokens and UW Gifts Tron. During the same year, I came in contact with an acquaintance who I knew played EDH. After warming up to the idea of the format, I quickly contacted him again to play several games. Needless to say, I was quickly hooked after a couple of matches.
My first deck was Toshiro Umezawa, a mono-black control deck. In the playgroup I started in, over time it proved to be a very versatile and a powerful list in our creature-oriented metagame. Due to that as well as the deck's various complex lines, it's still something that I regularly modify and try playing with at the more relaxed tables today. After Toshiro I started trying out things like Grenzo, Dungeon Warden goblin tribal as well as several Ephara, God of the Polis control strategies, accompanied by Wrexial, the Risen Deep mill for the most casual tables. These days my main casual decks are Ephara, God of the Polis token generator tribal, as well as a Goreclaw, Terror of Qal Sisma aggro list with some elfball synergies.
My foray into competitive EDH (or cEDH as many might call it) started when one of the people in our playgroup started building Jeleva, Nephalia's Scourge Doomsday storm. The deck proved to be far more powerful than any of the players in our playgroup anticipated (including the pilot), and henceforth it did take a large share of wins for a couple of months. The rest of the playgroup eventually grew tired of losing to the deck, but I decided to try and catch up in the arms race. While I was looking up information on the web, I quickly found out about one of the main pioneers of the cEDH community at the time: MTGSalvation, /r/CompetitiveEDH and Tappedout user razzliox. These days people might know him as the creator of Jarad, Golgari Lich Lord Graveyard Midrange and as one of the creators of the first tuned The Gitrog Monster combo list when the card came out in 2016. I assembled his Jarad deck sometime after finding out about it in 2015, and was quickly addicted to the high-stakes, high-speed action that the more competitive games had in them.
From there on, I've been playing a lot of powerful high-speed decks like classic Prossh, Skyraider of Kher Food Chain combo, Nin, the Pain Artist Monolith combo, Sharuum the Hegemon as well as Breya, Etherium Shaper eggs, and even delving into a bit of stax with Ruric Thar, the Unbowed. After the 2017 meta shift caused by Protean Hulk being unbanned and Partner commanders being printed, I've delved into many, many cEDH decks and archetypes, some of which you can see on my user page. Today my main decks are this Gitrog list, as well as a Yarok, the Desecrated Flash Hulk build that you can see here.
My Local Metagame
Today, the playgroups I interact with have more than a few competitive decks running about. My aforementioned playmate still has his Jeleva, Nephalia's Scourge, but since our initiation, the meta has enjoyed more than several decks archetypes, some of which have come and gone throughout the times. Decks such as Grand Arbiter Augustin IV control, Thrasios, Triton Hero/Tymna the Weaver Paradox Engine combo/control, Yidris, Maelstrom Wielder![]() Doomsday storm, Tasigur, the Golden Fang land combo, Tymna the Weaver/Bruse Tarl, Boorish Herder combo, Ruric Thar, the Unbowed stax, Krenko, Mob Boss goblins and more have been part of the fun, and people like to brew and tune their lists constantly to keep things fresh. The games we play usually last from turn three to turn eight. All-in-all, our meta is very combo-heavy among our regulars, although games can last way longer with more than one control/stax player at the table.
Doomsday storm, Tasigur, the Golden Fang land combo, Tymna the Weaver/Bruse Tarl, Boorish Herder combo, Ruric Thar, the Unbowed stax, Krenko, Mob Boss goblins and more have been part of the fun, and people like to brew and tune their lists constantly to keep things fresh. The games we play usually last from turn three to turn eight. All-in-all, our meta is very combo-heavy among our regulars, although games can last way longer with more than one control/stax player at the table.
I've been playing Gitrog in this meta from the start of 2017, and the deck has had its ups and downs during the time I've played it. Overall, the environment has forced me to adapt to a more value-oriented approach to leverage the longer, interaction-heavy games as opposed to merely racing for the win. The deck has received many upgrades on the interaction side of things due to this, as well as on the value-generating side to overwhelm any game with card advantage where people are hesitant in racing the deck. Consequently, the list has been found slightly more lacking in its potential to purely race the quickest lists in the format like Protean Hulk decks, which is mainly explained by an absence of such decks from the meta at the moment.
Pros & Cons
Pros
- Has a very high speed, threatening turn 3 wins consistently
- Has a very good ability to play the long game with its value engines if the games go grindy
- Is very resilient to interaction, often being able to just force a win in one turn through counterspells and removal
- Can win at instant speed, making her super scary to play against
- Has very few real weaknesses, often playing around conventional stax cards with ease
- Can work effectively in all stages of the game with general in play
- Is actually very cheap to build money-wise (the essential cards cost very little)
- Has a frog as its general for maximum style points
Cons
- Has a low amount of stack-based interaction due to the lack of blue
- Can have problems in stax-heavy metagames where multiple pieces disrupt the gameplan too much
- Is very weak against creature theft (Gilded Drake), extract effects (Praetor's Grasp/Bitter Ordeal) and grave-exiling replacement effects (Leyline of the Void/Rest in Peace)
- Is very scary to play against, and therefore often the main target for counterspells and removal
- Is often reliant on having the general on the field to function well
- Has arguably the hardest-to-learn and the most convoluted combo in EDH
Likes & Dislikes
You might enjoy playing this deck if you:
- Like complex combos. This deck might have one of the most intricate and convoluted combos in the history of Magic (the Gitrog + Dakmor Salvage combo), and getting to know all of its ins and outs is a one-of-a-kind learning experience.
- Like fast combo decks. Not unlike many other competitive decks out there, our main goal is to win as quickly as possible through a combo.
- Are entering an unknown metagame. Gitrog thrives in a large variety of metagames, as she can win quickly to outrace other fast decks as well as grind value against stax or control.
- Have a budget. While this list is all pimped out and budgetless, it's possible to make a semi-viable version of this deck that can be as cheap as $200. Links to a couple of budget builds can be found in a later section of this primer.
- Like decks that require a lot of intuition. Gitrog really rewards people who take risks, as many winning lines might have only a 70%-80% chance of winning, if not less.
- Enjoy proactive decks that can still play the long game. We are aiming to win as fast as possible, but contrary to other fast combo decks, we can just as effectively sit back and relax if people are holding up their counterspells and look for an opportunity where we can take the game.
- Have high amounts of knowledge of the game's rules. Knowing something like Necropotence creating an exile trigger to a discarded Putrid Imp so you can Necromancy it onto the battlefield in response to the trigger is an example of how advanced lines you can, and often have to employ while piloting this deck.
- Like playing and utilizing your general often. Our gameplan often is built around resolving our general as fast as possible, then proceeding from there.
You won't like playing this deck if you:
- Don't like decks with a steep learning curve. Again, the winning combo is very difficult to grasp off-hand, and it often requires a high amount of knowledge of the game's rules and a lot of goldfishing with the deck to understand completely.
- Don't like combo decks. We are a pure, all-in combo deck, and our ways to victory without our combo are few and far between.
- Don't like long turns. While gathering and landing the pieces that combo off is relatively simple, the combo itself takes a long time to play out. Might also apply if your playgroup frowns on having long winning turns.
- Have a meta that has too much of stax or control in it. People like gunning down the combo players' resources to the gutter in these kinds of metagames, so brace yourself if you're going to play this deck in such an environment regardless.
- Prefer decks without creatures. We play a ton of creatures, although we only occasionally use them for combat.
- Prefer utilizing tools provided by blue (or to a smaller extent, red/white) instead.
Commander Comparisons
So what makes this deck stand out from other decks? Many, many things actually: this deck is more or less one-of-a-kind in EDH. No competitive deck comes close to being like The Gitrog Monster, and that's a big part of the deck's appeal. As far as "Lands.dec" strategies go, all of them before Gitrog have been non-competitive, and effective only in more casual metagames. While someone like Azusa, Lost but Seeking does have a fast engine to ramp out a few Eldrazi, infinite mana combos or more recently dedicated Strip Mine lock builds, it is still considered too inconsistent and slow for actual competitive games, mostly due to a lack of tutors and draw power in the command zone.
What about other decks in the Golgari (B/G) identity? None of them are like Gitrog, but you do have options if you want to play a B/G deck of a different kind; both Varolz, the Scar-Striped and Nath of the Gilt-Leaf have relatively powerful decks for competitive tables right now, the latter going for an all-in stax plan with strong soft locks such as Contamination and Possessed Portal while the former being a relatively fresh but powerful Protean Hulk combo deck. Jarad, Golgari Lich Lord and Meren of Clan Nel Toth also have some potential to work in competitive tables, Jarad often built as an Necrotic Ooze reanimation combo deck while Meren is a more value-oriented stax/reanimation deck, kind of a hybrid between Varolz and Nath. Below there are example lists for all of the four if you're curious:
Our General
So, assuming you've already become convinced that our almighty frog lord is the path to true cEDH divinity, time to get down to the nitty-gritty. Let's start with a look to our general:
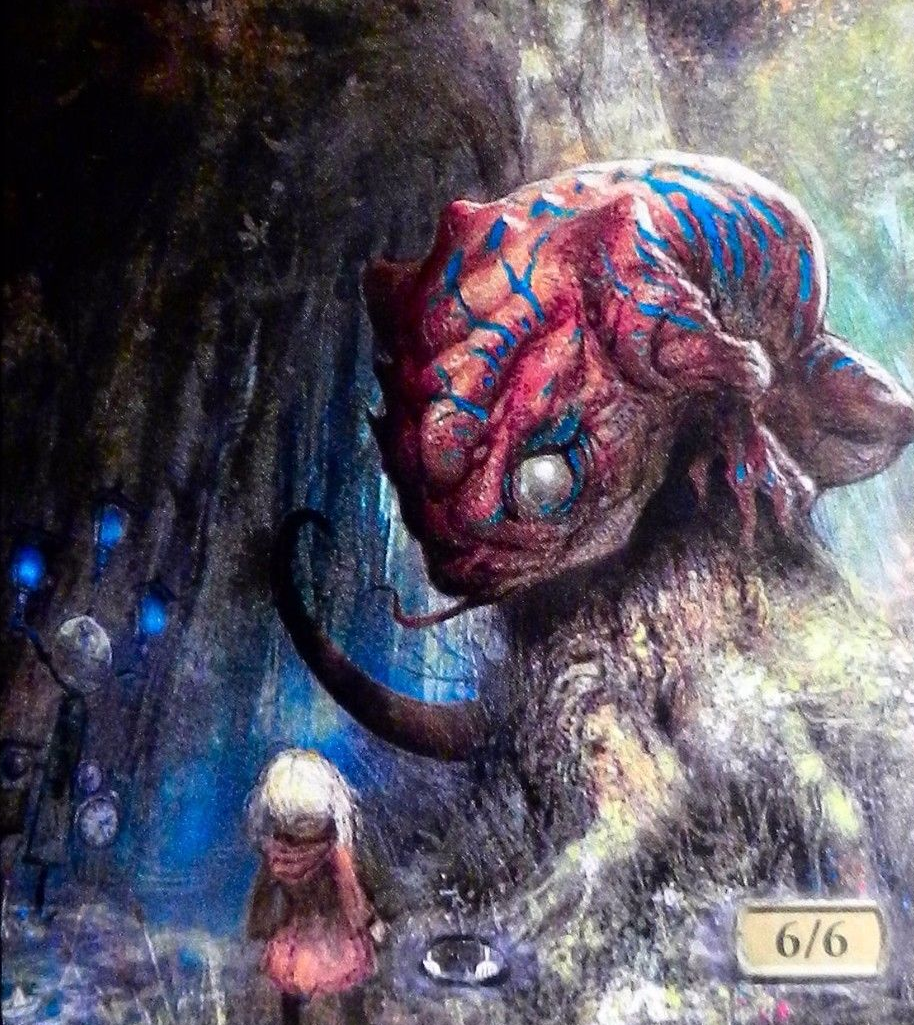
Ribbit.
The Gitrog Monster is a 6/6 Legendary Creature - Frog Horror with Deathtouch. In the basic sense, she is a relatively costly general at 5CMC, has a big and powerful body at 6/6 and deathtouch which combined make her a good attacker and a blocker, respectively. Because we're already playing green and black as our colours, our deck is filled to the brim with fast mana like mana dorks, rituals and moxen to reliably cast our general very early. Therefore in most situations, her mana cost is not too big of a problem for us. Recasting our general at 7 mana is often a way harder task if we get disrupted, however, so it's important to keep this in mind when trying to cast her. Next, her abilities:
"At the beginning of your upkeep, sacrifice The Gitrog Monster unless you sacrifice a land"
By its lonesome, this ability is a downside. To be able to keep up with our land count, the deck has to include a healthy number of lands to be able to function properly (I play around 36, which is enough due to an upcoming ability) with our general on the field. It's good to know that you are able to choose which one you sacrifice (the land or Gitrog) and that the choice is revealed only upon the resolution of the trigger.
"You may play an additional land on each of your turns"
In short, an Exploration effect. This works well to balance out the "downside" of her first ability, allowing us to power lands out at a frightening pace. This ability also enables us to play spells even after tapping out to cast our general by playing an extra land from our hand.
"Whenever one or more land cards are put into your graveyard from anywhere, draw a card"
Here we go. This is what this deck is all about and makes this general just ridiculous. This ability alone makes her aforementioned "downside" into an actual upside: instead of an upkeep cost, we actually get a Phyrexian Arena! With the land count that we have, we'll be playing more lands and mana sources each turn due to the second ability, making the sacrifice clause incredibly marginal and actually makes it a big upside for the longer games.
In addition to this, there is one word in there that makes this ability beyond stupid: "anywhere". This means that whether we are sacrificing a land to Gitrog, discarding a land from our hand, or even just milling a land we draw a card! This has insane synergy with a number of cards: any card with Dredge becomes a potential "Mill X, then draw a card", fetch lands become free cantrips and Bazaar of Baghdad becomes a ludicrous value engine. The deck also runs a package of cards that sacrifice, discard and mill lands to exploit this ability as much as possible, emphasizing on cards that do this often one land at a time to bypass the downside of the "one or more land cards" clause. We'll delve into this ability further in the rest of this primer, but rules-wise it's good to remember that you have to draw the card no matter what when a land hits our graveyard (or replace it with a dredge).
Revisiting Dredge
Before we proceed any further from here, it's important to first review Dredge as a mechanic. What follows are the main rulings for Dredge in the Comprehensive Rules:
702.51. Dredge
- 702.51a Dredge is a static ability that functions only while the card with dredge is in a player's graveyard. "Dredge N" means "As long as you have at least N cards in your library, if you would draw a card, you may instead put N cards from the top of your library into your graveyard and return this card from your graveyard to your hand."
- 702.51b A player with fewer cards in his or her library than the number required by a dredge ability can't put any of them into his or her graveyard this way.
To put things simply, a card with Dredge N can be used to replace any instance of "draw a card" with "mill exactly N cards and put this card from your graveyard to your hand". This only works if the particular card with Dredge is in your graveyard at the moment the "draw a card" effect occurs, and if you have N or more cards in your library to be milled. It's also good to know that dredging a card is a so-called "replacement effect", which means that it doesn't use the stack and the priority doesn't cycle between players when you conduct a dredge.
Confused already? No wonder, as Dredge is one of the most complicated mechanics Wizards has ever printed on a Magic card. It's also as broken as a mechanic as it is complicated, and for this reason, the deck has many ways to exploit it, mainly via our main combo enabler: Dakmor Salvage.
Dakmor Salvage, The Great Conspiracy Against The Blue Mages
Needless to say, you're rarely going to play this as your land for the turn.
How the main combo goes within the game is as follows. With The Gitrog Monster and a "discard outlet" (Wild Mongrel/Noose Constrictor/Putrid Imp/Oblivion Crown/Skirge Familiar) on the battlefield and a Dakmor Salvage in our hand, we first discard Dakmor to the outlet. Dakmor hits the graveyard, causing Gitrog's "land hit our graveyard, draw a card" trigger to occur. When this trigger resolves, we replace the draw with a dredge, getting Dakmor back to our hand and milling two cards in the process. If one or both of the two milled cards were lands, a new Gitrog draw trigger occurs. We either let this trigger resolve and draw a card, or let it stay on the stack (depending on the situation and your preference). We're now back to the original state, except that we've milled two cards and possibly put a draw trigger on the stack/drawn a card.
Because of our discard outlet, we can repeat the above process as long as we have cards left in our deck, milling two cards with each dredge and netting a draw trigger every time a land is milled. Because the deck runs both Kozilek, Butcher of Truth and Gaea's Blessing we will always have cards left in our library to dredge to Dakmor until we've drawn most of our library from the extra draw triggers that have accumulated. If we run out of cards in the library due to drawing both Kozilek and Gaea's Blessing, we can simply discard Kozilek to our outlet to reshuffle our graveyard back to the library to continue the process. Eventually, we'll have enough draw triggers to draw our whole deck, leaving both our graveyard and library completely empty.
After we've emptied our library and graveyard, we can start "looping" a spell of our choice to first gain infinite mana (Dark Ritual/Lotus Petal). After achieving enough mana, we can then use it to repeatedly cast an outlet spell of our choice to defeat the opposition. The most conventional outlet examples include:
- Praetor's Grasp to exile your opponents' libraries face-down and force them to deck themselves (or optionally using their wincons against them)
- Ebony Charm/Geth's Verdict/Collective Brutality/any other life-loss instant or sorcery to decimate your opponents' life totals
- Rath's Edge/Sunscorched Desert/Piranha Marsh + Crop Rotation to cause infinite damage or life loss to your opponents in land form to conserve nonland card slots
- Beast Within/Assassin's Trophy/Ulamog, the Infinite Gyre cast triggers to destroy all opposing permanents, then using infinite Beast tokens (Beast Within) or infinitely large creatures (Savage Summoning/Emergence Zone + Oblivion Crown pump) to kill your opponents with combat damage. You can potentially use Finale of Devastation to give your creatures haste if it's your turn.
That's essentially the gist of the whole combo, and while it may already sound relatively complicated there's a lot more to the combo than it seems that needs to be explored further to completely understand it. Next, we're going to go in-depth with each step of the combo as well as some ways on how we can assemble it.
Drawing Your Deck Pt. 1: How Dunnit
There are several methods on how you can draw your deck when we've got the combo up and running: some are more vulnerable to interaction than others, while some may be way simpler and more convenient to demonstrate to our opponents when they ask us to demonstrate how we combo off. The most conventional ways include:
A) Resolving Gitrog's draw triggers one at a time as they occur, and:
- Letting the deck shuffle whenever we mill a shuffler, then repeating the process. This method is simple and safe from discard outlet bounce, but very slow in practice/weak to grave hate as we might draw Gaea's Blessing. Usually, you never want to use this method as other methods are either faster to pull off, simpler to explain or safe from the more forms of interaction.
- Starting to dredge in response to the first shuffle trigger that occurs, milling the rest of our remaining library, then letting the shuffle resolve and repeat. This is the easiest method to explain and fastest one to practically pull off as it includes the minimum amount of shuffling but again is weak to grave hate. Use this method to explain your opponents how to draw your deck first, but if they want you to play it out you have to execute the line in a more secure way (as seen below in B2).
B) Dredging Dakmor in response to the draw triggers we get, and:
- shuffling the library until there are more draw triggers than there are cards in the library, then shuffling Kozilek in one final time, drawing our whole library at once and finally discarding Kozilek repeatedly to get rid of our surplus triggers. This is the simplest method in comboing off that also requires the fewest lines, but instant-speed discard outlet removal in response to a Kozilek shuffle kills us unless we can flash in a new discard outlet. Use only if you're sure your opponents have no removal spells left for your discard outlets or if you have enough mana to flash in Oblivion Crown afterward, preferably with protection.
- Leaving the draw triggers on the stack and dredging in response to them like in B1, but instead not accumulating infinite draw triggers and only drawing most of our library, then:
- discarding land cards equal to our remaining library to draw the rest of our nonland cards
- discarding Kozilek to shuffle the lands we discarded back in
- repeatedly dredging Dakmor enough times to equal the number of cards we are "looping" (land count + Kozilek). As our deck only has lands and Kozilek in it, every dredge has a 100% chance of getting an additional draw trigger, giving us an easier time reducing our library size in a controlled manner.
For the record, this last method is the one I use by default as it provides protection from both discard outlet removal and a single instant-speed grave hate effect. If you're sure your opposition has no interaction or you have a City of Solitude out, then feel free to use whichever method you like.
Drawing Your Deck Pt. 2: The Last Land Cards & The KoziLand Technique
KOZILAND!
One extra point to take note of in the last method above is that you will mill into Kozilek during different parts of the "land loop" that draws you the final cards of the deck. Because of this, you'll have to act accordingly whenever you shuffle your library; to keep drawing cards while not going above our library count to play around removal targeting our discard outlet.
To assure you won't accumulate draw triggers more than the count of cards that are being milled and reshuffled, resolve your draw triggers early enough until there are either 1 or 0 cards left in the deck after resolving them. If you're left with 1 card in the library instead of 0, there are two possibilities:
- You don't have Kozilek in your hand and it's the only remaining card in your library.
- You have Kozilek in your hand and the remaining card is a land card.
In both cases, our goal is to make our library equal that of land card+Kozilek. In the former case, discard a land to draw Kozilek, then discard it as well to shuffle them both back in. In the latter case, just discard Kozilek and it'll shuffle in with the land. We have now reached a state where we have only a single land and Kozilek in our library, which I will from now on refer to as the "KoziLand" state.
The reason why the KoziLand state is so special is that it can be used to execute the Dakmor Combo in such a way that it is shortcuttable. Whenever you dredge Dakmor with this library composition, you're netting both a draw and a shuffle from each dredge with a 100% certainty. Furthermore, because you can always arrange both of the triggers how you prefer, all of the conditional factors that the "loop" included before are now removed. At this point you can dredge Dakmor and shortcut to as many draw triggers as you like, allowing you to loop any instant speed spell or self-sacrificing rock like Lotus Petal by casting/sacrificing it before the last Kozilek's shuffle resolves. The technique will be very important when trying to legally shortcut the play lines we're going to be using from this point forward, which is why I'm simplifying it here by dubbing it as the "KoziLand technique".
On Shortcuts & Slow Play
At this point, you might wonder if the Dakmor Combo is shortcuttable. Simply put, the answer is yes and no. The rules of shortcutting only include loops, as in actions that you can perform indefinitely, that don't include any conditional factors, which this combo has plenty of due to having the possibility of milling between a nonland card, a land card and a shuffler (Kozilek/Blessing) every time you dredge Dakmor. After you've drawn your deck these conditional factors can be removed and the true "loops" may begin, but when you're emptying your library there are no ways to avoid them. Due to this, you will have to play out the "draw my deck" part of the combo in sanctioned environments unless your opponents agree to unanimously concede once you've assembled it.
However, sometimes people might start to shout slow play accusations if they're any familiar with tournament conduct and would like to abide by them (rare in an EDH table, but possible nonetheless). Luckily, despite the annoyingly long resolution of the "draw my deck" part of the combo, the combo is what is called "deterministic"; something that ultimately reaches the same outcome in all permutations it is able to produce. Another way to describe it rules-wise is that because it is not exactly a "loop" as described by the comprehensive rules:
- 719.1b "Occasionally the game gets into a state in which a set of actions could be repeated indefinitely (thus creating a “loop”). In that case, the shortcut rules can be used to determine how many times those actions are repeated without having to actually perform them, and how the loop is broken"
On a related note, here is the ruling on slow play as described in blogs.magicjudges.org:
- "It is also slow play if a player continues to execute a loop without being able to provide an exact number of iterations and the expected resulting game state"
As you can resolve one or multiple draw triggers on each iteration of the "loop" if need be, you can perform the combo so that you can essentially only continue to dredge cards as long as you have cards left in your library, making the set of actions definite as long as the total amount of cards in your library and graveyard keep decreasing.
This is why it's not "slow play" like Four Horsemen is because it's not an indefinite loop with no end, but a sequence of actions with differing outcomes that alter your play lines accordingly.
If the judge or players become particularly persistent on how the lines are still slow play, I'd demonstrate the 1B line of drawing the deck as follows:
- "With the combo in place, I'll begin to dredge Dakmor and mill cards to empty my library. Whenever I mill a land, a draw trigger will occur and I will resolve it to draw a card. If I mill into Gaea's Blessing or Kozilek, Butcher of Truth, in response to the shuffle trigger, I will keep dredging Dakmor and milling cards until my library is empty, drawing a card whenever I mill a land from the dredge. After emptying my library, I will resolve the shuffle trigger, and repeat this sequence of actions for about 7 times to ensure my library and graveyard are completely empty at the end of it. After reaching this end state, I will keep discarding Kozilek and shuffling it to my empty library to get rid of any surplus triggers that I may have accumulated during these 7 or so shuffles."
Of course, you can and should state a specific number without being vague in the line above, I just went with "7-or-so" to call the bare minimum for the amount of shuffles one has to perform to empty the library.
To add to this, this Reddit post has some attached mathematical proof for the deterministic nature of the combo, in case someone is looking for a run on the numbers for the more resilient lines.
At the end of the day, in sanctioned tournaments it's up to the judge to decide whether to give out a slow play warning, as the rules of slow play are extremely vague and could be written dozens of articles about. Due to the combo's deterministic nature however, you are able to demonstrate that you are able to win no matter what unless people are going to try and disrupt you while you draw your deck (and these are usually rare occasions themselves). This is why it has been allowed so far in the community's leagues I've played the deck in.
Of course, even though I'm constantly mentioning sanctioned tournaments, EDH is over 90% of the time played in a more lenient environment when it comes to rules enforcement, so most people should not have a trouble with the combo by default. Anyway, it's still a good discussion to have with your playmates when starting to play with Gitrog, especially if you're going to apply for an event with prizes on the line.
To give some closure to this controversy, the most time-consuming part of the combo is fortunately over after emptying your library and graveyard. From here on every play line is a legitimate, shortcuttable loop with the KoziLand technique as well as the other loops provided, so as long as you remember the lines things can be executed relatively fast. Time to proceed on to how we win the game.
Infinite Mana & Winning The Game
Our most conventional path to infinite mana.
Now that you've drawn your deck, you may proceed to create infinite colored (usually black) mana in a number of ways. The one below is the most universally useful method:
- Play Lotus Petal.
- Discard a land, putting Gitrog's "draw a card" trigger on the stack.
- Before the trigger resolves, discard Kozilek to shuffle it and the land back to your library to reach KoziLand state.
- Before letting the draw trigger resolve, dredge Dakmor and shuffle your KoziLand library twice more for a total of three draw triggers, sacrificing Lotus Petal before the last shuffle resolves to shuffle it in.
- Resolve your three draw triggers after the last shuffle, drawing your 3-card deck (Petal, land and Kozilek). Now you're at square one and have a single colored mana of your choice.
- Repeat for infinite colored mana.
Take note that you can replace Lotus Petal in the loop above with Dark Ritual or a Cabal Ritual, casting the corresponding ritual at the point you would be sacrificing Petal to its ability. As Lion's Eye Diamond discards your hand when you crack it, you have to repeat step 4. as many times as you have cards in your hand + 2 to draw your shuffled hand and LED/Kozilek/land again (you get the last trigger by discarding your hand which undoubtedly had a land in it).
Skirge Familiar Loops (Outdated) Show
Also of note, we can use the KoziLand technique we used to loop Lotus Petal/Dark Ritual to loop any nonland card that can be put to the graveyard at instant speed (like Lotus Petal or creatures sacrificed via Culling the Weak). This makes our library, hand and graveyard essentially the same zone for these cards, allowing us to play any of them infinite times assuming we have the mana for it.
The contemporary method for looping sorcery-speed nonland cards is a bit different, however, as you can't put them to the graveyard at instant speed. This is where we utilize a special "12-land" loop, devised by biopouvoir, as depicted below.
With the combo cards on the field, deck in hand, infinite mana in pool (using Lotus Petal or whatever you like) and nothing on the stack:
- Make your library compose of 12 land cards + Kozilek. You can achieve this easily by discarding 11 nonland cards to the graveyard, shuffling them in with Kozilek, discarding the 12 land cards to draw your nonlands + Kozilek, and finally discarding Kozilek to shuffle everything in nice and proper (12 lands + Kozilek in library).
- Cast any sorcery-speed nonland card that you want to loop. We'll use Thoughtseize in this example.
- Discard 13 land cards to draw your library, then discard Kozilek to shuffle everything back in. Library now has 13 lands, Thoughtseize and Kozilek (13 lands + Thoughtseize + Kozilek in library).
- Discard 15 land cards to draw your library again, then discard Kozilek again to shuffle everything in (15 lands + Kozilek in library).
- Cast Entomb with your infinite mana and tutor Kozilek to the grave with it. In response to the shuffle trigger, discard + dredge Dakmor 5 times to mill the first 10 land cards, and resolve the ensuing draw triggers to draw the remaining 5 land cards. Finally let the shuffle trigger resolve (10 lands + Entomb + Kozilek in library).
- Discard 12 land cards to draw your library, then discard Kozilek to shuffle everything in (12 lands + Kozilek in library).
- Repeat 2-6 with the sorcery-speed spell of your choice as many times as you like.
Sorcery Speed Loops With Cycling Lands (Outdated) Show
The reason why we use the line above to loop sorcery-speed cards is purely so that the lines can be legally shortcut. If we use the regular Dakmor Combo to empty our library after reshuffling the card we cast, the line will include the same conditional factors as in the earlier chapter: we can’t know how many draw triggers we will precisely get, even though all permutations do reach the point where your library and graveyard are both empty. Just to be on the safe side, I recommend using the 12-land or the cycling land method to legitimately loop sorcery-speed cards unless they’re left in exile if only to avoid situations where people want you to play the whole thing out (for the record, it will take a ton of time).
If we are comboing out on our main phase, we can use the loop above to repeatedly cast Praetor's Grasp until all of our opponents' decks are in face-down exile. After that, we'll pass the turn and wait until every player decks themselves, or just use one of their win conditions to win right away. Some decks optionally employ cards like Collective Brutality, Ebony Charm or Geth's Verdict to win at this point, the last two of which also work when going off at instant speed. The other instant-speed outlets like Beast Within however require a bit more preparation, as you require infinite green mana to produce them. Next, we're going to elaborate on how to win at instant speed while also showing how you can win by using the cleanup step as your discard outlet.
UPDATE: By including the new land from War of the Spark called Emergence Zone, you will be able to loop sorcery-speed outlet cards like Praetor's Grasp at instant speed, therefore making the lines above no longer as necessary as they have been in the past for legally shortcuttable loops with sorcery-speed outlets. You will also be able to use the land to generate infinite green by flashing in Lotus Petal repeatedly, just like using the Dark Ritual loops at instant speed!
The Cleanup Step Win Pt. 1: The Infinite Hand Sculpt
Next comes yet another point why the Dakmor Combo is one of the most ridiculous combos in Magic: it has the power to abuse the cleanup step as a discard outlet to combo off. See the following ruling about the cleanup step, written in the Comprehensive rules:
-
514.3. Normally, no player receives priority during the cleanup step, so no spells can be cast and no abilities can be activated. However, this rule is subject to the following exception:
-
514.3a At this point, the game checks to see if any state-based actions would be performed and/or any triggered abilities are waiting to be put onto the stack (including those that trigger "at the beginning of the next cleanup step"). If so, those state-based actions are performed, then those triggered abilities are put on the stack, then the active player gets priority. Players may cast spells and activate abilities. Once the stack is empty and all players pass in succession, another cleanup step begins.
So what does this essentially mean? Let's imagine that we're in a situation where we have The Gitrog Monster on the battlefield and eight or more cards in hand, including Dakmor Salvage. We go to our end phase and cleanup step, discarding down to seven cards and putting Dakmor into our graveyard in the process. Normally the turn would end there, but because of the ruling above a Gitrog draw trigger occurs and a new priority cycle commences. After the priority has passed between all players, the draw trigger resolves and we choose to dredge Dakmor into our hand, drawing an extra card if we milled a land. Then, a new cleanup step begins and we discard down to seven cards again by discarding Dakmor, then repeating this process as many times as we want. This allows us to sculpt our hand to our liking by continuously drawing new cards and discarding ones that we don't need.
The hand sculpt technique makes Gitrog a very dangerous opponent to have, as she can "go off" even without having a discard outlet on the field. It essentially makes Dakmor Salvage a one-card combo with our general. It is way more open to interaction, however, and that's why the method should be used with more caution.
After starting to sculpt our hand, we're looking to land a discard outlet at instant speed on the table. This essentially means one of the following options:
- Casting Necromancy to reanimate Skirge Familiar from our graveyard at instant speed (NOTE THAT THE LATEST LISTS MIGHT NOT RUN Necromancy!)
- Flashing in an Oblivion Crown, targeting any creature we might have on the field
- Flashing in a discard outlet creature via Savage Summoning
We usually require a black ritual to cast one of the spells above if we have no access to surplus mana. We also need to cast the ritual on the same cleanup step we're going to cast Oblivion Crown (or Necromancy if you run it), as mana empties from our pool when going to the next cleanup step. If we have no open mana sources left when going to our cleanup step, we can also use the following line to get mana for either spell (note that you'll have to discard Skirge Familiar before going for this so you can reanimate it if using Necromancy):
- Exile Elvish Spirit Guide, netting you .
- Cast Crop Rotation, fetching any land that produces black mana.
- Tap that land for and play Dark Ritual, netting you .
- Cast Oblivion Crown like described above to land a discard outlet.
- Combo off as usual by first casting infinite Dark Rituals for infinite black mana, then proceeding from there.
To flash in a discard outlet via Savage Summoning, you naturally need an extra Green source open from a land/dork/etc. to pull your line off in addition to the lines above.
Finally, a word of warning about the hand sculpt: it is not legally shortcuttable nor "deterministic" and will take a considerably large amount of time to pull off, especially when playing around opposing interaction. In a sanctioned tournament environment, this would almost unanimously be regarded as slow play due to its properties, as it is very much akin to 4 Horsemen. However, as the rules for slow play are extremely vague and are designed for 60-minute-round tournament environments, most EDH players I've played with have so far approved the use of the combo. I still recommend consulting players not aware of its properties before using it if they want you to play it out, as it will undoubtedly take a long time to execute.
The Cleanup Step Win Pt. 2: Infinite Green & Winning the Game
Most win outlets leave your opponent without any permanents, any relevant ones anyway.
UPDATE: Note that the deck can run a wide array of outlet cards, and they don't have to be cards that require green mana. Cards like Ebony Charm, Geth's Verdict and even a flashed Praetor's Grasp via Emergence Zone are viable ways to close off the game at instant speed, and if you plan on winning with those instead of green cards, feel free to skip this chapter.
Most instant-speed wins come via our cleanup step sculpt, so we're going to proceed straight from where we left off above to the next step: making infinite green mana. Usually, you can just cast Crop Rotation and fetch Emergence Zone, then crack it and win with the loops described in earlier chapters.
However, we sometimes don't have access to Emergence Zone, which is when we need to use more creative ways to achieve infinite green mana. Long story short, there are a couple of options:
- Have one open, then use Crop Rotation to repeatedly fetch a land that can produce more than one green mana (Gaea's Cradle or Twilight Mire), then filter our infinite black mana to infinite green. The loops required to do this are explained in a section below.
- If you run it, use Emergence Zone to give all your nonland cards flash until end of turn, then use the conventional methods of creating infinite mana via Lotus Petal.
- Finally, if you run Necromancy: Exile Elvish Spirit Guide from our hand and bring it back repeatedly by reanimating Riftsweeper via Necromancy, then sacrificing it to Culling the Weak. Note that you can use this method to retrieve any other cards you might have in exile that you'll need for the upcoming steps.
It really doesn't matter which one you'll use at this point, it all depends on what cards you run, your preference and occasionally on the pieces you have access to (as sometimes you might have a Riftsweeper in exile and so on).
The lines for netting infinite green by using Crop Rotation and a land that produces + mana go as follows with the whole deck in hand, the library empty and Gitrog + discard outlet on the field:
First, if you don't have Twilight Mire or a Gaea's Cradle in the field yet:
- Discard a land, then Kozilek in response to the draw trigger and shuffle it to your empty library.
- With the draw trigger still on the stack, discard and dredge Dakmor Salvage. Resolve the shuffle from Kozilek before the new draw trigger resolves (aka conduct the "Koziland" technique). Repeat this 4 times for a total of 6 draw triggers on the stack.
- Resolve 2 out of the 6 draw triggers to draw your 2-card-library.
- With 4 triggers still on the stack, discard and shuffle Kozilek and a nonland card into your library.
- Cast Crop Rotation to sacrifice a land you control, putting a new draw trigger on top of the spell.
- Discard Gaea's Cradle/Twilight Mire in response to put another draw trigger on the stack.
- Resolve the 2 triggers on top of Rotation to draw Kozilek and the nonland card you shuffled in.
- Discard Kozilek again to shuffle itself, Cradle/Mire and the land you sacrificed into your library.
- Resolve Crop Rotation, fetching Gaea's Cradle/Twilight Mire to the battlefield.
- Resolve 2 of the remaining 4 draw triggers to draw the land card you sacrificed to Rotation, as well as Kozilek.
- Discard Kozilek again to shuffle Rotation and itself back in.
- Resolve the final 2 draw triggers to draw back both Rotation and Kozilek.
Then, to create infinite green mana:
- Tap Cradle/Mire for 2+ green mana.
- Discard a land and then Kozilek in response to shuffle the two in just like above.
- Discard and dredge Dakmor with the Koziland technique for a total of 5 draw triggers on the stack.
- Resolve 2 of the 5 triggers to draw Kozilek and the land card.
- Discard Kozilek and shuffle it back in.
- Cast Crop Rotation, sacrificing Cradle/Mire.
- Resolve the draw trigger from sacrificing a land to draw Kozilek back.
- Discard Kozilek again to shuffle Cradle/Mire in.
- Resolve Crop Rotation, fetching Cradle/Mire back untapped.
- Resolve 1 of the 3 remaining draw triggers to draw Kozilek.
- Discard Kozilek again to shuffle it and Rotation back in.
- Resolve the final 2 draw triggers to draw Rotation and Kozilek.
- Repeat steps 1-12 for infinite green.
Elvish Spirit Guide Loops With Necromancy (Outdated) Show
After getting infinite green mana, it's time to start winning the game by looping our outlet card of choice. Nowadays the outlet cards are usually Assassin's Trophy, Beast Within or Ulamog, the Infinite Gyre+Savage Summoning, which can be used to destroy every opposing permanent at instant speed. In case you're using Beast Within, you can destroy the opposing tokens by using other removal spells like Abrupt Decay. Then you can finally create infinite beast tokens by playing a permanent and sacrificing it repeatedly, or flashing in all of your creatures via Savage Summoning or Emergence Zone, then winning with combat damage on your following turn. If you're using your creature base as the winner swing, you can pump them by repeatedly attaching Oblivion Crown to each of them, then discarding cards infinitely to make them humongously big. Same works with the new card from War of the Spark called Finale of Devastation; just cast it for X>=10 and you got yourself a lethal alpha strike.
For wins involving Beast Within and other instants, loops that are used to create infinite mana via Dark Ritual or the like can be used to loop any instant-speed spell. Just replace Dark Ritual with the instant-speed outlet you wish to loop!
Crop Rotation Loops With Damage Dealing Lands (Outdated) Show
Assembling The Combo With Dredge (AKA "The Dredge Tutor Trick")
Time to test your intuitions.
Occasionally there are situations where we have an opportunity to land a discard outlet with our general on the field but don't have Dakmor in our hand. Fortunately, if we have a card with Dredge in our hand we can almost certainly win regardless if you can draw a card in any way (usually by discarding a land). For example, if we have a Putrid Imp on the field with Gitrog, as well as a land card and Darkblast in hand, we can discard Darkblast then dredge it back by discarding the land. By dredging Blast we mill 3 cards, and if any of those cards was a land card, you can discard Darkblast again in response to the ensuing draw trigger to repeat the dredge. This can then be repeated until you hit a bigger dredge like Golgari Grave-Troll, then start using that to dredge instead. Eventually, you'll either don't hit a land (in which case you whiff) or mill into Dakmor, allowing you to go for the win.
Razzliox, the writer and pioneer of the original Gitrog primer ran the numbers for the probabilities between hitting Dakmor and "whiffing" (as in not hitting a land with a dredge) using a sample library size of 88 cards with 30 lands (Dakmor being one of them). With this kind of library composition, dredging for 6 with no extra lands in hand gives us a 58% chance to hit Dakmor. However, with just one extra land in hand that probability will increase to 89%! If you're running Stinkweed Imp, those probabilities are 43% and 79% respectively when dredging for 5. With Life from the Loam we also often have a chance to recur 3 land cards before our combo, giving us a 75% chance of hitting Dakmor using Loam alone to dredge!
Playing Around Interaction
Fortunately, this guy's exiling effect is not a mana ability!
There are two main forms of instant-speed interaction that will disrupt us during our combo attempts: instant-speed removal targeting our general or discard outlet, and grave exiling effects. Fortunately, for both of these, we have built-in methods of protection.
Assuming our combo pieces are targeted by removal when both are already on the battlefield, we can merely discard a land in response to that removal and keep comboing off. This applies to any piece of removal, so if we have 3 lands in our hand when starting to combo off, we can blank 3 removal spells and so on. For this reason, it is most wise for people to go for removal when we're casting our second part of the discard outlet/Gitrog combo, to ensure that there won't be a time when both cards are on the battlefield simultaneously. For these situations, the most effective way usually is to force your way through the removal by either starting up by casting Gitrog if you have mana to cast her twice or alternatively starting by landing a discard outlet first if you already have two of them in hand. This forces the opponent to remove a piece that you can land twice, allowing us to force ourselves through one removal spell if need be.
Same trick that is used to combo off in response to removal will protect our combo from any instant-speed grave exiling effects. If you're hit with a Tormod's Crypt for example, simply discarding a land to keep comboing off works wonders. For this reason, people should usually try to exile our grave when we mill to our Kozilek. However, we have a method around this as well with Gaea's Blessing, which gives us essentially two shuffle triggers available to us when going off with the combo. If somebody tries to exile our Kozilek in response to its shuffle trigger, milling into Blessing will nullify that effect by shuffling our graveyard in response and vice versa. The deck can even work around two instances of grave exiling by looping the deck via Gaea's Blessing, then using the upcoming technique.
If for some reason, you come across a point where Kozilek becomes exiled, you still have a way to bring it back from exile via Riftsweeper which is our second, post-exile layer of protection. Like demonstrated in a former part of the combo, looping Riftsweeper will allow you to get all exiled combo pieces back for your access. The loop will require Kozilek to be available to you, however, so prioritize on recovering it first if he's ever exiled.
There's also the threat of people removing your discard outlet in response to your shuffle triggers after we've put infinite draw triggers on the stack, which is why we avoid doing that as long as possible in the steps of our combo. We can safely avoid making infinite draw triggers and shortcut most play lines up until the point where we've drawn our deck and accumulated infinite black and green mana. Therefore, when we're accumulating infinite draw triggers to go off, we've got access to the cards and the mana to either silence the table via City of Solitude/Autumn's Veil or just keep comboing off in response to the removal spell by flashing in an Oblivion Crown, possibly Noxious Revivaling it and drawing it if it gets countered for any reason.
Finally, sometimes people like to use more proactive methods of interaction to prevent you from comboing off. Most often this means stax pieces like Cursed Totem or Rest in Peace, which can be removed with a well-placed Nature's Claim and so on. However, sometimes the proactive disruption can be an effect like Praetor's Grasp or a Jeleva, Nephalia's Scourge exile effect that takes an essential combo piece, usually Dakmor out of our reach. For these situations, provided you and/or your opposition has the correct cards to do so, you can use an alternative, non-infinite way of comboing off.
Winning Without Dakmor
Your pain and your salvation, all in one.
As Dakmor is pretty much our only combo in the deck, having it exiled is often a big hurdle to our gameplan. Usually, the card can be returned to our disposal via Riftsweeper, but sometimes you just can't access Dakmor in any way, primarily when someone decides to Praetor's Grasp it.
For these situations, I've devised an alternative method of winning in a single turn, provided one of your opponents is running something like a Laboratory Maniac or Aetherflux Reservoir. The preliminary requirements for the line are to have both The Gitrog Monster and Skirge Familiar on the battlefield, Life from the Loam in hand, few land cards in hand and/or graveyard as Loam targets, and finally access to about 4-6 green mana. The line goes as follows:
- Discard both a land and the Loam, dredging Loam back to your hand from the draw trigger. If you mill into a land, keep discarding Loam in response to the ensuing draw trigger to mill as much of your deck as you can and look for cards with dredge, Gaea's Cradle or cycling lands if you run them. Whenever you hit any other card with dredge, dredge that back to your hand too. Every discard provides you with one , so you'll be quickly accumulating black mana.
- When the draw triggers have resolved, cast Loam for any lands you might have in your yard ( preferably Cradle and/or cycling lands).
- Either discard or cycle the lands you have in your hand to create more draw triggers. If you need to generate more black mana, keep discarding all of your dredge cards in response to the draw triggers to mill. Otherwise, start drawing cards with your draw triggers instead.
- After you've started drawing cards instead of dredging, keep discarding any lands you draw to draw more cards, eventually drawing you into nonland cards. This will create a ton of black mana while drawing you into a ton of gas.
- Play any black cards you might draw with the black mana you have. Prioritize getting Cradle in play by tutoring for Exploration/Crop Rotation to increase your green mana so you can keep Loaming if you run out of lands to discard.
- Tutor/draw into and play City of Solitude (if you run it) and/or Autumn's Veil when you can to silence the table.
- Praetor's Grasp an opponent for a Laboratory Maniac/Aetherflux Reservoir.
- Win by either dredging into nearly 0 cards in library and discard lands to deck yourself (Labman), or alternatively generate a huge storm count by repeatedly casting and dredging either Loam or Darkblast to win through Reservoir.
If you find yourself having Dakmor Salvage continuously exiled and out of your reach and you don't have an opponent in your metagame who plays one of the cards above to act as your win condition, you can replace your Praetor's Grasp with a non-infinite win condition like Faith of the Devoted, Exsanguinate or an Aetherflux Reservoir of your own to win with the method while also retaining your ability to win with the conventional Dakmor Combo at sorcery speed.
UPDATE: With the advent of War of the Spark, Finale of Devastation can also be used as a mana sink at the end of the above line to kill the whole board with a huge alpha strike from pumped hasty creatures, granting the deck an independent, non-infinite win outlet when going off without Dakmor!
Gameplan
Now that we've gone through the ins and outs of how the deck wins the game, it's time to explore the ways we can reach that goal. This Gitrog deck is a fast combo list and it favors speed and resiliency as its main weapons against other decks, seamlessly switching between the "fast combo" and "midrange" archetypes and their gameplans. On the flip side, the deck's weakness is its interaction suite (or lack thereof), so it is important to pick your battles wisely when using your interaction.
As a straight citation from LabManiac_Sigi's Chain Veil Teferi primer, here are the main variables that one must consider each time you start a game:
- Opening Hand
- Other Decks at The Table
- Position at the Table
Next, we're going to elaborate on these factors in detail and on how they affect Gitrog's gameplan as a whole.
Early Game & Opening Hand
Before going through our deck's specific gameplan, it's good to look at what kind of cards we're looking in our opener. Our primary hand should have a bit of everything in terms of "roles" the different cards fill in our deck. A hand with about 2-3 lands, 2-3 pieces of ramp, 1 card advantage source and 1-2 tutors/combo cards would be an ideal starter. Having interaction and/or protection in your opener is situationally relevant and often useful, but it's important to remember that we're a fast combo deck first and foremost. Winning the game quickly often acts as our primary method of "interaction", so don't be afraid rely on the speed of your hand if you're provided with the opportunity.
To start with hands you want to mulligan here are several types of hands that should be avoided if possible:
- Too many lands: As with all cEDH decks, having too many lands at expense of business cards like ramp, tutors or card advantage is not beneficial for your gameplan, as you'll often take too long to create a board presence while the opponent has locked the game down or comboed off.
- No lands: To keep playing through the early turns you need to have permanents in play that allow you to play spells, which is why having lands is almost always essential. 1-Landers should be watched out for, but are keepable if the rest of your hand can be played out and is well-balanced otherwise.
- Very slow hands: Your primary gameplan in your opener is to get a card advantage engine going, so if your hand lacks draw, tutors or enough ramp to put Gitrog in play quickly, it should be shipped.
When you've gotten to a hand that is not one of the above and has business, the first thing to do is to evaluate the "speed" of your hand, which is primarily determined by:
- how fast you can establish a board presence
- how fast you can see and/or gain access to the cards in your deck
Board presence can potentially mean many things, but it essentially is measured by the amount of mana you have access to in relation to your opponents. For instance, playing out something like a Mana Crypt on turn 1 allows for a relatively strong early game board presence. Other decks can often do even better than that by playing out more fast mana rocks, or alternatively mana denial in the form of cards like Trinisphere or Winter Orb. Despite this, Gitrog can regularly outdo even them due to the high density and diversity of mana acceleration in the deck. Lands, Exploration effects, cheap mana rocks, mana-producing creatures like Llanowar Elves, black rituals... strictly speaking, our deck is littered with mana generators. These cards construct your board presence and allow you to cast more spells as well as more expensive spells faster.
After achieving a strong board presence, we next have to find ways to use that mana to drive our advantage further. That's where the other factor of "speed" comes in: the access to as many cards as possible. By default, Gitrog herself is our card advantage generator which is why hands with dedicated ramp are often good enough for a keep. Despite this, having a backup engine in your opener comes in handy in case Gitrog gets countered or removed, which happens often enough to be counted as a factor. As a rule of thumb, the slower your hand is the more you can expect interaction when Gitrog is cast, and therefore the more need there is for you to have a backup engine in hand.
To sum up the points above, here's several types of hands that you're most often looking for:
- Hard ramp: A hand that can cast Gitrog by turn 2-3 will often be a good hand, as Gitrog can propel you forward as long as you have lands to follow up with after casting her.
- Ramp + a contingency plan: Hands that can cast Gitrog by turn 4-5 but also have business going if she gets countered are also good, especially in a control-heavy matchup. At these tables Gitrog is a prime target for removal, so a backup plan in case that happens is important.
- Engines: If your opener has some sort of value engine like Sylvan Library, Necropotence or Life from the Loam + a cycling land, you are often also good to go. The deck is littered with ramp and fast mana, so you'll be able to get to Gitrog mana often in no time through your engines.
- Ramp + (a tutor for) Ad Nauseam: Early Naus hands are almost as broken in this deck as in other fast combo decks. If you can hold up Nauseam mana to cast it by the end of turn 2, chances are you're doing very well.
Matchups
The second large factor that decides what approach we're going to make is the initial matchup. As we sit down to the table with Gitrog, take a close look at what decks your opponents are playing and consider what gameplans they might have. Classifying these by their speed and interactivity will help to define your initial role at the table. To simplify how the most used cEDH decks operate based on these two factors, here's a graph prepared by LabManiac_Sigi in his Chain Veil Teferi primer.

cEDH Archetype Graph
Upon identifying your matchups and opponents' gameplans, it's time to adjust your own gameplan accordingly.
- Up against a lot of fast combo decks? You're likely to be the predator, and it's often a matter of racing to victory as fast as possible.
- Up against multiple blue control decks? Let the opposition hold up their counters and slowly accumulate value through your engines while looking for a window to combo off.
- Up against stax? Look for an opportunity to either combo through the stax pieces or to remove them through your removal suite.
- Up against a mixed table? Your plan may vary.
These gameplans may not even apply to every game, as there is a possibility of specific scenarios caused by other variables such as your opening hand, turn order and individual cards being played by your opponents. As the game advances, your role may also change at a moment's notice, so it's integral to your success to always recognize your role and when it changes, then exploit it.
Turn Order
In a multiplayer free-for-all game such as EDH, turn order has some special qualities to it in comparison to 1v1 formats. Going first is obviously an advantage, but it's often not as useful as in 1v1 as you have potentially 3 opponents eyeing your first moves. Like above, looking at your matchups is key when elaborating on the consequences of turn order. Does a stax player or a combo player go first? Does the combo player untap before or after the control player? Do you have to interact before establishing your own board presence because of turn order? These are all things that should be considered when starting a game, and even though our deck lacks in the interaction department, turn order often can affect how greedily we want to push our advantage forward. If you're going first for example, there probably won't be any stax pieces hindering you on your turn one plays. However, people might be using all they can to stop your early game plays because of the advantage you have, so plan accordingly.
Now that we've gone through most of your early game variables, it's time to take a look at how the deck fares after our initial turns.
Gitrog's Mid- & Late Game
By the time we've proceeded past the early turns that are more or less covered above, it's time to look at our side of the board first and foremost. Do we have Gitrog on the field? If not, try to resolve her through upcoming disruption with any protection we might have access to, that usually being a land tutor for Cavern of Souls. If we already have Gitrog on field, it's time to abuse all those sweet abilities she has with lands. Fetch lands becoming cantrips is incredibly good for longevity, and if we can get access to things like Bazaar of Baghdad, Life from the Loam or Ramunap Excavator/Crucible of Worlds we can grind to value town for pretty much as long as Gitrog is up and purring. Seeing as we won't be actively losing life through these engines, they are a big factor in why Gitrog has reach even in the longer games. It's something to keep in mind when playing against heavy interaction and/or stax, where preserving a decent life total can be incredibly relevant.
If we still can't get Gitrog to stick on the field for any reason, at this point of the game it's still more advisable to rely on the card advantage engines shown above, particularly in conjunction with Bazaar of Baghdad. As Bazaar allows us to "dig" for cards, we can slowly but surely sculpt our hand to find more fast mana that can then be used to recast Gitrog. Drawing into protection, discard outlets and dredgers will also help further the gameplan, as they help with comboing off as soon as Gitrog sticks.
Gitrog's late game is not much unlike her mid-game, as our frog overlord won't really quit grinding value for us as long as we have enough lands to feed to her. Fortunately, feeding lands often is way more easier at this point due to the deck's high land count and card-drawing power. Assuming we have no ways to combo off at this time, it's advisable to either Praetor's Grasp a win condition from one of our opponents or start removing our opponents' mana bases with a recurring Strip Mine.
A Frog Goes To The Bazaar
Vintage Dredge turned up to 11.
When Gitrog is used in conjunction with Bazaar, things will get a bit unconventional. The important things to remember are that both draws if replaced with a dredge, bring separate draw triggers from Gitrog due to the following ruling:
- 120.2. Cards may only be drawn one at a time. If a player is instructed to draw multiple cards, that player performs that many individual card draws.
If for example, we were to dredge from both "draw a card" effects that Bazaar provides us with and both dredges hit a land card, we get two Gitrog triggers put on the stack after we have discarded 3 cards and resolved Bazaar's activation completely. We can even discard the cards we dredged back to dredge them again for more card draw and mill! These interactions with dredge make Bazaar an outright ridiculous value engine with Gitrog in most situations, and this along with the fact that it doesn't cost us any life, is very hard to remove and very easy to recur makes it a prime target for our land tutors from midgame onwards, assuming we can't just combo off at that time.
Next, we're going to look at cards that could go into any Gitrog combo list. There are some options outside of my deck as well, usually ones that are established as good in certain metagames. Sample lists, on the other hand, can be found below in a separate section if you're curious.
Being the core of every cEDH deck, ramp is also an essential part of Gitrog. We run a lot of different forms of ramp, but their requirements often are that they're
- Cost-efficient. Going above 2CMC is often too slow for our deck, especially because we want to resolve our general as fast as possible. 1CMC and below is often most preferable to us, which is why mana elves are our most dominant form of ramp.
- Land-oriented. Gitrog loves playing around with lands, which is why most lands that tap for multiple mana are included. In addition, cards that allow you to sacrifice lands for mana or play more lands also work as viable forms of mana ramp.
Mana Rocks
- Mana Crypt - The most broken vintage rock, a must in pretty much any cEDH deck.
- Sol Ring - Coming right behind Mana Crypt, likewise a must-have rock.
- Mana Vault - A Dark Ritual in colorless form that allows us to play Gitrog as early as turn 2!
- Grim Monolith - 2CMC rock that taps for . Also makes for the 3 colorless mana required to play Gitrog.
- Chrome Mox - 0 mana allows us to play 2CMC cards or two 1CMC cards on turn 1, which is often very good. Exiling a card is often a trivial loss compared to the tempo gain.
- Mox Diamond - Similar to Chrome Mox, but much better as you can discard a land. With Gitrog on the field you get to draw a card, too!
- Lotus Petal - A 0CMC self-sacrificing rock. Good fast mana while also helping us get infinite mana when comboing off.
- Lion's Eye Diamond - A more desperate sort of ritual as it discards your hand, but you can use it in response to a tutor to net more mana for the spell you tutored. Also good when ramping to Gitrog quickly in case your hand is full of chaff otherwise.
Mana Dorks
- Birds of Paradise - Taps for all colors and costs , one of our better dorks.
- Elves of Deep Shadow - Taps for which makes it a great color fixer as well as ramp.
- Llanowar Elves - Taps for . Pretty basic, but allows for explosive following turns.
- Elvish Mystic - Same as above.
- Fyndhorn Elves - Same as above.
- Arbor Elf - Untaps a Bayou most often, allowing for color fixing. Worst of the mana dorks we run due to its dependence on forests.
- Boreal Druid - Taps for . Still very decent even though I'm not running it at the moment.
- Joraga Treespeaker - An extra 1CMC mana dork that I've skipped from running. Treespeaker is one of the ramp cards that when played on turn 1, set up for an explosive Gitrog turn on turn 3, which is why it's often considered to be worth running in many lists. Also amps up the elf count for Priest of Titania, which is always good.
- Deathrite Shaman - Usually exiles a land to make mana, but works as a toolbox dork for many situations, primarily as grave exile.
- Priest of Titania - With all the mana elves we run, it can tap for ridiculous amounts of mana. Becomes super good when your opponents play mana elves too.
- Wall of Roots - A 2CMC mana creature, that produces mana immediately after hitting the field, which is super useful when setting up a strong board presence. It also taps for extra mana when you count in the whole turn cycle, as you can use it once per an opponent's turn as well.
- Somberwald Sage - A 3CMC version of Joraga Treespeaker, in that it makes casting Gitrog from turn 3 onwards a breeze with tons of mana to spare for going off. It's excluded from my list, but its function is a powerful one if you decide to run it.
Rituals
- Dark Ritual - The most known and broken ritual in black. Allows for very fast Gitrogs and Ad Nauseams where its main applications lie.
- Cabal Ritual - Initially a bit worse Dark Ritual, but becomes stupid with Threshold active.
- Culling the Weak - Something that we get to run because of our mana dork count. Also good when we're trying to repeatedly sacrifice creatures when comboing off.
- Rain of Filth - When decent in decks that like to recur lands, this deck makes the most of the land sacrificing clause to draw cards with Gitrog. Primarily used when going off to cash in lands for mana and cards.
- Elvish Spirit Guide - While an unconventional ritual, it's incredibly good when dodging tax effects. Also necessary to gain mana when going off at instant speed with zero open mana and part of one of our infinite green loops.
Lands
- Ancient Tomb - A staple in most cEDH decks, but actually worth tutoring a lot with your land tutors as you get to ramp while providing Gitrog with more lands to sacrifice.
- City of Traitors - Like above, but instead of costing life it sacrifices itself when playing another land. Good sacrifice target for Gitrog's upkeep triggers.
- Crystal Vein - A land very similar to City of Traitors, except its ramping utility can only be used once. Less powerful than City as you often have to sac it to get to Gitrog mana, but it serves as an extra ramp piece as well as a cantrip when Gitrog is on the field.
- Lake of the Dead - An MVP in the deck, as it often works as a draw engine as well as a repeatable Dark Ritual in land form. Consider tutoring for this instead of Ancient Tomb if you have swamps handy.
- Gaea's Cradle - Not as good as in something like a Prossh deck, but it does a decent job here. Protects our creatures from The Tabernacle at Pendrell Vale if we come across it.
- Gemstone Caverns - It's ramp only in our opener when we are not going first, but there it's super powerful and a free land-drop.
Miscellaneous
- Carpet of Flowers - Assuming there's any person playing a blue deck in the opposition (and there often is), you'll be gaining tons of mana with this. With 1 island it's a mana dork with haste, with 2 islands it's a colored Sol Ring and it only gets better from there on.
- Exploration - Being able to play extra lands comes in especially handy in a deck that wants to continuously sacrifice them. With our high land count, playing extra lands is also a thing we do in all stages of the game.
- Wild Growth - A mana dork in enchantment form that has haste if you haven’t tapped the land you attached it to. Weaker to taxing effects, but more resilient against removal than normal dorks.
- Utopia Sprawl - a Wild Growth that can only attach itself to Forests, but we can pick the color it produces, unlike Growth. We do hit our Forests like Bayou consistently with fetchlands, so it's a relatively safe ramp card to use... assuming you either play all the fetches or enough basic Forests in your list.
The first half of our interaction suite. While we lack blue counterspells in our deck, we do have several ways we have that can protect our combo, on the stack and outside of it.
- Autumn's Veil - The green version of Silence, something I'd run more of if I could. Take note that it affects all spells you cast on the turn, even after it has resolved.
- Sylvan Safekeeper - An easy-to-tutor creature that shrouds our creatures from any incoming removal. It also allows us to cash in lands for cards on the turn we combo off.
- Thoughtseize (and co.) - A versatile way of both slowing down faster decks as well as protecting us from any incoming counters and/or removal on the turn we go off. Outside of that, it gives information to us and the rest of the table on target opponent's hand.
- Gaea's Blessing - The deck's insurance against instant-speed grave hate when comboing off. Incredibly useful and gives the combo a lot more resilience, although a relatively dead draw otherwise.
- Noxious Revival - Something that could be counted as a utility card, Noxious is a very good card when protecting our combo. Being able to recur any card from the grave to the top of our deck is excellent when we combo off, and at other times it can be used to mess our opponents' topdecks.
The second, more prominent part of our interaction suite. Primarily tools to take down the obstacles that prevent us from winning, they can also be used to deny mana from our opponents if they seem to be comboing off too soon for our taste.
- Assassin's Trophy - A new premier catch-all spell from Guilds of Ravnica. The fact that it destroys lands as well makes it a loopable recursion outlet like Beast Within when going off. Take note that you can force them to not find a land if you cast this after they have tutored something on the top of their library with something like Vampiric Tutor!
- Beast Within - Another, very powerful catch-all removal card. 3CMC is costly, but the card's versatility is undisputed which is why it's been a mainstay in most of the Gitrog iterations I run.
- Abrupt Decay - Less applicable than Beast Within, but is uncounterable and cheaper. One of our best removal spells.
- Nature's Claim - Best Disenchant in our deck, purely because of its mana cost and catch-all properties. Giving an opponent 4 life is almost always negligible.
- Toxic Deluge - Our creature wipe. We can almost always leave Gitrog on the field due to her high toughness, which makes the card pretty great.
- Pernicious Deed - Our universal boardwipe. As Gitrog is so large CMC-wise, you can often just clear the board out of all nonlands except for her. Just be sure not to crack it when someone might have a Mnemonic Betrayal in hand, as they can often win easily with the value you just gave them.
- Caustic Caterpillar - A Naturalize effect that can be fetched with our creature tutors. Loses to Cursed Totem and Linvala, Keeper of Silence, but destroys some of the other peskier enchantments we go up against, like Leyline of the Void, Rest in Peace and others.
Another part of our deck's "core". Card draw and selection engines have a big role in the deck so that you can grind and advantage even without Gitrog. They also allow you to increase your advantage further when you have Gitrog, allowing for faster and more resilient wins.
- Sylvan Library - Our most powerful card draw engine which also has a weird interaction with Dredge cards. If we're replacing all of our 3 draws with a dredge, we don't have to pay any life as we didn't "draw" any cards, something that Library specifies for us when we're looking to put cards back on the top of our library. Any two cards we draw however will have to be put on the top (or paid 4 life for) if you decide to dredge only one or two cards, so keep that in mind. In most cases we just pay the 8 life for the pure draw power.
- Necropotence - Our second life-as-a-resource card advantage engine. Take note that we can combo off through Necropotence, as the card's grave-exiling effect is a triggered ability. We respond to all exiling triggers with either a dredge or a shuffling effect, so no cards get exiled unless we're using the cleanup step as our discard outlet (at those points you can use the Riftsweeper loop to recover any cards you might need for the later parts of the combo).
- Dark Confidant - In our deck this is almost a creature version of Phyrexian Arena that also dodges draw preventing hate cards. Damage is negligible unless we flip a Kozilek, which is a relatively rare occurrence. Bonus points for being a normal tutor target for our creature tutors.
- Life from the Loam (+ cycling lands) - While not something that draws us cards straight out, this becomes a serious card advantage engine when we've got Gitrog on the field. Does double duty as a Dredge card that can be later used to search for Dakmor, either with the dredge tutor trick or by just milling into it naturally.
- Bazaar of Baghdad - Usually a target for our land tutors when games get grindy like described in the earlier chapters. One extra thing of note is that on the turn you're trying to go off, tapping Bazaar on your upkeep and then sacrificing it to Gitrog is good as you get to conserve more mana from your other lands.
In addition to the above, all cards with Dredge on them also work as card advantage outlets with Gitrog on the field (can be abused with other card-draw engines like Bazaar for maximum effect) and as ways to tutor Dakmor Salvage when you have a discard outlet and Gitrog on the field already.
In addition to our run-of-the-mill black tutors that inhabit all black cEDH decks, we've got several more specific tutors we use to either fetch for a combo piece or a card advantage engine to either combo off or accumulate more value, respectively.
- Demonic Tutor - The best tutor in the game, hands down. Pretty much an auto-include.
- Diabolic Intent - A Demonic Tutor that sacrifices a creature, something we have more than enough of to make it a consistent effect. Most often sacrifices a mana dork, or a value engine like Dark Confidant when going off.
- Vampiric Tutor - Not as good as Demonic due to the card disadvantage, but cheaper. The instant-speed application is a good bonus.
- Imperial Seal - A sorcery-speed Vampiric Tutor. While more open to opponents' interaction it's still a very good T1 play.
- Entomb - Almost always used to get either Life from the Loam, or just Dakmor Salvage if you're looking to combo off.
- Worldly Tutor - A creature version of the top-deck tutor suite. Can be used to get a discard outlet, a value engine like Dark Confidant or Ramunap Excavator, or just Golgari Grave-Troll for the dredge tutor shenanigans if you already have a discard outlet.
- Summoner's Pact - While Pact can be a risky card, it's functionality in the deck is undisputed by either searching for a green discard outlet, or Golgari Grave-Troll to mill into Dakmor. Just be sure to have enough mana sources open to pay the tax next upkeep in case you're not winning on the turn you cast this!
- Green Sun's Zenith - In most cases works as a turn 1 mana dork by fetching a Dryad Arbor, but later on it can be used to fetch cards like Priest of Titania, Ramunap Excavator or Wild Mongrel/Noose Constrictor depending on your situation.
- Finale of Devastation - A newcomer from War of the Spark that allows us to fetch Putrid Imp on the field for 3 mana. It also works as a way to get value by fetching a Dark Confidant, or as an extra sorcery-speed win outlet when you cast it for X>=10. All in all, a good include.
- Sylvan Scrying - A Demonic Tutor for lands. Our primary tutor targets are Cavern of Souls, Bazaar of Baghdad or just Dakmor Salvage itself.
- Crop Rotation - A pretty awesome tutor in that it fetches onto the table and at instant-speed, drawing us a card as well if Gitrog is on the field. Aforementioned tutor targets apply, save for Dakmor Salvage. Also used in instant-speed win lines in tandem with Emergence Zone, or even cards like Rath's Edge if they're being run as outlets.
Here are the cards that either set you up for a situation that leads to an almost surefire win, or used as pieces for the Dakmor Combo. Something to pay attention to is each card's applications outside of the combos we use to minimize the number of dead draws in each game.
- Dakmor Salvage - Our main combo card. Works as a fine value engine if you're feeling bold and reveal it by discarding it or tutoring for it early on.
- Kozilek, Butcher of Truth - The cheapest graveyard-shuffling Eldrazi titan, and therefore a staple for us. While using only Gaea's Blessing as a shuffler is possible, it requires way too many dead cards like Golgari Brownscale and Grave-Shell Scarab to become viable. Something to keep in mind if you’re looking to cut Kozilek in a budget-version of the build, however.
- Ulamog, the Infinite Gyre - A heavily discussed card due to being the only alternative to Kozilek, Butcher of Truth, and both have their ins and outs. Ulamog has more uses as a win outlet in "winconless" Gitrog lists due to its power to destroy permanents on-cast, while Kozilek is better mid-combo if you wind up with too much mana in hand and no cards (rare, but possible). Ulamog is also more expensive CMC-wise, but often way cheaper money-wise, so many budget builds prefer Ulamog to Kozilek. Over time Ulamog has found way more arguments to its worth as an alternative shuffler to Kozilek, and even now that Assassin's Trophy has made its way to the deck and works as the primary permanent destruction outlet, Ulamog still has its uses. Also played in deck:Gitrog Blitz -like lists for shuffler redundancy due to the inclusion of "forbidden" tutors like Tainted Pact.
- Putrid Imp - The cheapest discard outlet creature we have available to us. Often a primary target for Worldly Tutor.
- Wild Mongrel - A 2CMC discard outlet creature that can also be fetched with Green Sun's Zenith. Immune to all "nonblack" removal if you can discard a card to it.
- Noose Constrictor - An alternative to Wild Mongrel that has Reach instead of insurance to "nonblack" removal. Running both is usually a waste of deckslots due to our tutor density, but it's not a big deal as to which one you run.
- Oblivion Crown - Our only discard outlet that's not a creature, although it requires a creature to enchant and is not immune to Cursed Totem. As a bonus, it has Flash, which is super good when trying to go off at instant speed.
- Skirge Familiar - The most expensive discard outlet we run, but despite this one of the better ones as it provides mana for us as well. Most often used to accumulate infinite black mana, as well as to combo off during our cleanup step.
- Necromancy - A card run by the more classic Gitrog lists. While it was often overlooked as a utility card it was used in several parts of the combo, mainly when reanimating a discard outlet in our cleanup step, when reanimating Riftsweeper to recur any exiled cards back to our deck, when accumulating infinite green mana with Elvish Spirit Guide, or when we're reanimating Dryad Arbor continuously to provide us with land drops to sacrifice to Rath's Edge. It's not run anymore after alternative lines have been developed, and has mostly been replaced by Savage Summoning/Emergence Zone if we need to land creatures at instant speed.
- Riftsweeper - Primarily it's a part of our protection package, but it's used to attain infinite green mana with Elvish Spirit Guide often enough to be considered part of the combo.
- Golgari Grave-Troll - Many iterations of the deck have enjoyed a higher number of dredge cards, and GGT is the last remaining card that has application only as such. Being the only card with Dredge 6, Grave-Troll gives us the highest amount of probability in finding Dakmor Salvage with the dredge tutor trick, which is why he warrants an inclusion.
- Ad Nauseam - The most broken card in the format right now due to our high starting life total. Assuming we have enough resources when we cast this, we'll usually be able to just draw into enough gas to win right then and there. It has to be used a bit more conservatively in Gitrog than in other fast combo decks due to the presence of Kozilek, however. I usually go to about 13 life if I haven't hit Kozilek yet, otherwise I'll go down to around the usual 5-6 life that many Ad Nauseam -oriented decks go to when going off.
- Emergence Zone - A new instant-speed outlet enabler in land form from War of the Spark. While it is a colorless land, its effect allows for so many different lines that it's hard to exclude in a Gitrog list, where you can also use it as a cantrip. More info on what different lines you can make with Zone can be found from the "Combo" section of the primer.
- Praetor's Grasp - A 3CMC tutor of sorts, except it tutors from our opponents' decks. Used as our win condition after we've gotten infinite mana through our combo or as a way to get an alternative win condition from our opponents if we lose access to Dakmor. Outside of the combo, it's a 3CMC Mana Crypt at worst and a tutor for Ad Nauseam (or a similarly broken card) at best.
- Collective Brutality - An alternative to Praetor's Grasp if you feel like 1BB is too costly, or if you just feel like not needing the card for its applications. All of the modes are relevant outside of being a combo outlet as well, with the first one protecting your combo and giving information from one opponent's hand, and with the second one removing hatebears from the opposite side of the table. Draws us a card too when discarding a land to the Escalate cost.
- Ebony Charm/ Geth's Verdict - The traditional black instant-speed win outlets that use life-loss as their game-winning effect. They also have their individual uses in certain metas, as Charm can exile reanimation targets from graveyards, and Verdict can force players to sacrifice Hexproof/Shroud creatures like Narset, Enlightened Master. These days their inclusion is less prevalent due to the other, more slot-efficient ways of winning the game.
- Rath's Edge - The deck's classic instant-speed win condition. As it is also a land, it can be used with all the land shenanigans Gitrog provides us with, or as some situational removal for pesky hate bears.
- Sunscorched Desert - A damage-based win outlet card that takes up a land slot instead of a nonland one. Doesn't do much outside of being a colorless land however, unless you can catch an Ad Nauseam/Necropotence/Razaketh player from 1 life and have a Crop Rotation in hand. Still, a relatively simple way to win at instant speed, and very good in budget builds.
Note, that permanent destruction cards Beast Within, Assassin's Trophy, Ulamog, the Infinite Gyre are included in other sections of Single Card Discussion, as their function as win outlets are secondary. You don't need to run any of the above therefore, unless you want secondary win plans in addition.
Time to get to the bread and butter of the deck: lands. Aside from our colored lands and the ramp lands that were covered before, the deck likes to play several utility lands that collectively form a toolbox for specific situations. I'm not going to go through all of the colored sources, but I'll cover the ones that have extra quirks in this deck (and haven't been covered in the sections above). The deck ultimately favors utility lands that:
A) Can sacrifice themselves for cheap or no cost to maximize Gitrog's card draw.
B) Provide effects that can be relatively strong or beneficial to our gameplan even without Gitrog on the field.
- Verdant Catacombs, Misty Rainforest, Marsh Flats, Wooded Foothills, Windswept Heath, Polluted Delta, Bloodstained Mire - Our fetch land suite. All fetch lands have a nearly disgusting synergy with Gitrog who makes them free, uncounterable cantrips that also get you a land in the process. Getting these first is a top priority for most budget builds.
- Barren Moor, Blasted Landscape (optionally Slippery Karst/Polluted Mire) - Our cycling land suite. Super good with Gitrog and Life from the Loam makes them a serious value engine. Either Karst or Mire comes in and out of the deck when we're testing more utility lands, but having at least 2 cyclers is a must for our sorcery-speed infinite loops with Praetor's Grasp/Collective Brutality. No matter what cyclers you are using it's essential that you can cycle them with only black mana.
- Cavern of Souls - One of the deck's MVPs. A regular tutor target to ensure a resolved Gitrog or alternatively a resolved discard outlet creature. Lines that involve sacrificing Cavern, then recurring it and renaming it with a different creature type are not that uncommon, either.
- Petrified Field - Another, very useful land that's most often used in Realms Uncharted piles. Helps bring out any useful lands you might have sacrificed or milled to your hand while also sacrificing itself for free to net a draw trigger from Gitrog.
- Cabal Pit - Our creature-removal land. Gets rid of hate bears, is immune to most countermagic and becomes super effective when you can start recurring it.
- Command Beacon - A very useful fallback land in case our general's commander tax becomes too much to bear. Makes it easy to resolve Gitrog in the later stages of the game, especially with land recursion.
- Strip Mine - While most cEDH decks don't run this card as much, here it does double duty of being an alternative win condition with Exploration effects and land recursion (aka the Azusa-Strip Mine-Crucible lock). It's also good for removing things like The Tabernacle at Pendrell Vale, Gaea's Cradle or even blue lands from the control player when you're trying to resolve Gitrog in the early game.
- Homeward Path - With the rise of Gilded Drake-oriented reanimator builds, protecting oneself from a single Gilded Drake cast by removing Gilded Drake in response to its enter-the-battlefield effect is not enough anymore. That's why we run Homeward Path to return our astray frog-lord back to its rightful throne when trying to go off. Easy to search for with Crop Rotation after going off with an Ad Nauseam, for example.
- Dryad Arbor - Less of a land and more of a mana dork that uses a land drop instead of mana. Besides being a great tutor target for Green Sun's Zenith on turn 1, this card comes in handy in situations where you either need to sacrifice a creature for an effect (Diabolic Intent etc.) or when you're trying to provide yourself with land drops when going off with Rath's Edge (reanimating it with Necromancy). A very consistent card to fetch as well because it's a Forest, meaning you get to find it with your green fetch lands whenever you need it. Often cut in more contemporary Gitrog lists due to the cutting of Necromancy and its devaluation as a standalone card.
Removal
- Deglamer/ Unravel the Aether - Enchantment removal is very important in a deck like this that can concede to several hate cards. Deglamer is here specifically to answer early Leyline of the Voids, but it has a lot of applications besides that as well like disrupting top-deck tutors, Doomsdays and so on.
- Natural State - A cheap naturalize that's restricted by the target's mana cost. Great against most pieces, but a nightmarish draw when up against a Leyline of the Void, so keep that in mind.
- Slaughter Pact - Free removal that hits most hate bears. Being able to pay part of the upkeep cost with the land that we sacrifice to Gitrog is a nice plus. Doesn't hit opposing Notion Thiefs nor black generals, so be wary.
- Dismember - A hard-hitting removal spell, but hits even the bigger hatebears like Linvala while also being able to hit black creatures like Notion Thief that your opponents might play.
- Darkblast - While it's primarily "a card with Dredge 3" it can be used to kill various hate bears that bother us. Very useful as repeatable removal when against Tymna and dork decks, as you can play Blast on upkeep, then dredge it on your draw step (or from a Gitrog draw) to cast it again on the same turn. If you're trying to remove the dredge package altogether it can be slotted for something more relevant in terms of removal.
- Seeds of Innocence - An optional artifact wipe. Super good in that most of our artifacts are used to ramp on the turn they come to play only, and also allows us to wipe our opponents' mana as well as any artifact-based stax cards.
- Blast Zone - A newcomer from War of the Spark. Its usefulness is yet to be seen from my view, but it's a very good utility land due to its flexibility. Draws a card with Gitrog when sacrificed, as well.
Creatures
- Azusa, Lost but Seeking - While Azusa is an expensive card for ramp alone, her pros lie in being able to just grind a ton of lands to the table when we've got ramp recursion online. She also becomes sort of a combo with Strip Mine in the late game when we can start removing several lands per turn.
- Lotus Cobra - While not a "mana dork", this snake does serious work when continuously playing lands, and that's what Gitrog does best. Playing and cracking a fetch land with Cobra on the field will net you a ton of extra mana, especially with Gitrog on the field as you can draw into more lands that you can then play for more mana. Very powerful and explosive when going off with something like Ad Nauseam, as it produces a lot more mana than it costs as long as you have the lands in hand to play.
- Ravenous Slime - A control piece against grave-based strategies that have sprouted up in the metagame since the unbanning of Protean Hulk and the spoiling of Razaketh, the Foulblooded, also easy to tutor for with Green Sun's Zenith on the side. Run this if you're getting outraced by the aforementioned decks often in your metagame.
- Grim Flayer - A Dark Confidant of sorts that you can fetch with green creature tutors, mainly Green Sun's Zenith. While it is a great secondary value engine, it often is most useful when you already have a Gitrog on the field, and at that point, you often have tons of value already or are going off with the combo. It still is a good card to include due to its more unassuming nature as a value engine, as well as its tutorability with green creature tutors.
Protection
- Savage Summoning - A flexible, resilient protection piece, as well as a primary combo outlet card formerly in the winconless Gitrog builds, now supplanted by Emergence Zone. Uncounterable spells that make your combo pieces uncounterable are incredibly useful in lists without blue however, which makes its inclusion these days still very reasonable, if not encouraged.
- City of Solitude - A piece of protection on our combo turn that I was formerly very fond of in that it silences the whole table, allowing us to combo off with impunity (and with potential shortcuts). However, it often tempts the opponent to destroy something you need to combo off in response to you casting it, which can cost you the game. This is why it was cut in a relatively early part of the list.
- Dosan the Falling Leaf - Mostly for more budget builds that can't run Cavern of Souls, Dosan has a very good landing consistency in the list due to the creature tutors we run, which also makes it arguably better than City of Solitude as you can "cheat" him to play without casting him. If people can see you fetching for Dosan though, be prepared to deal with incoming interaction!
Tutors
- Realms Uncharted - An expensive tutor, but something that becomes super good with Gitrog on the field and with land recursion. Common value piles include something like Petrified Field/Bazaar of Baghdad/Cavern of Souls/a value land, as well as all piles with Dakmor Salvage in them when you're going off. Still costs 3 mana however, which justifies it being cut in some people's builds.
- Sylvan Scrying - A Demonic Tutor for lands. Our primary tutor targets are Cavern of Souls, Bazaar of Baghdad or just Dakmor Salvage itself. Sometimes cut from the de-facto list as creature tutors can be used to get Dakmor by finding Golgari Grave-Troll
- Grim Tutor - An universal 3CMC tutor, that is often cut due to peoples' budget constraints. The mana cost is also sometimes hefty, but the flexibility is undisputed despite this. Often cut from my list as I like to run Praetor's Grasp as a 3CMC tutor for opponents' cards.
- Sylvan Tutor - A sorcery-speed Worldly Tutor that can find a place in the deck due to being able to essentially tutor either piece of the Dakmor combo: discard outlets by themselves, or Dakmor by fetching Golgari Grave-Troll if you already have a discard outlet (See the Dredge Tutor trick in "Combo" section for more info).
- Eldritch Evolution - Another good way to fetch a discard outlet, except it requires you to sacrifice a creature. Very good in almost any Gitrog Combo deck, but due to its 1GG cost and sacrifice clause has fallen off the budgetless lists.
- Dark Petition - An expensive tutor CMC-wise, but definitely one of the more powerful tutors you can include. If you resolve a Petition, you're usually winning and fast, as it allows you to go off with the mana you have right after if you have Spell Mastery online. Due to Gitrog's more creature-oriented card suite and the almost optimal flexibility provided by the deck's way cheaper creature tutors as a consequence, Dark Petition sees more play in budget lists that might miss something like an Imperial Seal.
Stax/Hate
- Null Rod - Our deck runs very few artifacts, which makes this card a great addition to combat faster, artifact-based decks. Also good in against every deck without green in it, as they'll be reliant on artifact ramp most often.
- Collector Ouphe - A Null Rod effect stapled onto a 2CMC creature is also a card this deck can run (almost) without remorse, and unlike Rod, it can be tutored with all of our creature tutors! Highly recommend this as a card to slow down artifact decks, even if you choose to skip on Rod itself.
- Grafdigger's Cage - One of the more contemporary hate cards Gitrog often has to run if going up against Protean Hulk decks. If your meta sees a lot of Hulk decks, don't be reluctant in running it. Turns off Green Sun's Zenith/Finale of Devastation and other similar on-the-field creature tutors, as well as Necromancy if you run it, so be wary when trying to go off with those cards.
- Leyline of the Void - With the rise of Protean Hulk decks, this warranted an inclusion in some lists. Not many things can interact with Hulk, but this card does it and does it well, as well as with many other graveyard-oriented decks and archetypes. Godlike on turn 0, but hard to cast later on in case you draw it.
Utility
- Crucible of Worlds - This one gets thrown in and out now that Ramunap Excavator has been printed, but currently land recursion has become increasingly relevant for longer, stax-heavy games when you're trying to out-value your opposition. Cut this with Azusa if you don't want to go for the late game Strip Mine route.
- Phyrexian Tower - A land combined with a sac outlet and a bit of ramp. Currently here to sacrifice Gitrog in response to Gilded Drakes and similar creature theft if we don't have removal already in hand. Good ramp for the turns when you're going off in other situations.
- Winding Canyons - A reserved list card, but still relatively cheap in the secondary market and therefore useful in some budget builds when trying to go off in instant speed or when trying to find gaps in the blue opponents' defenses. Emergence Zone has supplanted its usefulness by a wide margin these days, however.
The Double Titan/Blitz Package
- Tainted Pact - A "forbidden" tutor that's played as part of the "double Eldrazi titan" package introduced by Noobzaurs's deck:Gitrog Blitz. As your combo pieces aside from Dakmor Salvage are redundant when you run both of the Eldrazi titan shufflers Ulamog and Kozilek, you get to use Pact as a way to tutor for Dakmor with fewer chances of exiling too many business cards. Don't run multiple basic lands of the same name with this in the list!
- Plunge into Darkness - like Tainted Pact, a "forbidden" tutor played in deck:Gitrog Blitz's "double titan" package. The creature sacrificing mode is rarely, if ever, relevant, but it's a nice bonus to have nevertheless.
- Ulamog, the Infinite Gyre - I discussed Ulamog's uses in the Combo section already, but reincluded it here as a reminder due to its primary function in the Blitz package as a redundancy piece.
For more extensive info on Double Titan shells, see forgottenkane's The Gitfrog and the attached primer.
Chains is a very popular Gitrog card, which is why it might be the most blatant exclusion I have. The reasons here are two-fold. First, while it allows us to "combo off" by using it, it is quite bad in our land-sacrifice oriented gameplan with Gitrog whenever we are not going off as we're not able to get more land drops without discarding the rest of our hand. Second, Gitrog already gives us a ton of cards to break card parity with our opponents, and instead of forcing everyone to stop increasing their hand-sizes altogether we might as well draw a ton of cards and combo off. Chains has some applications with dredge and can be run in stax-heavy builds, but with fewer dredge cards being run in our combo build than before, Chains has ultimately been cut as well. I'm not covering any Chains lines in my primer, but it's something you can find in one of razzliox's primers that I linked to in the first chapter.
A card I initially thought to be a must-include but ended up being horrifyingly bad for my personal playstyle. Survival is primarily a functional 1-card tutor for the whole combo, assuming you have a creature in hand. The line goes: discard a creature > tutor Golgari Grave-Troll > discard Grave-Troll > tutor discard outlet > cast discard outlet > start dredging Grave-Troll to mill into Dakmor > win. However, as the card can by its lonesome search for the whole combo with an average efficiency of 70% (sometimes you whiff when dredging Grave-Troll), it paints a huge target on your back when you stick it. This essentially means that you want to hold on to it until the turn you're going off, and at that point, you require plenty of green mana and a creature card in hand to pitch to Survival. I found the case where all of the stars align for that to happen to be quite rare in how I play the deck, which is why I haven't included it in my list at the moment. Still, a very good one-card way to reach a game-winning state with, and definitely play-worthy in almost any Gitrog combo list.
While Lich thematically looks like something that should be shoehorned into Gitrog due to its ability to chain off draw triggers and dig deep into the deck to find Dakmor, its 5CMC cost brings a conflict of interest on turns you want to cast it, as Gitrog herself is being cast on the same turn as well. Other cards at 5CMC like Skirge Familiar and Ad Nauseam are run-worthy as they have a big potential to generate mana as well, which makes casting The Gitrog Monster more plausible on the turn you play them. You can circumvent the mana cost by using Reanimation effects and bringing Lich in as part of a reanimation package, that could also include cards like Doom Whisperer and Razaketh, the Foulblooded as reanimation targets. At the end of the day however, this list keeps things simpler by not including a whole package for Lich, but the package can be a powerful addition in Gitrog. On an additional note, using Lich as a functional Dakmor copy isn't "deterministic" in the same sense that Dakmor + a discard outlet is, so I will not be using it for that purpose in any way until a deterministic line is devised.
While it has been often discussed in the past couple of months (and tested for several dozens of games), Doomsday fails to do here what it does best in decks with blue. The card needs you to include cheap cantrips in your deck that can draw the first card your 5-card library (aka "opens your Doomsday pile"), and without blue, our primary card to do this is Gitrog herself. The problem here is that when we have Gitrog and a way to sacrifice/discard a land on the field, we might as well just tutor for Dakmor Salvage to win the game. For this reason Doomsday is essentially a situational, high-risk and relatively expensive tutor in our list, despite its great success in blue storm decks like Jeleva and Zur.
A great card for self-milling due to our small density of basic lands. However, with shufflers in our deck this kind of powerful self-mill property becomes incredibly marginal, often just milling into a Kozilek and drawing/dredging us a card if we hit one of those and have Gitrog on the field. Useful for tutoring dredge cards, but otherwise not really that useful in our deck.
Imp was a bigger card when we were running more of a self-mill oriented gameplan. After cutting Hermit Druid the card's relevance became less important, and because it has pretty much no applications aside dredge other than being a flying blocker for a general like Zur or Jeleva it was ultimately cut. It can still be run if you like to increase the deck's dredge density, and it actually should be the first card to be slotted in for that purpose.
A godly ramp-card in your opener when the rest of it is filled with lands, but other than that it has little other uses and has been underwhelming overall in the games I've played it. The lack of application was what ultimately justified the cut for me.
While competitive Gitrog stax decks are not that common, stax cards can be used in certain metagames to tip the balance of power in your favor. Here are some enclosed stax cards (save for Chains of Mephistopheles that's discussed above) in Gitrog decks that I've seen people run as well as some additional includes that I think are good for an all-in stax version of the deck.
- Desolation - A favorite hate piece in Gitrog decks who like to take it slow, as you'll be able to break parity with this on most occasions.
- Oppression - Something that is less used than Desolation, but still useful for us to break parity as Gitrog draws us cards even from discarded lands.
- Planar Void - Contrary to popular belief, Gitrog can win through a grave-exiling effect… as long as it's a triggered ability. Planar Void's exiling effect is a triggered one, so you can shuffle up your grave in response to all of your grave-exiling effects, assuming you stack the triggers correctly.
- Death Cloud/Pox (and co.) - If I ever made a Gitrog deck dedicated to stax, these are the cards where I'd probably start from. With all the land recursion we have in the deck, breaking parity should be relatively easy after resolving one of these.
Competitive EDH decks are relatively expensive when getting to the fine-tuning part, and not everyone is made of money. Budget builds are therefore an incredibly important gateway to the format, and fortunately, Gitrog has several ways you can build her with a budget.
First of all, if you'd like a very budget-friendly list, you can find the McCRex's $50 Gitrog Monster list that won SpikeFeeders' r/BudgetBrews brewing contest in late 2018 below. The decklist does include slightly different lines from regular Gitrog lists due to the budgetary restriction but works very similarly to the real thing.
$50 Gitrog Dredge by McCrex
Starting from the $200 mark and going up to the $500-$1000 range and all the way to fully unbudgeted Gitrog, the most up-to-date budget lists come from the cEDH Gitrog veteran forgottenkane. Each decklist below also includes a guide on how to upgrade the list to its next "budgetary phase", if you will.
He's Just a Frog on a Budget - $500 (2018)
And finally, you can find several budget iterations of Gitrog below, courtesy of LabManiac_Dan and his Budget cEDH Decks series from 2017. They are the most outdated budget lists for Gitrog these days, but they could give you an idea or two on how to build your list from the ground up.
With that out of the way, next I'm listing out the most expensive cards (by category, but in an approximated order of priority as well) in our deck that can cut your expenses a lot and can also work as a "laundry list" for you if you eventually want to include them. They are a bit old-fashioned compared to Kiebz's laundry list that can be found in the link above, but they still mostly resonate with my thoughts on how important (or unimportant) they are to the deck these days.
Combo
- Kozilek, Butcher of Truth - Now with the hard truth: despite the final budget list's exclusion of an Eldrazi shuffler above, this deck practically always needs one Eldrazi shuffler to function properly. The combo lines that go off using Gaea's Blessing, while more budget, are nightmarishly hard and complicated to explain and pull off, and therefore doesn't make for a nice introductory lesson for new Gitrog players. Therefore, replace Kozilek with Ulamog, the Infinite Gyre if looking to save bucks, but whatever you do, don't leave home without an Eldrazi titan in your Gitrog list.
Rocks
- Mana Crypt - The most powerful form of mana ramp in EDH, and in our combo build it is a relatively wanted card despite its high price. Consider getting this when you can to increase your deck's speed by a ton, as it often is a primary tutor target in our early game. Can be replaced with a mana dork provided in the Single Card Discussion section, or some other ramp piece.
- Grim Monolith - Another mana-positive rock that allows us to get Gitrog on the field by turn 3. Very useful like Mana Crypt, but not compulsory overall. With Gitrog's high land-centric nature, depletion lands like Hickory Woodlot, Peat Bog or even Ebon Stronghold can be useful replacements that also help you ramp to Gitrog, as well as cheap mana dorks you don't already run.
- Mox Diamond/ Chrome Mox - Relatively important cards despite their high $$$ cost, but can be replaced by mana creatures a depletion lands like above.
- Lion's Eye Diamond - Out of the busted mana ramp, this is one of the cards that can be cut more easily due to its high price and lower amount of application than with the ramp rocks above. Be sure to run Lotus Petal in case you're removing this so you still have a rock-based infinite mana outlet that works in the Dakmor combo.
Also, if you're cutting most of your mana rocks and have a Null Rod handy for some reason, that might be a good card to slot in as you'll be pretty much immune to it.
Lands
- The Fetchlands - As described in earlier sections, your deck is going to love these guys when you can include them due to their ridiculous synergy with Gitrog. Getting initially at least a few of the cheaper ones (from Khans of Tarkir) is advisable. Get the Zendikar fetches later on when your budget allows you to get them. Don't cut them for utility lands, but lands that come in untapped and tap for a color. Basics are fine replacements on that note!
- Cavern of Souls - We want to have Gitrog in our field, and that means resolving it through counterspells. This is why Cavern is our top priority in terms of lands, so I recommend getting it relatively early when you start upgrading your deck. Fills a utility land slot, so replace it with one or (with a basic) when going the budget route. In the nonland slots you can run more protection like Dosan the Falling Leaf if you want to cover your combo turn more consistently.
- Bazaar of Baghdad - From the lands that we run, this is the most difficult card to evaluate as it does a lot for us while we're not going off but has no budget replacement and fetches a stupidly high price. The deck can however combo off without it just fine, and therefore it can be easily cut in favor of some other value card (Grim Flayer) or one of the many interaction pieces in budget builds.
- Bayou - A relatively good card in that it increases our deck's consistency a little, but its high price tag justifies an easy cut for a basic land in budget lists.
- Gaea's Cradle - While it is a land that ramps us, it is definitely not compulsory to the deck due to our lower-than-average creature count (unlike with elfball/Prossh decks). Replace with a basic land or a depletion land of your choice.
- City of Traitors - Same as Gaea's Cradle: land-based ramp but not compulsory for the deck to run. Can be replaced with a utility land of your choice, or just a basic land if you feel like it.
Miscellaneous
- Imperial Seal - Something that I off-handedly added to the deck because I had it and it is pretty versatile despite being a slow Vampiric Tutor. I'd advise replacing it with something like Expedition Map which is a pretty decent tutor in our land-based deck, or Dark Petition when looking for a more universal tutor.
- Dark Confidant - Another card that's pretty expensive but can be cut easily when going budget. A cheap dredge card like Stinkweed Imp is probably a good replacement, a discard outlet creature being a good alternative as well.
Here's a few competitive Gitrog lists that I'd personally refer to in case you're looking for different perspectives, card choices and/or strategies revolving on Gitrog combo. All come from relatively experienced Gitrog pilots, so every single one has my blessings:
- kiebitzen's Just Froggin' Around - The Gitrog Monster Primer
- Noobzaurs's Competitive Gitrog EDH
- Noobzaurs's deck:Gitrog Blitz (Double Titan variant)
- forgottenkane's The Gitfrog (Double Titan variant)
- forgottenkane's The Resilient Frog
- Nakhla's Amplexus Nauseam
- razzliox's Getgood Monster Dredge
When all is said and done, Gitrog combo has withstood the test of time and has quickly become one of the top predators of unwary competitive EDH pods. While the list has many cards that could be considered must-haves, there still are many underlying card choices between interaction, value engines and utility cards that are shaped by your local metagame. These cards can even come with a whole new play-line, strategy or technique that you then have to train yourself to execute, which in conjunction with the deck's stupidly complicated combo lines has granted a great amount of depth to the piloting experience. Overall the deck has been demanding but incredibly rewarding as well, which is why it's my favorite EDH deck of all time.
I also won a decently sized tournament with it, so I guess that's a thing. :^)
Special thanks in helping me with this primer go to:
- LabManiac_Dan for initially pushing me to make the whole thing.
- LabManiac_Sigi for the general primer structure and for helping with the grammar.
- Carvuscus for cleaning up the primer layout and giving design ideas.
- kiebitzen & Noobzaurs, by far the longest standing Gitrog pioneers and pilots. The former's primer helped me a lot in making this one, while 'Zaurs has been one of the more influential people in fine-tuning the list during current times.
- Brassmoose & Nakhla (AKA Sugandaraja) for being great Gitrog players during the days of the card's reveal, and for giving me a lot of feedback.
- ShaperSavant & JimWolfie for generally being very involved with Gitrog's evolution in the cEDH community ever since she was printed.
- reversemermaid for helping me playtest the deck and for being an unquenchable source of Gitrog-related rules knowledge (even though he doesn't even play the deck, lol).
- razzliox for being the cEDH and Gitrog forefather that brought her to the community's spotlight and inspired me to start playing cEDH in the first place.
- Everyone else from the cEDH/PlayEDH Reddit & Discord communities that I forgot to mention, you guys rock!
Last but not least, thank you for reading this primer. If you ever decide to walk the path of the Gitrog, may your croaks, dredges and draw triggers be ever so plentiful.
"Draw trigger on the stack"
If you are interested in joining the Discord server being run by several frog savants (including yours truly), consider joining us by clicking on the link below. I'll try my best to answer any questions through that medium as well if there are some uncertainties that this primer didn't cover. Catch you there!
Discord Channel
Primers
forgottenkane's Gitrog Primers - Double Titan & Gaea's Blessing (traditional)
Kiebitzen's Just Froggin' Around - The Gitrog Monster Primer
Razzliox's MTGSalvation Primer (2016)
Reddit Articles
MazeTemporal's Proof of Determinacy for The Gitrog Monster Combo
MazeTemporal's Proof of Determinacy, Addendum 1: Gaea's Blessing
MazeTemporal's Gitrog Monster Cleanup Step Sculpt: Analysis of Failure States
Noobzaurs' Gitrog Monster Titanless Combo in 60 Easy Steps
MaynardFerguson's Loopholes in the Cleanup Step - A Niche Rules Interaction
Podcasts
Into the North Podcast - Special Episode: The Gitrog Monster
Extra Attachments
Leptys' Primer - Google Docs Version (Outdated)
100 Goldfishes by Leptys (late 2017)
10/30/2020:
Cuts
Adds
Commander Legends additions. Long story short, both Lotus and Agent are pretty easy includes for almost every list with black in its identity. Lotus aids a lot in getting the more expensive generals on the field, and Gitrog is no exception. Except more turn 2 wins from now on, something frog formerly struggled with by relying on LED.
Also, with the presence of Opposition Agents on other sides of the table, forbidden tutors and raw draw power from Gitrog is going to break parity somewhat which might give the deck extra leeway in the coming cEDH landscape. Agent might not be in every list out there (doesn't have the best synergy for proactive lists, no matter how backbreaking it is), but it is something to consider. You still have to outrace Dockside Extortionist decks and Agents can welp you hard by getting rid of your Dakmor, but I think the overall situation is favoring the frog right now.
All in all, a short update. Spicier includes are left on stand-by for now.
7/24/2020:
Cuts
- Grafdigger's Cage
- Wall of Roots
- Riftsweeper
- Exploration
- Gaea's Blessing
- Duress
- Sylvan Scrying
- Toxic Deluge
- Force of Vigor
- Cabal Pit
- 2 Forests
- 2 Swamps
Adds
- Lion's Eye Diamond
- Joraga Treespeaker
- Wild Mongrel
- Allosaurus Shepherd
- Skirge Familiar
- Ulamog, the Infinite Gyre
- Survival of the Fittest
- Inquisition of Kozilek
- Tainted Pact
- Plunge into Darkness
- Urborg, Tomb of Yawgmoth
- Crystal Vein
- Snow-Covered Swamp
- Snow-Covered Forest
A personal decklist update to keep up with the newest printed Gitrog includes, the ban of Flash, as well as the fine tuning Gitrog community has done during the past year. Although I haven't been playing frog for a long while in real games, the current list is a depiction of how I'd be playing Gitrog to an unknown meta in accord with how I've found my goldfishes to be with the fast-paced Ad Nauseam-meta crunching down on available turns. The list is basically the Community's Primer list with a few personal twists.
Long story short, the Double Titan package, AKA "Gitrog Blitz" is finally included. Double Titan has been the de-facto way to run Gitrog for years now, and as one of the more well-known lists it was due time for this page to keep up with that adjustment. Ad Nauseam turns get worse due to running both Eldrazi titans, and consequently "critical mass" wins are less common. However, Gitrog does naturally draw into most of its combo pieces anyway due to the sheer robustness of its engine, which is why the few extra tutors you get makes it all the more worth it.
Among other news, with Flash being banned I took out Grafdigger's Cage. I also took out some interaction pieces for more mana to match the community list, as well as protection, mainly the new Allosaurus Shepherd from Jumpstart.
Skirge Familiar is back in as a personal pick, so is Praetor's Grasp. Replace both with Chains of Mephistopheles and Mausoleum Secrets respectively to make it more like the community list.
6/29/2019:
Cuts
Adds
Another set release, another mainstay for Gitrog. This time the biggest spoiled card is our long-awaited green Silence number 2: Veil of Summer. Along with Autumn's Veil, both of these allow for consistent, interaction-free combo turns, protection for our creatures and outlets, and in the case of Summer, also incidental card-draw. Veil will most definitely see play in Gitrog for a long time going forward unless they keep printing more of these effects that surpass its power level as a protection card, which I doubt. The new Veil comes in to replace Caterpillar, which is a pretty usual flex card for the deck, and only a small setback to our interaction potential.
With the release of Core 2020, the mulligan rules are also changing to the much more forgiving London mulligan. London mulligans warrant at least one land cut for the time being, and while a utility land, Command Beacon will be getting the axe right now. Ramping into subsequent Gitrogs after being removed or countered isn't the easiest task at times, but it's something this deck is known for, which is why I'm willing to have a go without it for a while. With the land cut, we can add more turn 1 ramp by reincluding Elvish Mystic to the list.
Now to the cut which probably causes most of the Gitrog vets out there to rejoice and/or sigh in relief: Skirge Familiar. Skirge is a card that warranted inclusion in the list for a long time due to its unique position as a discard outlet, mainly due to its ridiculous mana production potential. Despite its cost, the deck can achieve pretty disgusting hand sizes even without and Ad Nauseam, which makes sticking it a practical win when you start discarding lands to draw into more cards, something I compared to a black Future Sight when you had Gitrog on the field. With Ad Nauseam it was even more ridiculous, pretty much winning the game instantly with the amount of mana you had access to. Finally, it also allowed the deck to win without Dakmor by producing tons of mana for a "storm turn", something that was often the only win option to go for in our Praetor's Grasp -heavy metagame (despite Gitrog/outlet beats, of course). The spoiling of the "green Exsanguinate", aka Finale of Devastation now covers for Dakmorless wins quite well, however, and therefore Skirge finally gets cut as an engine remnant of the Gitrog lists of old. Most forerunners of Gitrog Dredge have cut it for other utility long ago already, so I'll be following in that suit in a sense.
The replacement to Skirge will be another sigh of relief for Gitrog vets, as it's the often discussed Hulk hate piece Grafdigger's Cage. Our paper meta has enjoyed the inclusion of a couple of Hulk decks now, so including it has (finally) become timely. For anyone who hasn't played Cage in the past, be sure to not play Green Sun's Zenith nor Finale of Devastation into it (unless in the case of the latter spell, you're trying to pump your creatures)!
Finally, time for the include I'm definitely the most excited about: Null Rod. We're going double Rod with Ouphe, baby! Prepare your rocks and socks, nongreen players! Pernicious Deed gets cut so our Null Rod effects can hold their ground in the board with Cage, and also due to Deed feeding Mnemonic Betrayal players too much mana rocks in the late game. Deed might get included in the future again, but for now, I'll try to adjust to a gameplan that aims for a hate-heavy board position. We'll see how that fares, so stay tuned!
6/4/2019:
Cuts
Adds
Just when we got to thrive from a couple of new staple cards from WAR, we get bombarded with Modern Horizons, a set that Gitrog decks enjoy several new mainstays from. The most obvious, as well as some of the more powerful additions to our list from the set are the two new self-sacrificing lands Nurturing Peatland and Prismatic Vista. While Peatland might seem somewhat unnecessary in a list where almost every land already is a Horizon Canopy or better, its power to grant us multiple cards while also tapping for both of our colors is a welcome addition. However, the true star of the set here is Prismatic Vista, a whole new fetchland that fetches basics, which in our deck is a very negligible drawback when you can draw a card from a land drop. The two least impactful utility lands Strip Mine and Petrified Field get the axe in the light of the new lands getting added, the former from being relatively useless in today's competitive games unless people like to play Boseiju, Who Shelters All a bit too much, while the latter is less useful these days without Realms Uncharted, where Field was one of the main tutor targets.
As Prismatic Vista hops in, the list calls for a bit of increase in basic lands, something I've been advised on more than once in the past to go through with. The cuts of Crystal Vein and Blooming Marsh are relatively debatable lands to cut for the basics, but neither were instrumental in the lists consistency while I'm still often benefiting from the flexibility the rest of the included utility lands (like Homeward Path, Command Beacon etc.) allow.
In addition to the lands, we also have two powerful nonland inclusions from the set: Force of Vigor and Collector Ouphe. Most Gitrog pilots in the online community know my love for Null Rod in pretty much any BG-heavy list, Gitrog not being an exception to this rule. When Null Rod gets printed to a creature however, a green creature at that, the whole deck becomes a Null Rod tutoring grind machine. Ouphe allows the list to switch gears to a midrange gameplan much more consistently than before due to the high amount of creature tutors we have access to, which makes it a very consistent threat to rock-heavy lists in any table. Cutting LED for Ouphe is a pretty conventional switch I did with Rod in the past, so nothing new there.
Force of Vigor gets in as the second midrange-ish addition, as Gitrog decks love to interact in unexpected ways to turn the tide in their favor, and free spells do that marvelously (looking at you, Noxious Revival!). As Gitrog can win at instant speed, a free "get-rid-of-Leyline-plus-Cursed-Totem" will also find lots of uses as an offensive tool when trying to go off. Beast Within is finally getting cut as the premier permanent destruction spell due to Assassin's Trophy filling the same niche without too significant drawbacks (the basic land is pretty negligible I found), as well as due to the amount of other instant-speed ways the deck can win these days via Emergence Zone.
Also, after testing out with the copious amounts of creature tutors in the list, I realized that I find myself needing Cavern of Souls much more often than usual. That's why I'll be reincluding Sylvan Scrying in place of Sylvan Tutor, also to complement the remaining utility land package I still find very useful. I also tend to play in a meta that loves to screw with topdeck tutors (Jeleva, Circu etc.), which is why Sylvan Tutor isn't as effective in the playgroups I play in.
5/13/2019:
Cuts
Adds
War of the Spark is upon us, and it's time to bring the list up to speed. With the advent of Emergence Zone, a lot of our instant-speed win lines have become relatively trivial to execute. No matter the card, after using Crop Rotation to land Zone, then cracking it for 1 generic mana, you can play all of your mana rocks, generate infinite mana of any color with a sorcery-speed mana generator (Lotus Petal, Lion's Eye Diamond), or just skip the colors and loop Praetor's Grasp/ any other sorcery outlet for an instant-speed win by using conventional KoziLand loops. The deck also retains its ability to go off at instant speed via Crop Rotating into a land that produces multiple green repeatedly, in case Zone is out of reach due to exile or other reasons. The common pathways to victory after that are by looping a permanent destruction instant like Beast Within or Assassin's Trophy, then winning with creature token beats or pumped discard outlet creatures in the following turn.
As Emergence Zone takes up a colorless land slot, the deck starts to become crowded with colorless lands, so cutting some other utility land is in order. The cycling lands come out to give room for Zone, but also for Crystal Vein, a strong piece of ramp for earlier Gitrogs casts that also sacrifices itself for card-draw in case you already have her on board.
Finally, Savage Summoning gets the axe due to its "flash function" being fulfilled by Zone already. The open slot allows for more War of the Spark testing in the form of Finale of Devastation. The green Finale shows a lot of promise as a Putrid Imp tutor/reanimation, but it also happens to be a sorcery-speed win outlet as a bonus, which isn't the worst thing for a tutor.
As far as other WAR newcomers go, Bolas's Citadel and Blast Zone might show up in later iterations of the list if a combo package or their general utility end up being impactful enough.
1/31/2019:
Cuts
Adds
A huge, long overdue update this time around, mainly due to brewing and trying out other decks at the moment. My apologies for the delay on that note.
Humble notions aside, this time the changes are mainly about coming around on the most contemporary Gitrog preferences for interaction. Due to the printing of Assassin's Trophy, my list can cut more of the specific hate directed at Leyline of the Void and Linvala, Keeper of Silence, those being Deglamer and Dismember respectively.
After cutting the two cards above, I went ahead and also cut Null Rod to reinclude the 1CMC discard package in the form of Thoughtseize and Duress. While my experiences with them in Gitrog have been mediocre personally in my meta that's full of blue decks, having the power to strip faster players off their combo pieces is a surprisingly powerful way to interact, especially when you can use the revealed information to direct even more interaction against the players you target. This goes doubly so as we can't have counterspells of our own in Golgari colors, making the hand hate an essential form of interaction against decks that try to race us like Ad Nauseam or Protean Hulk decks.
Pernicious Deed comes in to replace Seeds of Innocence, as the card slot's main purpose was to get rid of opposing stax pieces anyway. While Seeds is a powerful tempo play at times, it doesn't do this redundantly enough to be worth running for this reason. Deed also is great when the game gets grindy, and allows you to keep Gitrog on the board despite wiping everything else. I'll be looking forward to embracing the wipe potential this card has in the current metagame for sure.
Finally, the land tutors I ran in the deck to fetch Dakmor Salvage, AKA Realms Uncharted and Sylvan Scrying, are replaced by the creature tutors Summoner's Pact and Sylvan Tutor. Like the former two, both can also get Dakmor by searching for Golgari Grave-Troll and going for the Dredge Tutor line explained in the "Combo" accordion of the primer. They also get discard outlets and powerhouses like Sylvan Safekeeper, making them in general more useful than the land tutors, and are cheaper to boot.
As far as future cuts and adds are concerned, I might drop Beast Within for additional discard effects, and possibly replace Kozilek, Butcher of Truth with Ulamog, the Infinite Gyre to loop permanent destruction in tandem with using it as a shuffler. Another option would be to include an instant-speed black outlet like Geth's Verdict or Ebony Charm, but being comfortable with that still requires some mental paradigm shifts on my end. I will probably not include Hulk-specific hate pieces like Grafdigger's Cage too soon, but I've grown fond of Extirpate as a card that can deal with anything grave-based that doesn't utilize Grand Abolisher.
9/8/2018:
Cuts
Adds
A slight alternation to my recent update, which compared to a lot of the pros and cons of newer Gitrog combo lists as well as my own. In the former update I said the following:
- "Savage Summoning, while way more powerful by its lonesome and way cheaper mana-wise when compared to Necromancy, it requires you to go for riskier lines when creating infinite green at instant speed (hitting a ton of draw triggers on the stack and and sacrificing Gitrog before you can start casting Crop Rotation to find a Gaea's Cradle or a Twilight Mire, otherwise Gitrog's draw triggers get in the way of Crop Rotation loops)"
However, after being consulted by Noobzaurs on the matter, turns out this was not the case, and that you can produce infinite green by looping Crop Rotation and one of the aforementioned lands with the following line after drawing your deck and achieving infinite black mana.
First, if you don't have Twilight Mire or a Gaea's Cradle in the field yet:
- Discard a land, then Kozilek in response to the draw trigger and shuffle it to your empty library.
- With the draw trigger still on the stack, discard and dredge Dakmor Salvage. Resolve the shuffle from Kozilek before the new draw trigger resolves (aka conduct the "Koziland" technique). Repeat this 4 times for a total of 6 draw triggers on the stack.
- Resolve 2 out of the 6 draw triggers to draw your 2-card-library.
- With 4 triggers still on the stack, discard and shuffle Kozilek and a nonland card into your library.
- Cast Crop Rotation to sacrifice a land you control, putting a new draw trigger on top of the spell.
- Discard Gaea's Cradle/Twilight Mire in response to put another draw trigger on the stack.
- Resolve the 2 triggers on top of Rotation to draw Kozilek and the nonland card you shuffled in.
- Discard Kozilek again to shuffle itself, Cradle/Mire and the land you sacrificed into your library.
- Resolve Crop Rotation, fetching Gaea's Cradle/Twilight Mire to the battlefield.
- Resolve 2 of the remaining 4 draw triggers to draw the land card you sacrificed to Rotation, as well as Kozilek.
- Discard Kozilek again to shuffle Rotation and itself back in.
- Resolve the final 2 draw triggers to draw back both Rotation and Kozilek.
Then, to create infinite green mana:
- Tap Cradle/Mire for 2+ green mana.
- Discard a land and then Kozilek in response to shuffle the two in just like above.
- Discard and dredge Dakmor with the Koziland technique for a total of 5 draw triggers on the stack.
- Resolve 2 of the 5 triggers to draw Kozilek and the land card.
- Discard Kozilek and shuffle it back in.
- Cast Crop Rotation, sacrificing Cradle/Mire.
- Resolve the draw trigger from sacrificing a land to draw Kozilek back.
- Discard Kozilek again to shuffle Cradle/Mire in.
- Resolve Crop Rotation, fetching Cradle/Mire back untapped.
- Resolve 1 of the 3 remaining draw triggers to draw Kozilek.
- Discard Kozilek again to shuffle it and Rotation back in.
- Resolve the final 2 draw triggers to draw Rotation and Kozilek.
- Repeat steps 1-12 for infinite green.
NOTE THAT YOU CAN'T PERFORM THE LINE(S) WITHOUT HAVING ACCESS TO A SINGLE SOURCE WITH GREEN TO CAST YOUR FIRST CROP ROTATION!
All credit for the line above goes to Noobzaurs.
So, now that I know of a deterministic, shortcuttable line to get infinite green without resorting to the Elvish Spirit Guide/Riftsweeper/Necromancy line or (doing something like putting 10 000 draw triggers on the stack and sacrificing Gitrog), I can safely cut Necromancy for Savage Summoning to land creatures at instant speed for extra applications in landing discard outlets or Gitrog while also decreasing our general mana curve. With Savage Summoning in the mix, the deck can also now enter a winning position at instant speed by:
- Looping Beast Within to destroy all of your opponents' permanents.
- Looping Dismember to kill all Beast tokens resulting from Beast Within.
- Looping Noxious Revival to infinitely Fateseal your opponents with the worst cards they have in their graveyards.
- Putting all of the deck's creatures into play by looping Savage Summoning.
After all that, you can pass turn, then kill all opponents during your next turn by repeatedly attaching Oblivion Crown on one of them, pumping the creature to fatal levels, then destroying Crown and repeating the process on a different creature. After pumping your creatures, you can finally win by swinging for fatal amounts of combat damage undisrupted.
Due to the line above, the deck doesn't need Rath's Edge that much anymore, and therefore will be replaced by Homeward Path to deal with Gilded Drake decks (especially ones that keep reanimating it over and over to steal Gitrog, sheesh).
Finally, I've also done slight modifications like replacing Dryad Arbor with Forbidden Orchard and Grim Flayer with Caustic Caterpillar. Arbor will be facing the axe for now that I don't need it as a combo card for Rath's Edge and to see how I fare without it, while the flex slot filled by Flayer will be filled by more enchantment/artifact removal in the form of Caterpillar.
EDIT: Now that the list is without primary cards used in the "classic" combo (Necromancy, Dryad Arbor and Rath's Edge), the "Combo" accordion of the primer has been updated to accommodate the infinite green loops above, while also explaining the primary outlet that is used to win at instant speed in the current list (Beast Within).
8/27/2018:
Cuts
Adds
An update that was long overdue. Praetor's Grasp is back for the near-infinite flexibility it offers in almost any table, often exceeding the floor of being a functional 3CMC Mana Crypt. One of the main strengths of the card is the hidden information - not even your opponents know what you extracted unless they can immediately crack a fetch and the target is painfully obvious like Ad Nauseam. It also allows you to go off in some less conventional ways with your opponents' cards (Laboratory Maniac and Aetherflux Reservoir), which can win games even without access to Dakmor Salvage, something this deck has a lot of difficulties with when going against opposing Praetor's Grasp effects. Wall of Roots substitutes for Lotus Cobra so that I can finally test the card out due to the recommendations I've gotten, more on that below.
The lack of other changes might come off as underwhelming to the more seasoned Gitrog players out there. To be more precise, people who have been active in the Gitrog Monster Discord channel most likely know that the current veterans of the deck have adopted a new combo core with several completely new cards (major credits for the innovations go to Noobzaurs, as he's been tuning his list with the following additions for several months now, decklist here: Competitive Gitrog EDH). The most drastic switches include:
- Ulamog, the Infinite Gyre replacing Kozilek, Butcher of Truth as the shuffler and Praetor's Grasp/Collective Brutality as the main wincon outlet by looping its cast triggers to destroy all of opponents' permanents, then winning on the following turn with combat damage by pumping your deck's creatures with their activated pump abilities (Oblivion Crown/Wild Mongrel/Noose Constrictor).
- Savage Summoning replacing Necromancy for instant-speed creature casting/looping (see Ulamog above).
- Chains of Mephistopheles replacing Skirge Familiar as a cheaper discard outlet that also works as a stax piece and goes through Cursed Totem effects.
- Homeward Path replacing Rath's Edge to deal with creature theft effects like Gilded Drake, while cutting the optional instant-speed wincon card in a land slot.
- Survival of the Fittest replacing Riftsweeper to work as a functional 1-card tutor for the whole combo, assuming you have a creature in hand at the cost of resiliency to exiling effects. The line goes: discard a creature > tutor Golgari Grave-Troll > discard Grave-Troll > tutor discard outlet > cast discard outlet > start dredging Grave-Troll to mill into Dakmor > win.
- Wall of Roots replacing Lotus Cobra, allowing for a more immediate impact in mana generation even without any extra lands to drop. This was the only change that I integrated into my personal list (reasons as to why, see below).
Zaurs' deck also runs a different suite of interaction for the online metagame he's facing, which include switches like Null Rod > Grafdigger's Cage and Beast Within > Natural State. The deck also runs a suite of targeted discard effects like Duress and Thoughtseize for extra layers of interaction and proactive combo protection.
Finally, for most of the switches mentioned have been elaborated on by Noobzaurs in his decklist's description, which I linked above.
Now, there are several reasons why I haven't adopted most of the above changes, the foremost of which is my relatively conservative playstyle and card preference. Reworking the primer to accommodate the above lines is also a minor factor, but it essentially comes down to Zaurs' list's advantages not being significant enough to just abandon my current set-up. Regarding some of the most significant, card-specific changes:
- After all this time, I still dislike Chains of Mephistopheles as a parity breaker, which it usually ends up being outside of the combo unless you already have access to a dredge card.
- Savage Summoning, while way more powerful by its lonesome and way cheaper mana-wise when compared to Necromancy, it requires you to go for riskier lines when creating infinite green at instant speed (hitting a ton of draw triggers on the stack and and sacrificing Gitrog before you can start casting Crop Rotation to find a Gaea's Cradle or a Twilight Mire, otherwise Gitrog's draw triggers get in the way of Crop Rotation loops).
- Ulamog, the Infinite Gyre doesn't warrant an inclusion in my list just due to the fact that I tend to always run Beast Within for the same effect.
- Survival of the Fittest is a card I initially thought to be a must-include but ended up being horrifyingly bad for my playstyle. As the card can by its lonesome search for the whole combo with an average efficiency of 70% (sometimes you whiff when dredging Grave-Troll), it paints a huge target on your back when you stick it. This essentially means that you want to hold on to it until the turn you're going off, and at that point, you require plenty of green mana and a creature card in hand to pitch to Survival. I found the case where all of the stars align for that to happen to be quite rare, which is why I haven't included it in my list.
To summarize, Noobzaurs' list is a slightly more slot-efficient and moderately more CMC-efficient (see Ad Nauseam) version of Gitrog Combo that is the amalgamation of months of fine-tuning. The cost for the switches primarily are less resilience to exiling effects like Leyline of the Void or Rest in Peace, and the tendency to require more risky play lines (like sacrificing Gitrog with thousands of draw triggers on the stack to create infinite green with Crop Rotation). With all that on the table, the upsides overthrow the downsides by a long shot, but the benefits are not so significant that it would warrant reworking the whole list on my end.
There might come a time when I'll adopt the changes Zaurs and other Gitrog veterans in the Discord have made, but for the time being, the modifications I've done are quite minimal. Sorry for postponing the update of my list, and hopefully my explanation above has cleared the air somewhat on why I've kept the deck as-is. Cheers, and stay tuned!
3/1/2018:
Cuts
Adds
LED is once again back in the menu after a long hiatus. Despite the marginal feel-bads we get from playing more mana rocks with Null Rod already in the list, a situational Black Lotus is still... well, a situational Black Lotus. One of the only cards that allow us to win as early as turn 2 by rushing into Gitrog and a discard outlet on the field by turn 1, and also allows us to get extra mana whenever we tutor for something. It's a one-shot discard outlet on the side, which actually becomes quite beneficial for us at times.
As LED slides back in, Leyline of the Void and Faerie Macabre are consequently cut from the official list. Both were filling flex slots to fight graveyard-oriented metagames that I have not been in much contact with, so they will be taking the back seat until the metagame springs back with more Breakfast Hulk and something like Razaketh Reanimator. More often than not, however, we're in a very bad position against them unless we sacrifice our own gameplan to stop them by aggressively mulliganing to our hate cards, which also is synonymous with a loss. Time will tell if I'll re-add them, but for now, Noxious Revival, Necromancy and Gaea's Blessing cover the graveyard hate suite.
Grim Flayer is a relatively new addition and in testing right now. Extra card selection engines that require minimal mana investment are never a bad thing, and in a combo-oriented metagame, creature removal is less apparent which in turn makes Flayer a valid candidate for the list. Will be trying him out in at least several games from now on, mainly to see how resilient the card is in competitive tables.
1/14/2018:
Cuts
Adds
Increasing the deck's removal suite while also trying out a different wincon instead of Praetor's Grasp. As creature decks with Tymna in the helm are pretty much the standard these days, having more creature removal makes sense, and cutting a situational ramp creature in this removal-heavy meta is what I'm going to do for the time being. In addition, removing Gitrog from the opposite side of the table will now be easier when combining different removal spells in the deck, as all of them have -X/-X effects in them.
11/23/2017:
Cuts
Adds
A small revision taking out Azusa as she has been doing next to nothing in my gameplans except when really desperate (trying to assemble the Strip Mine/Ramunap Excavator lock), which is why she is taking the bench for now. Same goes for Tabernacle; while the card does hurt creature decks a bit in the early game, it often doesn't do enough to hinder the opponent's gameplan unless they are an elfball combo deck or play Food Chain, but even then it's a temporary solution. Finally, Polluted Mire got removed because I realized that Blasted Landscape enters the battlefield untapped. I honestly feel like an idiot for not noticing that, but the problem is now fixed.
11/3/2017:
Cuts
Adds
So. I found out during my 100 goldfishes that the deck can win with an Ad Nauseam pretty consistently on turn 3 with our former card setup, so here I try putting back the "hate for decks faster than us" package with the intention of keeping the average CMC of the deck below 2, while also doing some minor cuts and adds in the form of Elvish Mystic for Arbor Elf (testing the consistency of landing it with Wild Growth) as well as Wild Mongrel for Noose Constrictor (a more relevant blocker against flying donger beats from Tymna the Weaver lists).
Speaking of which, in the recent light of Tymna becoming a metagame predator and the main symptom of inadequate threat assessment, I've decided to start testing (a proxied) The Tabernacle at Pendrell Vale to see how well it fares in Tymna -infested metagames that are running rampant both online and offline.
10/22/2017:
Cuts
Adds
After playing with it for a decent testing period I finally cut the stax/hate package. While both Null Rod and Leyline were and are great additions to the deck (Null Rod especially does some serious work), in the end, they weren't compulsory to the deck's primary game plan, which is to combo off as quickly as possible. Leyline was there mainly to combat Breakfast Hulk which can win faster than we can, but for those matches, the payoff really isn't worth wasting a deck slot for. I still want to keep Faerie Macabre in there for now though, as it can certainly have more application outside of getting an extra turn or two against faster grave-based strategies. Crucible of Worlds is also a great card and an awesome topdeck in a grindy game, but since we already have an arguably better Crucible effect with Ramunap Excavator I decided to cut it too, at least until I decide I don't need Macabre anymore.
As far as adds are concerned, the fast combo cards that have been sitting on the bench make a comeback. As many of us frog players already know, Lotus Cobra is a house in this deck: it works as a great mana accelerator in the early turns, a way to get back on your feet in a staxier game, as well as fast mana after we draw Exploration effects from Ad Nauseam. Lion's Eye Diamond, while less useful overall as mana ramp, does find often use by forcing a turn 2 Gitrog and is one of the main factors in our early game wins because of that. Finally, Diabolic Intent is a universal tutor for 2 mana, and sacrificing a creature in a deck with dorks is very marginal, so in short, it is pretty darn good. All in all basic stuff, but the each of the three adds is very powerful and they work extremely well towards the deck's combo plan while having use outside of that too, which is key.
In addition to the cuts/adds I've included a Google Sheet with records of 100 goldfishes, done with the most up-to-date version of the list. Check it out in the "Attachments" panel if you haven't already!
10/6/2017:
Cuts
Adds
A small revision to reinclude our dredge card suite, as they undoubtedly are super powerful value engines with Gitrog. So far the Protean Hulk hate package has worked well, but having more than 2 pieces of grave hate, although almost universally useful, dilutes the deck too much from its combo/value gameplan. This is why I cut Scavenging Ooze and kept Faerie Macabre and Leyline of the Void in for now. When it comes to Diabolic Intent I've run it for a while with great results, but because it fills a flex slot right now I swapped it out for the time being.
9/4/2017:
Cuts
Adds
A drastic update, which is primarily oriented to fight the Hulk/Razaketh menace while simultaneously getting rid of some utility cards that I might or might not miss. Leyline is often a must against Breakfast Hulk decks, as they usually win after resolving Flash (and after that we can't interact with them due to Grand Abolisher). Faerie Macabre is here to help with that cause as well, along with Scavenging Ooze which in turn is the easiest to tutor for.
Wild Growth is a bit more resilient dork, and while it's sort of a nonbo to remove Arbor Elf while we add Growth, it's still our "worst" dork in the deck as of now. Null Rod is also back to help with faster artifact-based decks and also to slow down every non-green deck if we so desire. Switching Wild Mongrel back in the place of Noose Constrictor is pretty obvious: turns out Reach is not that useful. Who knew?
8/7/2017:
Cuts
Adds
In short, Azusa/Strip Mine/Crucible lock is back in business and in testing. Gitrog has a surprisingly good gameplan in just trying to force the Strip Mine lock in longer games, and it has extra uses in making your play lines less predictable which is always a big plus. Chord and Pact have been cut for the time being despite their lack of testing so far.
7/25/2017:
Cuts
Adds
Upon the release of Ramunap Excavator, we have replaced Crucible with it as our backup land recursion engine. Because of our green creature tutor suite in addition to competitive metagames using less creature removal, Excavator has a lot more application when feeding Gitrog with further land drops and as a value engine.
Chord of Calling is to further support the above strategy, while also giving us another way to put a discard outlet on the battlefield at instant speed to further aid in instant-speed victories. Burgeoning was cut for this due to the card's underwhelming performance in most games as well as the poor application outside of opening hands that have more than a few lands, something that we usually are looking to avoid anyway.
Wild Mongrel has been replaced by Noose Constrictor for the time being to test the applications of Reach, even though the difference is pretty marginal so far.
Rest of the changes are to increase the amount of interaction the deck has, as it is lacking in that department already by a large margin. Deglamer is to provide an additional way to get rid of cards like Leyline of the Void, while Slaughter Pact is being tested as an answer for troublesome 4CMC creatures, primarily Linvala, Keeper of Silence.
Suggestions
Updates Add
Comments View Archive
Attention! Complete Comment Tutorial! This annoying message will go away once you do!
Important! Formatting tips — Comment Tutorial — markdown syntax
Please login to comment
| Top Ranked |
|
| Date added | 7 years |
| Last updated | 3 years |
| Exclude colors | WUR |
| Legality | This deck is Commander / EDH legal. |
| Rarity (main - side) | 14 - 0 Mythic Rares 55 - 0 Rares 16 - 0 Uncommons 11 - 0 Commons |
| Cards | 100 |
| Avg. CMC | 1.86 |
| Folders | Helpful, EDH Decks, EDH Collection, Top Decks, Competitive EDH, Asshole decks, CEDH, Interesting Brews, EDH, Interesting Commander Decks |
| Votes | |
| Ignored suggestions | |
| Shared with | |
| Based on | |
| Views |
