pie chart

To Drown the World in Death: Araumi EDH [PRIMER]

Commander / EDH Infinite Combo Jank Mill Primer Reanimator Tokens UB (Dimir)

Daedalus19876


Sideboard


Maybeboard


IMPORTANT: This deck now lives on Moxfield! This TappedOut page will no longer be updated.

Check there for future updates: https://www.moxfield.com/decks/Cx0f3NJkDU203YLF6K3kqQ

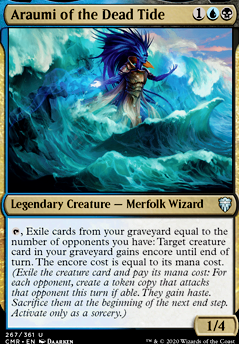
What do you get when you cross reanimator, aristocrats, spellslinger, and dredge? You get THIS monstrosity! Built around my new favorite commander:

Master of the Sea-Tossed Dead Show

There's an emphasis on small but efficient ETB/LTB effects, a few larger "bombs" which scale exponentially when reanimated, powerful control effects which keep the board clean, and efficient combo finishes. This deck performs VERY well when you manage your resources carefully, and if you can trace the complex lines of victory...

I’ve intentionally chosen to avoid the “standard” to-hand tutor package (Demonic Tutor, Diabolic Intent, Vampiric Tutor, Lim-Dul's Vault, et cetera) because 1) I found they weren’t quite as useful when half my library was already milled, and 2) I wanted to intentionally create higher variance, so that every game doesn’t end in exactly the same infinite combo. The deck doesn’t run much ramp, but it also doesn’t NEED much ramp — there’s essentially no circumstance where we pay more than 5 mana for an effect. Anything over 5 mana is cheated into play with a reanimation spell, never cast.

This deck does not depend on Araumi to function (for the most part), but she makes the deck play very very smoothly if she’s not removed. In the descriptions below, I’m assuming that we’re playing against three opponents; some of the lines get trickier with less players. Note that most of these lines can be fetched with Entomb, Buried Alive, or Intuition, but those tutors can also fetch Stinkweed Imp or Fatestitcher for their effects from graveyard when setting up.

There are several categories of win-cons in this deck:

This is exactly what it sounds like — we want to trigger Gray Merchant of Asphodel multiple times in the same turn, with high devotion. The easiest way to do this is to encore Gray Merchant with Araumi’s ability — remember that token copies DO keep their mana costs, so if we reanimate Gary with Araumi, we immediately drain all our opponents for at least 21 (six devotion from the three tokens, one devotion from Araumi). We can follow this up by encoring three copies of Glasspool Mimic   (each coming in as another Gary) to drain for another 39 life.

We can also — with more difficulty — win by chaining a bunch of back-to-back “normal” reanimation spells on Gary, if we have decent devotion. It’s not difficult to get to 10+ devotion in this list, particularly if we’ve encored something with high devotion, so three or four normal reanimation spells can also do the trick.

Wake the Dead for Gary, Peregrine Drake, and Archaeomancer will let us drain every turn, and can also go infinite if we have a sac outlet.

The classic cEDH combination. The deck runs a lot of wheels (mostly intended to fill our graveyard), and can also encore Jace's Archivist if needed. Paired with Hullbreacher, a wheel allows us to strip our opponents’ hands while also generating massive mana.

If we need to get Hullbreacher, Intuition for Hullbreacher, Reanimate, and Animate Dead will do the trick. Heartless Summoning makes it easy to surprise our opponents with Hullbreacher, because we’ll only need to hold up a single mana.

The deck used to run Echo of Eons to pair with Hullbreacher, but it ended up being too all-in.

This is a more obscure combo that I haven’t see many people run. If we have Glasspool Mimic   as a copy of Cavalier of Night, we can sacrifice it to any sac outlet (Yawgmoth, Thran Physician, Phyrexian Altar, Ashnod's Altar, Altar of Dementia, etc). When we sacrifice the Mimic, it has a “dies” trigger which reanimates a creature with converted mana cost three or less. Since Glasspool Mimic   is in graveyard fulfilling this condition, we can automatically return it to the battlefield as a copy of Cavalier and repeat.

This allows us to use our sac outlet infinite times, generating infinite mana, or mill, or card draw depending what the outlet is. It’s trivial to leverage into a win from there :)

Note that this combo does NOT work as a direct consequence of Victimize or Living Death. If the Mimic and the Cavalier enter the battlefield simultaneously, the Mimic cannot copy the Cavalier. The Cavalier must enter first. Still, this is rarely a problem; you can choose to have the Mimic enter as a 0/0, immediately let it die, then reanimate it with a separate spell.

For this combo, Cavalier of Night can be a token copy from Araumi, but Glasspool Mimic   cannot be a token.

The goal here is to mill your whole library at once, then recur your win-con with Dread Return. This is achieved by pairing Mesmeric Orb with some form of self-untapping permanent. The best two options are Basalt Monolith and Aphetto Alchemist, but this can also be achieved by getting multiple copies of Fatestitcher/Vizier of Tumbling Sands (with either Araumi of the Dead Tide or Glasspool Mimic  ), then having each creature untap the other to get around the "another" clause.

Once we’ve milled our library, we can use Araumi or Dread Return to retrieve a creature from graveyard (unearthing Fatestitcher as necessary, either as extra fodder for Dread Return or an extra untap for Araumi). We smoothly transition into one of our other win-cons from here: usually Dread Return into Scholar of the Ages into Songs of the Damned and Agadeem's Awakening  /Living Death, to win on that same turn.

This is the most complex category of win-cons, and the hardest to describe. Fundamentally, these loops have 4 components:

  1. Reanimation spell capable of recurring at least two creatures (Living Death, Agadeem's Awakening  , Wake the Dead, Victimize)
  2. A creature capable of recurring an instant or sorcery (Archaeomancer or Scholar of the Ages, Scholar is necessary if Songs fits in category 3)
  3. Some combination of cards to generate break-even mana (Peregrine Drake, Cloud of Faeries, Songs of the Damned, Pitiless Plunderer, Phyrexian Altar/Ashnod's Altar)
  4. A sac outlet to return the targets to graveyard to restart the loop (Yawgmoth, Thran Physician, Undercity Informer, any of the three Altars)

Note that In some circumstances, Body Double can substitute for any of these components.

The goal is to chain the same reanimation spell an infinite number of times, and harvest infinite uses of any sac outlet and ETBs. For example, one combination is Wake the Dead + Archaeomancer + Peregrine Drake + Altar of Dementia. In this case, you can wait until your opponent goes to attack step (which they cannot skip), and cast Wake the Dead on X=2 for Archaomancer and Peregrine. You return Wake the Dead to hand with Archaeomancer’s ETB effect, untap 5 lands with Peregrine’s ETB effect (netting one mana in the process), then sacrifice both creatures to Altar of Dementia, milling yourself. By doing this, you generate infinite mana and mill your own deck, then either mill your opponents out with Altar or trigger every ETB in your deck an infinite number of times. Note that you CAN cast Wake the Dead any number of times during the same combat step!

However, these loops can be VERY difficult to spot if you’re unfamiliar with them. Some cards can fill multiple roles (particularly Ashnod's Altar/Phyrexian Altar as sacrifice effects AND mana generators, but also Wake the Dead/Living Death/Victimize as conditional sac outlets). There’s MANY combinations here (more than a hundred I’m aware of), some of which work better than others. There’s a lot of hidden conditions — for example:

Overall, this is often the best win-con for this deck — because it can come out of NOWHERE, and because nobody sees it coming. However, they can be hard to recognize and even harder to sequence. I’d recommend playtesting multiple times to really get the hang of recognizing these.

Note that we can fetch this combo if we encore SpellseekerWake the Dead, Songs of the Damned, Entomb for Scholar of the Ages does the trick. If we have a reanimation spell in hand, Intuition will fetch the pieces as well. We can also “bootstrap” this combo from just Entomb + Wake the Dead in our opening hand, even with an empty graveyard:

  1. Entomb for Scholar of the Ages.
  2. Wake the Dead on X=1, grabbing Scholar.
  3. Scholar of the Ages recurs Wake the Dead and Entomb.
  4. Move to next player’s combat. Scholar of the Ages automatically dies at EOT.
  5. Entomb for Peregrine Drake.
  6. Wake the Dead on X=2, grab Drake and Scholar.
  7. Scholar of the Ages recurs Entomb and Wake the Dead. Peregrine Drake untaps 5 lands.
  8. Move to next player’s combat. Scholar of the Ages and Peregrine Drake automatically die at EOT.
  9. Entomb for Yawgmoth, Thran Physician.
  10. Wake the Dead on X=3, grab Drake, Scholar, and Yawgmoth.
  11. Again, Scholar of the Ages recurs Entomb and Wake the Dead. Peregrine Drake untaps 5 lands.
  12. In the SAME combat, Entomb for Gray Merchant of Asphodel.
  13. Sacrifice Scholar of the Ages and Peregrine Drake to Yawgmoth.
  14. Wake the Dead on X=3, grab Drake, Scholar, and Gray Merchant.

We can now sacrifice the three creatures to Yawgmoth, reanimate them, and repeat — we’ve broken even on mana and life! We easily drain our opponent to death with Gary from this position. Also, this demonstrates how we can use Wake the Dead as both a reanimation spell and a partial sac outlet!

In total, this line cost us B+1BB+B+2BB (everything else was generated by Peregrine Drake). That sounds like a lot, but remember that we can execute these steps over two turns (by sequencing this with our untap in the middle), and thus it costs us 1BBB in the first turn cycle and 2BBB in the second. Quite achievable! We can also execute a slower, more complex loop by folding in Cloud of Faeries as well, if we have less than 5 lands. I hope this demonstrates the flexibility of these lines!

If our opponents let us keep our commander long enough for her summoning sickness to wear off, it’s our job to make them regret that choice.

While the deck functions without Araumi’s assistance, she lets us kick it into overdrive. Note that you can choose to activate Araumi’s ability during your second main phase in order to not lose any of your tokens during combat (useful for things with EOT triggers).

Below is a partial list of Araumi targets, and what each one does for us:

To pay for Araumi’s abilities, it’s best to exile lands first, then enchantments, then anything which isn’t relevant to any of our combo lines. Note that we generally do NOT want to encore the following creatures:

Even beyond these possibilities, there's a lot of overwhelming value plays, and we can also toolbox to a great extent with Araumi's ability. On the whole, this deck presents a multifaceted threat at any point from the early game to the late-game, while also flying under the radar due to an underappreciated uncommon commander. Note that we can also sacrifice all three tokens to Dread Return during a combo turn.

Even beyond these win-cons, there's a lot of overwhelming value plays, and we can also toolbox to a great extent with Araumi's ability. On the whole, this deck presents a multifaceted threat at any point from the early game to the late-game, while also flying under the radar due to an underappreciated uncommon commander.

This deck is also surprisingly budget-friendly: although this version is over $1000, the VAST majority of that cost is from foils, an unnecessarily optimized land base, and from a few unnecessary RL cards (Intuition, Gilded Drake, et cetera). I’ve also built a budget Araumi list which keeps most of this deck’s power here, check it out as well!


Fresh Fish for Cheap ($250 Budget Araumi)

Commander / EDH Daedalus19876

SCORE: 16 | 4 COMMENTS | 2109 VIEWS | IN 4 FOLDERS


Tracking visitor locations, starting from 11/4/20:

Flag Counter

Special thanks to MasterP87, MorganeLeFay, Birdboy, and Rylock for their help, this deck wouldn't have been possible without them!

If you're a fan of this list, please feel free to give an upvote and/or comment! I’d love to hear feedback on how I can improve this deck :)

Suggestions

Updates Add

This TappedOut page will no longer be updated.

Thank you for all the favorites and help here, but TappedOut has finally gotten glitchy enough for me to transition.

Check on Moxfield for future updates and an expanded primer: https://www.moxfield.com/decks/Cx0f3NJkDU203YLF6K3kqQ

Comments View Archive

Attention! Complete Comment Tutorial! This annoying message will go away once you do!

Hi! Please consider becoming a supporter of TappedOut for $3/mo. Thanks!


Important! Formatting tipsComment Tutorialmarkdown syntax

Please login to comment

Revision 37 See all

(2 years ago)

+1 Cabal Ritual side
+1 Consuming Tide side
+1 Exhume side
+1 Fell Stinger side
+1 Spectral Arcanist side
Top Ranked
  • Achieved #1 position overall 3 years ago
Date added 3 years
Last updated 2 years
Legality

This deck is Commander / EDH legal.

Rarity (main - side)

13 - 1 Mythic Rares

41 - 3 Rares

30 - 2 Uncommons

8 - 0 Commons

Cards 100
Avg. CMC 2.30
Tokens Bird 2/2 U, Copy Clone, Morph 2/2 C, Treasure
Folders Fun, Cool, Interesting decks, Copied Decks, slime, Fun Themes, Commander, simulation, Deck Primers, EDH Decks
Votes
Ignored suggestions
Shared with
Views