
MEREN: THE CIRCLE OF LIFE AND DEATH【Primer】
Commander / EDH BG (Golgari) Combo Counters Dredge Infinite Combo Multiplayer Reanimator Sacrifice
Creature (41)
- 1x Birds of Paradise
-
1x
Carrion Feeder

-
1x
Caustic Caterpillar
- 1x Deathrite Shaman
-
1x
Elves of Deep Shadow
-
1x
Fyndhorn Elves
-
1x
Llanowar Elves
-
1x
Spore Frog
-
1x
Viscera Seer
- 1x Blood Artist
-
1x
Cankerbloom
-
1x
Dawntreader Elk
-
1x
Fauna Shaman
-
1x
Fiend Artisan
- 1x Hermit Druid
-
1x
Lesser Masticore
-
1x
Melira, Sylvok Outcast
-
1x
Sakura-Tribe Elder
-
1x
Satyr Wayfinder
- 1x Zulaport Cutthroat
-
1x
Eternal Witness
-
1x
Fierce Empath
-
1x
Fleshbag Marauder
-
1x
Grim Haruspex
-
1x
Midnight Reaper
-
1x
Plaguecrafter
- 1x Skullwinder
-
1x
Woe Strider
-
1x
Wood Elves
-
1x
Yahenni, Undying Partisan
- 1x Body Snatcher
-
1x
Foundation Breaker
-
1x
Ravenous Chupacabra
-
1x
Solemn Simulacrum
- 1x Yawgmoth, Thran Physician
-
1x
Gray Merchant of Asphodel
-
1x
Shriekmaw
-
1x
Sidisi, Undead Vizier
-
1x
Bane of Progress
-
1x
Massacre Wurm
- 1x Protean Hulk
Land (37)
-
1x
Blooming Marsh
- 1x Bojuka Bog
- 1x Command Beacon
-
1x
Command Tower
-
1x
Darkbore Pathway
Flip
- 1x Dryad Arbor
-
1x
Fabled Passage
-
1x
Forest
- 3x Forest
-
1x
Forest
-
3x
Forest
-
2x
Forest
- 1x Geier Reach Sanitarium
-
1x
High Market
-
1x
Hostile Hostel
Flip
-
1x
Llanowar Wastes
- 1x Nurturing Peatland
-
1x
Overgrown Tomb
- 1x Phyrexian Tower
-
4x
Swamp
-
4x
Swamp
-
1x
Temple of Malady
-
1x
Twilight Mire
-
1x
Urborg, Tomb of Yawgmoth
- 1x Verdant Catacombs
-
1x
Woodland Cemetery
Enchantment (3)
Commander (1)

Sorcery (7)
- 1x Reanimate
- 1x Life from the Loam
- 1x Bala Ged Recovery Flip
-
1x
Buried Alive
- 1x Toxic Deluge
-
1x
Victimize
-
1x
Living Death
Artifact (5)
Instant (4)
Planeswalker (2)
Maybeboard
Creature (44)
-
1x
Walking Ballista
- 1x Diligent Farmhand
- 1x Disciple of the Vault
- 1x Greenseeker
- 1x Krosan Wayfarer
- 1x Stitcher's Supplier
- 1x Sylvan Safekeeper
- 1x Apprentice Necromancer
- 1x Dawnstrider
- 1x Destiny Spinner
- 1x Devoted Druid
-
1x
Elvish Visionary
-
1x
Lesser Masticore
-
1x
Melira, Sylvok Outcast
- 1x Putrid Goblin
- 1x Riftsweeper
- 1x Silverglade Pathfinder
- 1x Soldevi Adnate
- 1x Vampire Hexmage
-
1x
Wall of Blossoms
-
1x
Winding Constrictor
-
1x
Demon's Disciple
- 1x Manglehorn
- 1x Merciless Executioner
-
1x
Ramunap Excavator
- 1x Reclamation Sage
-
1x
Stinkweed Imp
- 1x Thrashing Brontodon
- 1x Yavimaya Elder
- 1x Agent of Erebos
- 1x Bloodspore Thrinax
- 1x Mindslicer
- 1x Smothering Abomination
-
1x
Acidic Slime
-
1x
Golgari Grave-Troll
- 1x Syr Konrad, the Grim
-
1x
Kokusho, the Evening Star

-
1x
Mikaeus, the Unhallowed
- 1x Woodland Bellower
-
1x
Avenger of Zendikar
-
1x
Sheoldred, Whispering One
-
1x
Razaketh, the Foulblooded
-
1x
Terastodon
-
1x
Woodfall Primus
Land (8)
- 1x Grim Backwoods
- 1x Miren, the Moaning Well
- 1x Misty Rainforest
- 1x Prismatic Vista
- 1x Strip Mine
-
1x
Westvale Abbey
Flip
- 1x Windswept Heath
- 1x Wooded Foothills
Instant (3)
Sorcery (7)
Enchantment (4)
Artifact (3)
“Nature’s most raw beauty is the circle: perfect in its continuance, with no break between death and life.”
- Savra, Queen of the Golgari, Ravnica, City of Guilds, 2005.

MEREN: THE CIRCLE OF LIFE AND DEATH. THE WAY OF THE GOLGAR
 Art by Mark Winters
 INTRODUCTION
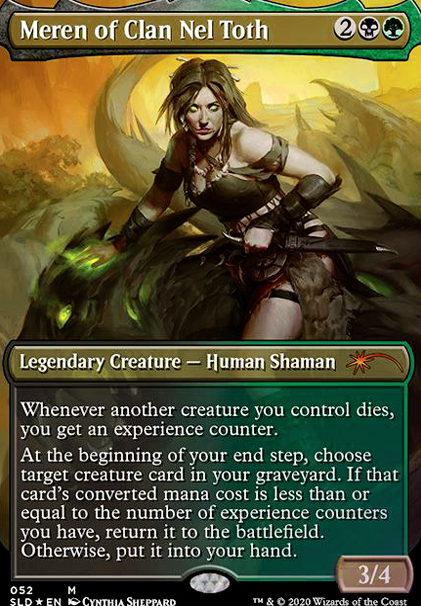
This is my Meren of Clan Nel Toth![]() EDH optimized deck. It's my oldest ready to play commander deck of my current collection, and one of the first ones I started to build, so Meren is a very special card&deck for me.
EDH optimized deck. It's my oldest ready to play commander deck of my current collection, and one of the first ones I started to build, so Meren is a very special card&deck for me.
I'm aware of the high popularity of this commander, so I don't pretend to innovate or about Meren or highlight my deck out from others. As you can figure out, my decklist is very similar to other Meren decks, because when optimizing a deck, we all end up choosing the most efficient cards for it. I just needed to share the experience I've gathered playing and tunning up this deck for years, and maybe giving other players new ideas and helping new Meren/Golgari players to start with their decks.
BASIC DATA
Construction date: 12/11/2015
Power level: 8,5
Format: Multiplayer EDH, non competitive
Budget: High (Mainly due to foil and promos)
Build restrictions: No Stacks heavy, No combo heavy, No expensive tutors.
 BRIEF DECK'S HISTORY
At winter of 2015, when Commander 2015 was released, I only had built some low-budget and (due to my unexperience in the format) poorly designed commander decks. Black-Green was my favorite two color combination as The Golgari Swarm was my favorite Ravnica guild, and I always loved to play graveyard mechanics. Also, I also found awesome the Alara's shard-plane of Jund, with it's primal and wild natural enviroments and it's devour mechanic. That's why when Meren appeared, a golgari shaman from Jund with a creature reanimation theme, I loved her design, and I fastly visited my LGS to get her preconstructed deck.
For me, Meren of Clan Nel Toth became the best choice for a graveyard golgari EDH commander. When she appeared in the game, quickly took the crown to the golgari lords of the moment: Skullbriar, the Walking Grave, Jarad, Golgari Lich Lord, Glissa, the Traitor, Savra, Queen of the Golgari and Varolz, the Scar-Striped... The reason was simple: The best mechanics of golgari are automill (Thanks to abilities like dredge) and graveyard recursion, both reanimation or recovery of mainly creatures. But although many of these decks used them, none of that time golgari commanders really represented well those strategies themselves: Savra, Queen of the Golgari and Jarad, Golgari Lich Lord loved sacrifice but they didn't grant much graveyard recursion or mill themselves; Skullbriar, the Walking Grave was a voltron +1/+1 beast; Glissa, the Traitor worked well in the graveyard but only with artifacts, and Varolz, the Scar-Striped was more a +1/+1 tribal with some nasty tricks.
This deck has experienced many changes and improves, and I'm showing it now in 2020 at it's current state, but with a large Maybeboard to compile cards that had been in this deck in the past, or could enter in the future.
 STRATEGY
Meren of Clan Nel Toth is capable to recuperate or even reanimate any of our creatures in an neverending cycle, and her abilities gain effectiveness over time with the death of your other creatures, thanks to the experience counters mechanic. A Meren deck usually works by recycling it's creatures again and again to generate tempo and card advantage, and at the same time disrupting the enemy's gameplan. Eventually, the Meren deck will reach to its wincon (generally a sacrifice-loop infinite combo) to close the game.
The basic core of any Meren deck usually has two main components:
A- Creatures with useful ETB or death triggers (For example Eternal Witness or Solemn Simulacrum)
B- Sacrifice outlets that let us send creatures to our graveyard (For example Viscera Seer or Ashnod's Altar).
Meren will connect these two strategies: She will give us experience counters when any of our creatures dies, and then she will recover those creatures, leting repeat their effects again in a powerful value mechanism.
This need will demand a high amount of creature cards to work consistently. Luckily, this is not a restriction at all: Green an Black have one of the most efficient and complete collection of creatures with triggers and sacrifice engines of all MTG. Some of them (Like Sakura-Tribe Elder![]() or Shriekmaw
or Shriekmaw![]() ) are even capable of do all the "Value Effect - Sacrifice" by themselves!!!. In fact, Meren decks can be very variable from one to another, and can work in a wide range of budgets... although is true that most of players decide to use very similar cards at the end, due to their effectiveness compared to other options. Also, being the leader of a Preconstructed deck that has been commercialized two times (Commander 2015 and in Commander Anthology (2017)), is very normal that many Meren decks are made from this same preconstructed base, sharing many staples.
) are even capable of do all the "Value Effect - Sacrifice" by themselves!!!. In fact, Meren decks can be very variable from one to another, and can work in a wide range of budgets... although is true that most of players decide to use very similar cards at the end, due to their effectiveness compared to other options. Also, being the leader of a Preconstructed deck that has been commercialized two times (Commander 2015 and in Commander Anthology (2017)), is very normal that many Meren decks are made from this same preconstructed base, sharing many staples.
Said that, Meren of Clan Nel Toth is a very good commander by herself, so she tolerates to play in many powerlevels. Tha amount of combos, tutors and early game disruption and taxes cards you include in your Meren deck will determinate the kind of Power Level your deck is. If you want to play casual Meren, is more fun to ignore the most poweful combos and tutors and try to experiment with any awesome golgari card! Although remember, to have fun remember always to have enough creatures and sacrifice engines!
Now I'll explain my own Meren of Clan Nel Toth![]() deck strategy:
deck strategy:
 1- PUTRID SOIL
As any golgari commander, Meren of clan Nel Toth has a wide access to mana resources, both in form of creatures, spells or mana rocks. But our need of keeping an efficient creature sacrifice engine and graveyard synergy. Thats why we play more ramp creatures than traditional ramp spells.
First we have access to some one-mana creatures capable of producing mana: Birds of Paradise, Elves of Deep Shadow![]() and Fyndhorn Elves
and Fyndhorn Elves![]() . Other EDH decks prefer to avoid mana dorks as they are easily removable, but in Meren they give us cannon fodder to keep going with our mechanisms. Deathrite Shaman could fit in this category, as he is capable to produce mana in concrete situations, but it's more a nice graveyard hate and utility card than a mana source.
. Other EDH decks prefer to avoid mana dorks as they are easily removable, but in Meren they give us cannon fodder to keep going with our mechanisms. Deathrite Shaman could fit in this category, as he is capable to produce mana in concrete situations, but it's more a nice graveyard hate and utility card than a mana source.
Sakura-Tribe Elder![]() and Dawntreader Elk
and Dawntreader Elk![]() are our ramp key cards. With Meren on the battlefield, we can sacrifice them to ramp, obtaining experience counters and at the end of turn reanimate them with Meren's second ability to keep ramping and sacrifying.
are our ramp key cards. With Meren on the battlefield, we can sacrifice them to ramp, obtaining experience counters and at the end of turn reanimate them with Meren's second ability to keep ramping and sacrifying.
Other creatures will help to build our mana base with ETB: Wood Elves![]() can search us any forest, included the non-basic ones. Solemn Simulacrum will search us a land and also gives card draw when it dies. Satyr Wayfinder
can search us any forest, included the non-basic ones. Solemn Simulacrum will search us a land and also gives card draw when it dies. Satyr Wayfinder![]() can give us lands and fill our graveyard in the process. These creatures can't sacrifie themselves, but other cards will use them as fodder, and again Meren will reuse them later.
can give us lands and fill our graveyard in the process. These creatures can't sacrifie themselves, but other cards will use them as fodder, and again Meren will reuse them later.
Dryad Arbor is a very special and unique card. It's both a creature and a land, aspect that let us do many tutor or ramp tricks with it, otherwise impossible for a normal land or normal creature. Meren can reanimate it without any experience counter, Wood Elves![]() can search it instead a normal forest, Fiend Artisan
can search it instead a normal forest, Fiend Artisan![]() can put it onto the battlefliend without paying too much, Life from the Loam can recover it... the possibilities are endless. Yes, we are in a EDH enviroment where a creature-land means a land easier to remove... but in this deck, this means (in many cases) one more death trigger for us, and one more chance of ramp from our graveyard.
can put it onto the battlefliend without paying too much, Life from the Loam can recover it... the possibilities are endless. Yes, we are in a EDH enviroment where a creature-land means a land easier to remove... but in this deck, this means (in many cases) one more death trigger for us, and one more chance of ramp from our graveyard.
We don't use many mana rocks or ramp spells, to maximize the size of our creature base. Despite this, Sol Ring![]() is always a solid option. Ashnod's Altar is also a key card: a instant speed sacrifice outlet that generates tons of mana from killing our creatures. Grisly Salvage
is always a solid option. Ashnod's Altar is also a key card: a instant speed sacrifice outlet that generates tons of mana from killing our creatures. Grisly Salvage![]() let us recover a land or a creature from the top cards of our library, and will fill our graveyard after that, being useful at any moment of the game.
let us recover a land or a creature from the top cards of our library, and will fill our graveyard after that, being useful at any moment of the game.
Life from the Loam is awesome in any graveyard deck: It will recover lands that fall in the graveyard due to mill, re-use our fetchlands or sacrifice lands... but it's best part is that it has dredge itself, if it falls into our graveyard from anywhere we can recover it an will help us to continue filling our graveyard. Some players evade Life from the Loam as in some games they don't have lands to recover... but even then (worse case scenario) isn't a dead weight at all: you play it to recover (sadly) 0 lands, but then dredge it to start setting our graveyard. It may look stupid but other players play many other automill cards that can't grant you lands or can't be auto-recovered from the graveyard.
Last, mention: Hermit Druid, a recent addition on my deck as it wasn't very budget friendly, but is very worthy. It's ability will always give you a basic land to keep building your mana base, and in the process, can fill your graveyard with an insane amount of cards.
 2- OVERGROWN GRAVES
The most important zone of any Meren deck is the graveyard. Many cards we'll play are going to come from there, rather than from our hand. That's why we need to try to grow the size of our graveyard if we want access to more resources.
As we have already mention, early turns cards like Satyr Wayfinder![]() , Grisly Salvage
, Grisly Salvage![]() , Life from the Loam or Hermit Druid have the ability of both building our mana base and our graveyard.
, Life from the Loam or Hermit Druid have the ability of both building our mana base and our graveyard.
The spells Buried Alive![]() and Entomb
and Entomb![]() not only fill our graveyard, but act as tutors for granting us the better card for each situation.
not only fill our graveyard, but act as tutors for granting us the better card for each situation.
We also can discard cards from our hand for filling our graveyard. Although this seems to be a lose of card advantage, discard can be useful sometimes to put dredge cards or desired reanimation targets on the right place. Fauna Shaman will help us discard cards to search the right creatures. Lesser Masticore![]() is part of our wincon combo, but cast will help us to get a discard chance.
is part of our wincon combo, but cast will help us to get a discard chance.
Aside Life from the Loam, Stinkweed Imp![]() is our dredge engine. We can discard it or let it die to dredge them later, recycling them and puting a great amount of cards in our graveyard. Stinkweed Imp
is our dredge engine. We can discard it or let it die to dredge them later, recycling them and puting a great amount of cards in our graveyard. Stinkweed Imp![]() is a nice early game blocker, discouraging our opponents of attacking us with their valuable flying creatures.
Altar of Dementia
is a nice early game blocker, discouraging our opponents of attacking us with their valuable flying creatures.
Altar of Dementia![]() is another powerful sacrifice outlet altar and a key card in our deck. First let us sacrifice at instant speed, second can transform the power of our creatures in the same amount of cards put in our graveyard... and third, it can become a temible weapon for milling our opponents. It's also part of one of our wincons by infinite combo.
is another powerful sacrifice outlet altar and a key card in our deck. First let us sacrifice at instant speed, second can transform the power of our creatures in the same amount of cards put in our graveyard... and third, it can become a temible weapon for milling our opponents. It's also part of one of our wincons by infinite combo.
 4- THE LIFE AND DEATH CYCLE
Following our first objetive of building a fertile mana base and abundant graveyard, we must establish the pieces of our sacrifice an reanimation engine.
Our first need is a sacrifice outlet, something that let us send any of our creatures to our graveyard, sometimes to enter it into our reanimation cycle, othertimes to generate a death trigger and in some occasions as a defensive action to prevent a creature from being exiled o stealed for our opponents.
Carrion Feeder![]() , Viscera Seer
, Viscera Seer![]() , Yahenni, Undying Partisan
, Yahenni, Undying Partisan![]() and Woe Strider
and Woe Strider![]() are our main creatures with free and instant-speed sacrifice outlets. Carrion feeder and viscera seer are the most fast due to their low mana cost, while Yahenni, Undying Partisan
are our main creatures with free and instant-speed sacrifice outlets. Carrion feeder and viscera seer are the most fast due to their low mana cost, while Yahenni, Undying Partisan![]() is more resilient thanks to her indestructibility and +1/+1 counter growth, and Woe Strider
is more resilient thanks to her indestructibility and +1/+1 counter growth, and Woe Strider![]() give us goat tokens to use them as a sac fodder. Also mention that all these sac outlets count as creatures that can be sacrificed, tutored or reanimated too.
give us goat tokens to use them as a sac fodder. Also mention that all these sac outlets count as creatures that can be sacrificed, tutored or reanimated too.
Then we have our altars: Altar of Dementia![]() and Ashnod's Altar also let us sacrifice at instant speed and grant us powerful effects like the Ashnod altar mana or Altar of Dementia mill. Also mention that Dementia altar can be part of an infinite mill combo.
and Ashnod's Altar also let us sacrifice at instant speed and grant us powerful effects like the Ashnod altar mana or Altar of Dementia mill. Also mention that Dementia altar can be part of an infinite mill combo.
Sidisi, Undead Vizier![]() will act as tutors fo any card in exchange of the sacrifice process.
will act as tutors fo any card in exchange of the sacrifice process.
Birthing Pod and Fiend Artisan![]() form our pod engine, leting us sacrifice creatures to transform them in new ones by searching them from our library and putting them right onto the battlefield.
form our pod engine, leting us sacrifice creatures to transform them in new ones by searching them from our library and putting them right onto the battlefield.
Sacrifice strategies supose the lose of many resources, as we are killing our own creatures, so is good to search card advantage from it. Grim Haruspex, Midnight Reaper![]() and Liliana, Dreadhorde General will give us card draw when our creatures die. Skullclamp can be equipped to creatures that are going to die to draw a lot of cards, and if those creatures have 1 thoughness, skullclamp itself can become their own sacrifice engine. Also, remember that some creatures like Wall of Blossoms
and Liliana, Dreadhorde General will give us card draw when our creatures die. Skullclamp can be equipped to creatures that are going to die to draw a lot of cards, and if those creatures have 1 thoughness, skullclamp itself can become their own sacrifice engine. Also, remember that some creatures like Wall of Blossoms![]() , Elvish Visionary
, Elvish Visionary![]() or Solemn Simulacrum give us one card draw when they enter the battlefield (or die), so we can use them as sacrifice fodder without losing card advantage or start reanimating them several times to create a card draw engine by themselves.
or Solemn Simulacrum give us one card draw when they enter the battlefield (or die), so we can use them as sacrifice fodder without losing card advantage or start reanimating them several times to create a card draw engine by themselves.
Last mention that some of our lands, Phyrexian Tower, High Market![]() and Grim Backwoods can also be used as sacrifice outlets, if we lack our other sacrifice engines.
and Grim Backwoods can also be used as sacrifice outlets, if we lack our other sacrifice engines.
 4- LURKING HORRORS
Any Meren deck should act as a complex echosystem where each of our creatures fit into a concrete role. Some of them give us resources and others deal with our opponent's dangers. Depending on our necesities, we'll try to enter ones or anothers in our cycle of death and rebirth. Plaguecrafter![]() and Fleshbag Marauder
and Fleshbag Marauder![]() will make our opponents sacrifice their creatures, giving us sacrifice outlet at the same time, and they can be looped to totally control the board. Caustic Caterpillar, Reclamation Sage
will make our opponents sacrifice their creatures, giving us sacrifice outlet at the same time, and they can be looped to totally control the board. Caustic Caterpillar, Reclamation Sage![]() , Acidic Slime
, Acidic Slime![]() and Bane of Progress
and Bane of Progress![]() will deal with the most dangerous artifacts and enchantments (and in case of the acidic slime, also with lands). Ravenous Chupacabra
will deal with the most dangerous artifacts and enchantments (and in case of the acidic slime, also with lands). Ravenous Chupacabra![]() and Shriekmaw
and Shriekmaw![]() can be used as targeted creature removals. And Massacre Wurm will wipe the board off tiny creatures, being special effective agains token and go wide decks.
can be used as targeted creature removals. And Massacre Wurm will wipe the board off tiny creatures, being special effective agains token and go wide decks.
 5- CLOSING THE CIRCLE: WIN CONDITIONS
Any Meren deck has access to a big amount of different Win Conditions, although it will be necessary to focus on certain strategies or combos rather than flood the deck with finisher cards, if you don't want to lose space for other important pieces of the deck, like mana base, removals or iteration cards.
The basic wincon paths I recommend the most for a Meren deck are:
- Infinite Sacrifice Combo (Any combo that lets you sacrifice and reanimate a creature in an infinite way, provoking some kind of ETB / Death effect that repeated enough times will give you the victory).
EXAMPLES:
-> Mikaeus, the Unhallowed![]() + Walking Ballista
+ Walking Ballista![]() + Free Sacrifice Outlet (Viscera Seer
+ Free Sacrifice Outlet (Viscera Seer![]() , Carrion Feeder
, Carrion Feeder![]() , Yahenni, Undying Partisan
, Yahenni, Undying Partisan![]() , Altar of Dementia
, Altar of Dementia![]() ) = Infinite damage to all opponents (and mill if Altar of dementia).
) = Infinite damage to all opponents (and mill if Altar of dementia).
-> Mikaeus, the Unhallowed![]() + Walking Ballista
+ Walking Ballista![]() + Aristocraft (Zulaport Cutthroat, Blood Artist, Disciple of the Vault...) = Infinite damage to all opponents (just this time use Walking ballista to kill itself in the loop).
+ Aristocraft (Zulaport Cutthroat, Blood Artist, Disciple of the Vault...) = Infinite damage to all opponents (just this time use Walking ballista to kill itself in the loop).
-> Mikaeus, the Unhallowed![]() + Walking Ballista
+ Walking Ballista![]() + Ashnod's Altar) = Infinite damage to all opponents (Use the altar to generate any amount of mana, then stop the loop to charge your walking ballista with all the counters you want and shoot your opponents).
+ Ashnod's Altar) = Infinite damage to all opponents (Use the altar to generate any amount of mana, then stop the loop to charge your walking ballista with all the counters you want and shoot your opponents).
- > Melira, Sylvok Outcast![]() + Lesser Masticore
+ Lesser Masticore![]() + Free Sacrifice Outlet (Viscera Seer
+ Free Sacrifice Outlet (Viscera Seer![]() , Carrion Feeder
, Carrion Feeder![]() , Yahenni, Undying Partisan
, Yahenni, Undying Partisan![]() ) + Aristocraft (Zulaport Cutthroat, Blood Artist, Disciple of the Vault...) = Infinite life loss to all opponents.
) + Aristocraft (Zulaport Cutthroat, Blood Artist, Disciple of the Vault...) = Infinite life loss to all opponents.
- > Melira, Sylvok Outcast![]() + Lesser Masticore
+ Lesser Masticore![]() + Altar of Dementia
+ Altar of Dementia![]() = Infinite mill to all opponents.
= Infinite mill to all opponents.
- > The Help of the Hulk: Protean Hulk can help you search those combos, as many of their pieces are creatures. You can also include in your deck Body Snatcher or maybe Phyrexian Delver to search it with your hulk's death trigger.... reaniamte your Protean Hulk, and search for even more creautres!! Many Meren decks use Protean Hulk as a key to find their comboes.
THose are the most common combos in Meren decks, as they are easy to assemble and usually the have many versions or variations. This doesn't means you can experiment with many other powerful combos in Golgari, of course!
- Aristocrat attrition (Just the strategy of keep sacrifying and then recovering creatures to keep repeating ETB / Death effects and slowly weakening your opponents until their defeat).
-> Just keep sacrifying your creatures to trigger cards like: Zulaport Cutthroat, Blood Artist, Disciple of the Vault, Gray Merchant of Asphodel![]() , Spore Frog, Altar of Dementia
, Spore Frog, Altar of Dementia![]() , Dictate of Erebos... This isn't a safe victory like assembling a combo, but if your combo went off our you couldn't find it, you can slowly try to defeat your enemies via attrition.
, Dictate of Erebos... This isn't a safe victory like assembling a combo, but if your combo went off our you couldn't find it, you can slowly try to defeat your enemies via attrition.
- Massive reanimation loops (The use of a spell capable reanimate big amounts of creatures combined with creatures that let you recover and replay that spell, ending in a loop that will give you an incredible advantage while weaking the rest of the table).
EXAMPLES:
-> A good example of this is the combination of Living Death![]() with Eternal Witness
with Eternal Witness![]() or Skullwinder. Again, this probably will not give you the victory by itself, is just a great synergy to keep weakening your opponents while you only grow stronger thanks to all the death/ETB triggers of your creatures returning from the graveyard again and again.
or Skullwinder. Again, this probably will not give you the victory by itself, is just a great synergy to keep weakening your opponents while you only grow stronger thanks to all the death/ETB triggers of your creatures returning from the graveyard again and again.
 LORE
LORE
"She was Meren, last of Clan Nel Toth. And she would not stop until all of the cairns of Jund were toppled."
- All the Cairns of Jund, Magic Story, November, 4, 2015.
-To be continued-
*This article is unfinished. I pretend to develop it more in the future bit by bit. Thanks for looking! :D
Suggestions
Updates Add
Comments
Attention! Complete Comment Tutorial! This annoying message will go away once you do!
Important! Formatting tips — Comment Tutorial — markdown syntax
Please login to comment
Casual
84% Competitive
Revision 1 See all
(1 year ago)
| +1 | Cankerbloom | main |
| +1 | Lesser Masticore | main |
| +1 | Melira, Sylvok Outcast | main |
| Top Ranked |
|
| Date added | 3 years |
| Last updated | 1 year |
| Legality | This deck is Commander / EDH legal. |
| Rarity (main - side) | 8 - 0 Mythic Rares 42 - 0 Rares 17 - 0 Uncommons 12 - 0 Commons |
| Cards | 100 |
| Avg. CMC | 2.79 |
| Tokens | Experience Token, Goat 0/1 W, Insect 1/1 BG, Morph 2/2 C, Zombie 2/2 B |
| Folders | 1- BRAZATO EDH DECKS, stuff, Golgari/Witherbloom Decks |
| Votes | |
| Ignored suggestions | |
| Shared with | |
| Views |