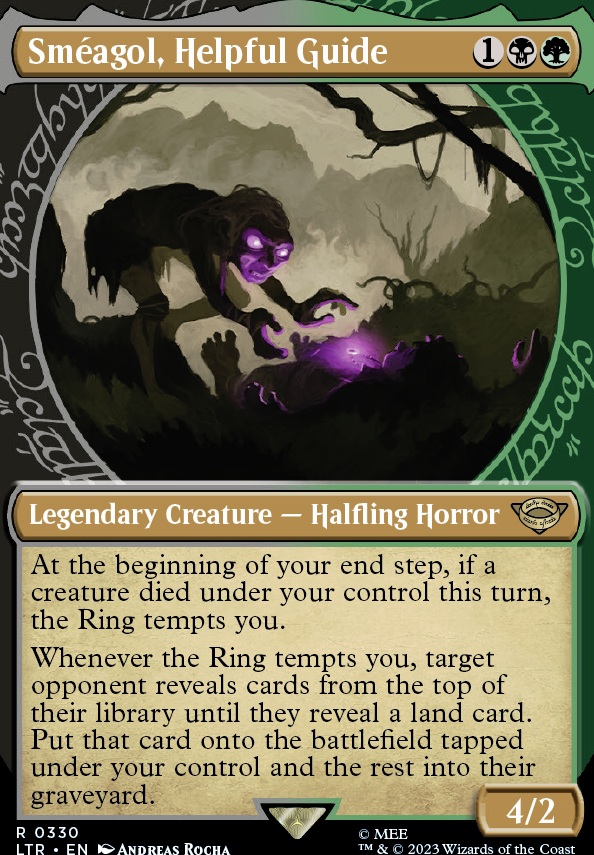
Where does Smeagol guide you to?

We guides you to the precious victory, yesss yesss, we want the precious victory. We can't let these filthy hobbitses have our precious victory!

But yes of course you guide the people to victory, I'd hope so. However we still need to know how to get to the precious victory, do you still remember the way, or should I explain it?

Oh ooh yesss the way, we need to explain them the way. Gollum doesn't want to, no, Gollum doesn't want to explain it. But we can explain the idea, yesss yesss, the reason for this path.

That's a great idea, but first let me tell the people what to expect from this path:

  • We love to annoy hobbitses, so we do that quite well.
  • You like to play around with quite the powerful friends.
  • If you already know Smeagol a bit, you should know that he has quite the swingy personality. Which shows quite well when he is guiding you. However that is okay, since else it wouldn't be as fun and diverse.
  • You like winning throughout a combo path.

The idea

We created this path that we can play with these filthy hobbitses, yesss, yesss we want to play with them and let them see our power, yesss. We want the beat these filthy hobbitses!

Smeagol, that's enough, I'll take over. Right, Smeagol and I created this path because Smeagol is just that good of a friend. I wanted to help him see more of the world and help him beat up more hobbits and also, he is quite the strong halfling himself so I'm very happy he is here.

To begin with, we had quite the problem finding a good path to walk, but we were able the steal a map from some people passing by and with that, we found our own path. In the planning phase I had quite a good friend help me find more helpers for the way.

The path

For us to make a great path, we need cover as much land as we can. Of course we have the greatest motivation possible for that, which is the most precious Ring itself.

Yesss the precious! It's tempation is so great, yesss yess!

As the temptation towards the ring grows, we get to cover more land and the path to victory becomes clearer. Since we get to control our opponents lands, we in turn also get to prevent dem from walking their path. Our friends along our path are very greatful for us controling so many lands, which is always the best, when your friends profit from the path you decide to take.

Now we go more into a bit of a technical perspective to see which factors give shape to our path. (I'm too lazy to write these things with flavor, sorry.)

This is of course a key focus of the deck, since Smeagol, Helpful Guide basically says: "Whenever the Ring tempts you, mill your opponent and steal their land.". So yes of course we need the ring to tempt us!

This is where the deck loses out the most, since this is a Universes Beyond mechanic, there isn't as much support as we'd like for it.

These cards tempt us with the ring:

  • Smeagol, Helpful Guide - His ability to tempt us with the ring really only gives us early game traction and a bit of consistancy.
  • Dunedain Rangers - Mostly a combo piece as finisher, on it's own the card isn't that consistant.
  • Gollum, Patient Plotter - He give us a ring tempts trigger every turn if needed and is the better combo finisher.
  • Nazgul x 9 - Even tho they want the ring to themselves, they are quite useful to us, since they are quite strong.
  • Call of the Ring - Draw minimum 1 additional card each turn for 2 life? Yes please!
  • Claim the Precious - Thy creature is not strong enough to stand in the way of Smeagol, now give us your land!
  • Sam's Desperate Rescue - Sometimes creatures of us need some rescue, things happen.

The reason we need this many (and would need more) ring tempt trigger is really only to ramp us and then in the end win the game. Since our deck revolves around this mechanic ramping us, we do have such a greedy land count. The biggest problem is that we don't have a easy way to get more than one or two triggers per turn. If we do get more, we most likely are already going infinite or near-infinte with it and at that point we don't have to talk about the cards anymore.

When comboing doesn't work out, we at least have our good "friends" the Nazguls which can easily get to be 15+ power creatures. I'm thinking of giving them more support, but there isn't really a way to fit everything I want into this deck. But still they are really good just as they are right now.

Luckily the games ruling doesn't care if the we own the lands that etb under our control, so we can use the land etb triggers from the lands that Smeagol steals to our advantage. All these pieces are mostly combo pieces, but will always give us an advantage.

Now then, what do we have in our ranks for landfall triggers:

  • Bloodghast - If he is in our graveyard and then we play a land, he gets to come back to us.
  • Dunedain Rangers - Their Landfall makes the ring tempt us, which is great for our cause.
  • Field of the Dead - This land gives us a token, when we play another land and we already have 7 lands.
  • Scute Swarm - The biggest army ever, at some point.
  • Greensleeves, Maro-Sorcerer - She herself a huge creature that gives us quite the army of 3/3, yes please!
  • Avenger of Zendikar - Have you ever been killed by huge plants? No? Then you have never played against a green deck.

Our own Land count really isn't that high, so we really need to lands we steal through Smeagol. Which also is the reason we don't run The Gitrog Monster in this deck, since if we sac the lands we sac aren't owned by us, they never go to our graveyard, so we don't get to draw. This is also the reason why we run no "play X additional lands on your turn" in the deck, since it really only helps in the first few turns.

We aren't really an aristocrats deck, but we do want to kill our creatures and so we also wat to get our value out of it.

We get to kill basically all our creatures if need, however we try to mostly only kill tokens besides the two that really scream "please kill me". Of course I'm talking about our good friends Bloodghast and Gollum, Patient Plotter. If we "accidently" kill our important creatures along the way, worry not we have a few reanimation effects, so we get to bring them back.

These cards give us the ability to kill our creatures:

These cards give us some kind of advantage when we kill our creatures:

The aristocrats side of the deck mostly goes to combo win the game, but also gives some additional value along the way.

How does the deck play out? (mostly)

These cards ramp us...

...through giving us additional lands:

...through artifacts:

...through creatures:

...through giving us additional mana:

To find out what type of hand we want we want to start the game, we first need to know our goal. Our goal is it, to get Smeagol, Helpful Guide out on the battlefield as soon as possible and then activate him as fast and often as possible. We also of course want to win as fast as possible, so we want a way to get to it.

So now, what critera should our hand fullfill?

  • 2 Lands at minimum
  • at least 1 piece of ramp
  • 1-2 ways to get the ring to tempt us (sacrifical creatures with a way to sac them is also possible)
  • we'd love to see 1 or even 2 combo pieces or tutors
  • 1 or more card draw / advantage piece

Cards (synergies) we love to see:

here will be a part about what we want to do in the early game, but it'll take a bit more time till I do it

When I first built this whole thing up, I found a combo online that was and still is the main focus of the deck. I'm talking about the Dunedain Rangers combo, however now I've added a few more combos that either win us the game or just put us that far ahead, that we basically win the game.

here will be a few more words and thought on how to get to these combos and so on, but it'll take a bit more time till I do it

Combopieces:

Smeagol, Helpful Guide + Dunedain Rangers + Ashnod's Altar or Altar of Dementia or Viscera Seer + Scute Swarm or Greensleeves, Maro-Sorcerer or Bloodghast or Field of the Dead

Setup:

  • All on Battlefield
  • Have one expendable creature as your Ringbearer

Howto:

Start the combo by any of the following three ways:

  • Sacrificing the Ringbearer and waiting to your endstep for Sméagol to tempt us with the Ring.
  • Play a card with a "the Ring Tempts you" effect on it.
  • Play a Land while you don't have a Ringbearer (using the Rangers "the Ring Tempts you" effect).

  • When the "the Ring Tempts you" trigger resolves, Sméagol will trigger. With that trigger on the stack hold priority and sacrifice your new Ringbearer.

  • Then let the Sméagol trigger resolve, which then means we get a land ETB under our control.
  • Stack the triggers as such, that we first create a Token creature (or let Bloodghast return) and then have our "the Ring Tempts you" trigger from the Rangers.
  • With the "the Ring Tempts you" trigger from our Rangers choose the new Token creature as the Ringbearer.
  • Repeat until you can't anymore (you can take out one person for sure, but not everyone).

As long as your receive Lands out of our opponents libraries, we can go on with the combo. If we don't, we need to start it again, or die because everyone now focuses us, so that we don't do it again the next turn.

Results:

Near Inf. Death Triggers

Near Inf. ETB Triggers

Near Inf. LTB Triggers

Near Inf. Ring Tempts Triggers

Near Inf. Sacrifice Triggers

Near Inf. Landfall Triggers

Near Inf. Mill

Many many Lands under our control.

Additional Results depending on what cards you used / had on the board:

Ashnod's Altar:

  • Inf. Colorless Mana

Altar of Dementia:

  • Probably that no Opponents have any cards left in their libraries (if done correctly), so you win!

Bastion of Remembrance / Syr Konrad, the Grim / The Meathook Massacre:

  • You probably just won, since you have that many death triggers.

Combopieces:

Chatterfang, Squirrel General + Pitiless Plunderer

Setup:

  • All on the Battlefield
  • Have at least 2 additional Squirrels
  • {B} Available

Howto:

  1. Pay the {B} to Chatterfang and sacrifice the two Squirrels. This gives any creature we choose +2/-2.
  2. The two Squirrels dying triggers the Plunderer twice, giving us two Treasures.
  3. That triggers Chatterfang giving us two Squirrels.
  4. Crack a Treasure for {B}.
  5. Repeat until satisfied.
  6. Let the Chatterfang ability's resolve.

Results:

Inf. Treasure Tokens

Inf. Death Triggers

Inf. ETB Triggers

Inf. LTB Triggers

Kill all creatures our Opponents control.

Additional Results depending on what cards you used / had on the board:

Bastion of Remembrance / Syr Konrad, the Grim / The Meathook Massacre:

  • You just won, since you have that many death triggers.

Combopieces:

Chatterfang, Squirrel General + Pitiless Plunderer + Gollum, Patient Plotter

Setup:

  • All on Battlefield
  • One Squirrel (Token) <- if you have two you can start with step 7 and only need {B}
  • {B}{B} Available

Howto:

  1. Pay {B} for Chatterfang, sacrificing the Squirrel Token and giving +1/-1 to Gollum.
  2. Plunderer sees two creatures die, makes two Treasure Tokens.
  3. Chatterfang sees two Treasures being created and makes two Squirrels.
  4. Crack one Treasure for {B} and use Gollum's ability to return him to your hand by sacrificing a Squirrel.
  5. Plunderer sees a creature die, makes a Treasure and Chatterfang gives us another Squirrel.
  6. Play Gollum again by cracking the two Treasures.
  7. Pay {B} for Chatterfang, but this time sacrificing two Squirrels and giving +2/-2 to Gollum.
  8. Plunderer sees three creatures die, makes three Treasure Tokens.
  9. Chatterfang sees three Treasures being created and makes three Squirrels.
  10. Crack one Treasure for {B} and use Gollum's ability to return him to your hand by sacrificing a Squirrel.
  11. Plunderer sees a creature die, makes a Treasure and Chatterfang gives us another Squirrel.
  12. Play Gollum again by cracking two Treasures.
  13. Now you still have a Treasure over, which you will at this point use to pay for Chatterfang.
  14. From this point forward always sac three Squirrels to Chatterfang.
  15. Repeat until satisfied.

Results:

Inf. Death Triggers

Inf. ETB Triggers

Inf. LTB Triggers

Inf. Ring Tempts Triggers

Inf. Sacrifice Triggers

Inf. Leaving the Graveyard Triggers

Inf. Squirrel Tokens

Inf. Treasure Tokens

Additional Results depending on what cards you used / had on the board:

Bastion of Remembrance / Syr Konrad, the Grim / The Meathook Massacre:

  • You just won, since you have that many death triggers.

Sméagol, Helpful Guide:

  • You win by milling.

Finale of Devastation

  • You win through infinte infinitly big creatures.

Combopieces:

Bolas's Citadel + Sensei's Divining Top + Aetherflux Reservoir

Setup:

  • All on the Battlefield
  • Your life total is at least 2

Howto:

  1. Activate Sensei's Divining Top by tapping it, drawing a card and then putting Sensei's Divining Top on top of your library.
  2. Cast Sensei's Divining Top from the top of your library by paying 1 life.
  3. Aetherflux Reservoir triggers, gaining you 1 life for each spell you have cast this turn.
  4. Repeat until your life total is 52 or greater.
  5. Activate Aetherflux Reservoir by paying 50 life, dealing 50 damage to any target.
  6. Repeat.

Results:

Inf. Card Draw

Inf. Draw Triggers

Near Inf. Damage

Near Inf. Lifegain

Near Inf. Lifegain Triggers

Near Inf. Storm Count

Additional Info:

If you are bored by just killing with the Aetherflux Reservoir, you can also at some point (when your life total is high enough) just cast everything you want from the top of library and then just win through the different lines. If you do it this way, you may also just have a Necropotence in play and exil the cards you don't want to play (like lands) and you still should be able to easily do it this way.

Discusing includes and excludes

This is the most important part to me, since here it shows my personality, but really right now I'm waaaayyy to lazy to write it righ now, it'll come, but it'll take some more time.

Revision History

2023-09-05 - V1.0 - Completed the Primer to how I wanted it and hopefully it holds up as long as possible.

2023-09-11 - V1.1 - Corrected a mistake within the "perfect start", since I was a bit stupid when I wrote it originally. Also added the Amass Orcs combo and added Field of the Dead to the infinte combos.

2023-09-27 - V1.2 - This one could actually be V2, but I decided it isn't quite enough change to say that. However many things changed, so really you need to re-read if you only knew the older versions.

2024-04-12 - V2.0 - I finally did the Primer revision. I waited a bit too long to do this tbh. Also I'm still not finished, but I'm putting out the update for you all. I'll put the rest in, in further V2.X updates.

Suggestions

Updates Add

I've finally done it, the new Primer is here, but also not yet really finished. I'm still working on a few parts, but the most important things are done.

The Formatting also doesn't really work yet (since I wrote it in markdown and to isn't that good with that yet), I'll finish that up a bit sooner, but it'll take a few days.

Comments

Attention! Complete Comment Tutorial! This annoying message will go away once you do!

Hi! Please consider becoming a supporter of TappedOut for $3/mo. Thanks!


Important! Formatting tipsComment Tutorialmarkdown syntax

Please login to comment

Casual

94% Competitive

Top Ranked
Date added 8 months
Last updated 1 week
Legality

This deck is Commander / EDH legal.

Rarity (main - side)

26 - 0 Mythic Rares

39 - 0 Rares

21 - 0 Uncommons

5 - 0 Commons

Cards 100
Avg. CMC 2.59
Tokens Badger 3/3 G, Copy Clone, Human Soldier 1/1 W, Insect 1/1 G, Orc Army, Plant 0/1 G, Radiation, Squirrel 1/1 G, The Ring, The Ring Tempts You, Treasure, Zombie 2/2 B
Folders Commander decks, EDH Try, Decks I Use, Cool EDH Decks, CMDR Decks, EDH Decks, interesting
Votes
Ignored suggestions
Shared with
Views