pie chart

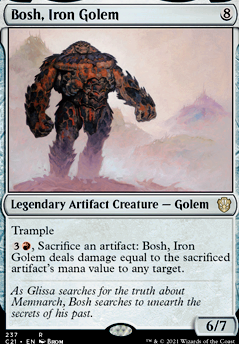
[Primer] Engineered Explosives

Commander / EDH* Artificer Mono-Red

Mortaal


Deckbuilding Disclaimer


This is my primer on Bosh where I want to avoid (at all costs) infinite combo lines (Rings of Brighthearth + Basalt Monolith + Prismite to kill the table with bosh and so on) as well as the nasty lockdowns that do not win the game outright but rather make it a slow dragged out mess (Mycosynth Lattice+Vandalblast//Karn, the Great Creator and such). It is not that you can not or should not play these combinations in the deck, it is just that this is what my playgroup agreed upon.

Having set these rules in place, the challenge with this deck is for us to push bosh to his absolute limits and find out whether he can still compete at a higher power table (and trust me, as the title of this deck explains, he is a blast to play).


Lines of Play


The basic idea of the deck is to build a powerful board full of mana rocks at a pace no other player can match in speed, and to defend them via Slobad, Goblin Tinkerer/Darksteel Forge (which must be found as fast as possible). Once this board has been set up we can find our synergy piece through a multitude of tutors in the deck, bring out Bosh, and start flinging damage through the following lines:

Mycosynth Golem + Bosh, Iron Golem + 7+ other artefacts on board = casting bosh and flinging himself repeatedly.

Metalwork Colossus + Bosh, Iron Golem + 11cmc of non-creature artefacts on board + sac fodder = casting and flinging Metalwork Colossus repeatedly.

Of course these are the 2 ideal lines, yet Bosh can throw any artefact on your side of the battlefield, so when all else fails the final playline is to sacrifice our entire board and hope to blow everyone off the table.

The last note I will make on the lines of play is that you really want to perform your throws with Bosh at instant speed (and end of turns) as much as possible. Doing this will provide you with a constant bomb threat which is "primed" and ready to go off on whoever or whatever (creature) threatens your game-plan, and also gives you great options for politics such as: "if I get rid of that creature for you, you can not attack me for two turns". I have learned that threatening 8+ instant speed damage is a powerful tool to have on your side of the board, so be patient with blowing stuff up.


Card Inclusions


Before digging through all the separate card selections I want to provide a short summary for ease of reading. Within the deck there are a few inclusions that are very important in the deck. The first is that we want to run multiple big-draw (wheels and so on) effects in the deck. The speed at which we empty our hands through the sheer amount of mana available to us requires a continuous refill to keep the game-advancement going. Secondly the addition of creature tutors to find either Goblins, Constructs, or any low power creature with recruiter offers flexibility in building your board state. The final note will be regarding the recursion package in the deck. As we empty our hands quickly, and sacrifice artefacts for damage and card draw, returning artefacts from our graveyard to hand (or play) is another form of pseudo card draw in the deck and guarantees we won't run out of gas too quickly and provides consistency of plays.

With an 8 cmc commander and an elaborate setup to get going this deck wants to run an explosive number of ramp artefacts. Also, seeing our commander can turn artefacts into damage, it does not really matter that we run such a large amount of them. Lastly I want to remark that artefact ramp tapping for mana rather than adding mana to our pool (like Blinkmoth Urn) is much more synergistic in a deck that runs multiple untap effects such as Unwinding Clock

Card by Card

Ancient Tomb - Tap for two, loose two, nets us 1 extra mana on play turn, amazing.

City of Traitors - Taps for two, and we lose it to a land-drop (can ramp two turns in a row). Can be replayed with Crucible of Worlds.

Crystal Vein - Taps for one, but can be sacrificed for two mana when we need to crank things to 11.

Mana Crypt - Needs no introduction, the Sol Ring for 0 mana with a minor drawback. If it starts hurting too much just sacrifice it when needed.

Mishra's Workshop - The land that taps for 3 mana, this thing is nuts. Especially dropping a Metalworker turn one is insanely powerful, and will paint an instant target on your forehead.

Mox Diamond - Taps for red mana, and the land we have to discard can later be recurred using Crucible of Worlds.

Mox Opal - The artefact Mox, just perfect for artefact focussed decks.

Scorched Ruins - The trap-land as some (most?) call it. I still love the extra mana it offers the turn it comes down and because we want to be explosive, we want this.

Mana Vault - The Sol Ring tapping for 3 but does not untap. Luckily we run key's and Unwinding Clock to circumvent this.

Sol Ring - The best mana rock in the game. Nets you one mana the turn it comes down, and has no downsides... yeah...

Dockside Extortionist - This goblin offers insane ramp in the right scenario's and for artefact swap shenanigans is great as the treasures are artefacts themselves. Can be tutored with Goblin Matron or Imperial Recruiter when needed.

Grim Monolith - The worse Mana Vault, yet as we run the clock and Voltaic Key and Manifold Key, we get to draw insane amounts of mana out of this rock.

Mind Stone - The mana rock with a draw option. Amazing in a mono red deck where we can use any draw we can get.

Basalt Monolith - The worse Grim Monolith, yet as mentioned before, with untap effects becomes great.

Metalworker - Probably the most absurd ramp card in the deck is this guy. getting to pump out 8+ mana per turn really turns this guy into a massive target. Keep that Deflecting Swat at the ready!

Hedron Archive - Same as the Mind Stone, hedron ramps, draws, and can be thrown for 4 damage. Nice overall utility.

Thran Dynamo - The reason this deck can use cards like the dynamo is because our commanders is so costly. Ramping on turn 4 with this means we will have our commander out next turn. Fits perfectly on our curve.

Gilded Lotus - The mana rock tapping for 3 red mana. Even though this seems subpar compared to other rocks, we are still playing a mono-RED deck and need red pips to be paid for. We also run an enormous amount of lands not tapping for red mana, and therefore really can use mana-rocks like this.

Dreamstone Hedron - The Mind Stone + Hedron Archive stapled together. Again due to the high curve, and added draw and damage utility it offers, it deserves a spot in the deck.

As this deck intends to ramp hard, it also means our hands will be emptied in rapid succession. For this reason we need the deck to run bursty draw effects that are either stapled to artefacts, or wheel effects that give us a full refill on gas.

Card by Card

Bonders' Enclave / War Room - Two lands which draw us a card for 3 mana. In mono-red this is fantastic to have stapled to a land especially as we will have plenty of mana from our ramp to put into these abilities. The Bonders' Enclave is included in the deck as our commander is at 6 power, enabling the guaranteed use of this land when needed.

Soul-Guide Lantern - Apart from its graveyard hate uses, this card doubles as a draw engine which is requirable. Dual functioning permanents are great, and that also goes for this gem.

Mind Stone / Hedron Archive / Dreamstone Hedron - The three stones that draw us 1, 2, and 3 cards respectively. Used for ramping, throwing for damage, and also draw when they are needed.

Wheel of Fortune / Wheel of Misfortune / Reforge the Soul - Now we come to our actual big draws. Drawing 7 cards is so powerful in a mono red deck, it refuels our hands and propels us forward. In this deck we do not wheel to disrupt, we wheel to draw gas as we empty our hands quickly. With the Wheel of Misfortune naming higher life totals to guarantee a wheel is kind of needed, yet also worth it.

Mystic Forge - This artefact lets us look and exile the top of our library at any time we don’t like what we see. Much more importantly, we get to cast colorless spells from the top of our library technically counting as drawing cards we play from the top. As about half the cards in our deck are colorless, the chances of hitting something to cast is high enough to be worth a slot.

Memory Jar - The recurrable artefact draw. You usually want to activate this guy when you have all your mana available to you, otherwise you may miss out on plays from your newly drawn hand. You can also use it to protect the card you have in hand in a response to a wheel effect of another player. Although that may be rare.

Sandstone Oracle - Another recurrable draw machine. Looking at the low number of cards we usually have in hand, this creature is amazing in what it does and usually nets you at least 4 cards. And being able to do this multiple times makes it even better.

Red is especially good at artefact recursion, and as we will either lose artefacts due to our opponents blowing them up, or we willingly discard them into our graveyards, we need forms of bringing them back. This is a pseudo-draw strategy that sometimes can even work better than regularly casting our artefacts. Cheating in a Darksteel Forge for example.

Card by Card

Buried Ruin - The land that returns an artefact to our hand (getting it into our hand directly is of high value). Can be used in response to graveyard hate, or as general utility to grab what we need from our graveyard. Can be recurred with Crucible of Worlds.

Codex Shredder - The hate card that can also grab us anything we need at instant speed. Need another wheel? Board wipe? You got it, and directly into your hand.

Goblin Welder / Goblin Engineer / Daretti, Scrap Savant / Trash for Treasure / Scrap Mastery - All of these provide us with a similar trick, although the Scrap Mastery does this in mass form. Swapping a card in our grave for one in play provides resilience and flexibility and is kind of the party trick of mono red artefacts.

Crucible of Worlds - This card is great in a deck where we run a land base that tends to sacrifice itself quite a bit. Getting back a City of Traitors or a Great Furnace that was sacrificed to a Goblin Welder is fantastic value.

Scrap Trawler - Boardwipe protector, and great little creature with the amount of artefacts we sacrifice. We also run quite a low curve, which guarantees there is almost always something we can return to hand.

Underworld Breach - If you have ever played a Yawgmoth's Will you know the power of this enchantment. It is fantastic that we get access to our entire graveyard, from where we can almost entirely rebuild our board state in most cases.

Tutors are important in the singleton commander format as they offer us a direct pathway to enhance our board position without having to draw through our libraries. With this deck this is no different and several tutors are included to dig up key pieces from the deck as fast as possible.

Card by Card

Inventors' Fair - A land that can find us any artefact in our deck that we need at that specific moment. Amazing card in this deck.

Sanctum of Ugin - This land is only included in this deck as our commander costs 8 mana to cast, guaranteeing this land to become a tutor when we want it to. With it we can then find a Sandstone Oracle for draw, or a Mycosynth Golem for utility, or even just a Meteor Golem for spot removal.

Expedition Map - This tutor is amazing in the deck as we run plenty of utility and ramp lands we wish to get into play. Need ramp? Go find Mishra's Workshop, need a tutor for a specific creature, go get yourself an Sanctum of Ugin.

Gamble - The classic red tutor, finds anything at a risk of losing it. Do not use this with few cards in hand unless you are desperate. The downside of this tutor may sometimes even prove to be an upside as we can reanimate whatever artefact we ditch into our graveyard.

Goblin Matron - We run four powerful goblins in this deck, each of which offers utility, protection, or ramp. This matron will count as the duplicate of each of these, and is therefore well worth running.

Imperial Recruiter - The recruiter can find us any of our utility creatures we need, including the Metalworker, which is enough to earn him his spot in the deck.

Scrapyard Recombiner - This is an interesting, and perhaps odd addition, yet this little guy can also find us our Metalworker in the early game, while in the late game he can grab us our Metalwork Colossus, Kuldotha Forgemaster, or Scrap Trawler.

Kuldotha Forgemaster - This guy seems to come at a high cost for a tutor, yet puts the tutored card into play. This is a huge deal, as it skips the casting of the artefact in question also avoiding paying it's mana cost.

Planar Bridge - This is possibly the best tutor in this deck. It puts the tutored card directly into play (which always should be a Darksteel Forge to start with) and can be untapped to be used on multiple turns at instant speed. When you drop this into play, people will paint a target on your back so be ready for that.

To protect our board development and important plays (such as Metalworker for example) we want to run several interaction pieces which will protect them.

Card by Card

Pyroblast / Red Elemental Blast - The (old) Counterspell in red. Most of the games we play we will have a player playing blue on board. These two allow us to remove great blue permanents such as Mystic Remora and Rhystic Study, or counter a Counterspell countering our progression.

Tibalt's Trickery - The REAL counter spell in red, absolute fantastic interactive material. Functions like a Chaos Warp so we could even counter one of our own spells to hope for a good hit off the top of our library.

Deflecting Swat / Bolt Bend - The two redirects in the deck can either redirect removal spells (or abilities!) to different targets when our opponents want to blow something up on our (or an ally's board), can deal with counter spells, and could redirect a beneficial draw effect such as Stroke of Genius towards ourselves for advantage.

Slobad, Goblin Tinkerer / Darksteel Forge - These two protect almost our entire board (or at least half of it with Slobad) and are essential for our board progression. Finding either of the two as soon as possible through tutors such as Inventors' Fair and Goblin Matron is extremely important.

Sometimes during the game we need to be able to get rid of an oppressive permanent or dangerous creature in a more or less mana efficient way (so that we can use the majority of our mana for spell-casting). In red there are several decent options, and as we are an artefact deck we will also include some artefact based removal.

Card by Card

Strip Mine - Land removal on a land, perfect. Gets rid of powerful utility lands such as Gaea's Cradle and Cabal Coffers and we can tutor it with Expedition Map when needed.

Pyroblast / Red Elemental Blast - Destroying that Rhystic Study or Mystic Remora never felt so good.

Chaos Warp - The best permanent removal in red. At instant speed we can shuffle away any permanent, working around indestructible creatures as we go. This spell can also be used to shuffle our own Mana Crypt back into our own deck when the damage it causes is getting out of hand.

Vandalblast / By Force - Our artefact spot(s) removals in a pinch. Feel free to use this on a turn 1 Sol Ring of an opponent, or any other artefact that is looking threatening to your game-plan.

Shatterskull Smashing   - Counts as a land, but may come handy in a pinch. Can also be used as a spell first and replayed as a land through Crucible of Worlds.

Duplicant - Creature exile on an artefact creature is perfect for this deck. We can tutor this out using Imperial Recruiter or artefact tutors when needed, making it a reliable source of removal, which can later on be thrown for 6 damage using our commander.

Spine of Ish Sah / Meteor Golem - These two destroy permanents (non-land for the Golem) when entering the battlefield. We have numerous ways of tutoring for these removal pieces when needed through things as Planar Bridge and Inventors' Fair.

Bosh, Iron Golem - Bosh can throw any artefact at any target, making him a very versatile spot removal in the deck. Do not be afraid to use his throw to get rid of a threat on the board. If you feel like you wasted resources doing this, don't worry, the deck is meant to throw things, it will recover.

In EDH we need ways to clear the board when opponents get out of hand, within this category we focus on wipes which do not hit non land permanents, as these also greatly affect our board state most of the time.

Card by Card

Vandalblast - A mass removal of only our opponents artifacts is great. Blowing up their mana rocks and hate pieces is a fantastic way to pull ahead in board development and slow them down stopping you.

Blasphemous Act - The best board wipe. Probably in the format. Paying mostly one red mana to blow up the board is just great value in mono red.

Star of Extinction - This card seems less ideal until you realise this also hits planeswalkers and has no artefact destruction clause, great wipe for this deck.

All Is Dust - Sacrificing all non-coloured permanents. This is just a wipe made for this deck as our board will almost never be affected.

Ugin, the Spirit Dragon - Big papa Eugene. This guy is absurdly strong, again, just as with All Is Dust he can wipe our opponents while leaving us alone. He can also be used as a lightning bolt to zap players or planeswalkers when needed, and when you get to ult him, you can stock your board full of value.

Utility cards in any deck are cards that fit the setup category. They do not have a payoff on their own but help solidify your board state or enable strategies that benefit your game plan.

Card by Card

Darksteel Citadel / Great Furnace - The artefact lands that help us get our Mox Opal active asap, and are sacrifice fodder for our Goblin Welder effects.

Manifold Key / Voltaic Key - Untap effects for artefacts which do not untap, such as our Grim Monolith are great for ramping. They also can untap utility artefacts such as Scrapyard Recombiner for multiple uses, and the Manifold Key even has an unblockability option stapled to it.

Goblin Engineer - The Entomb for artefact decks. And on top it has an ability to reanimate from our graveyard.

Shimmer Myr / Vedalken Orrery - With untap effects for our mana rocks, instant speed artefact casting got even more powerful. Also when a Spine of Ish Sah loop is active with bosh, doing this in each of our opponents turns is awesome.

Daretti, Scrap Savant - This guy has a more important second ability stapled to him, yet in a pinch he can help us loot through our decks when the need arises.

Lithoform Engine - Duplicating mana rocks, big guys, or the ability of bosh is amazing flexibility warranting this a spot in the deck.

Unwinding Clock - with all our mana rocks, being able to untap and do our tricks in our opponents turns makes this an almost must-play in the deck. Especially if we can go and find a Vedalken Orrery afterwards.

Mycosynth Golem - This is one of our synergy pieces with our commander. Enabling him to cost 0 for several “throws” is a great way to have a lethal trigger early on in the game. Tutor for him when your setup is complete and you can start doing massive damage.

Metalwork Colossus - Our second heavy hitter with our commander. This bad boy is almost always free to cast in our deck, and has a pseudo-reanimate ability attached to itself! Overall great guy, and if not thrown can still threaten 10 damage on the board, which is nothing to sneeze at either.

As we are playing a mono coloured deck, we miss several colours of the color pie to provide us with options to interact with. As a replacement we add a few specific Hate pieces that interact with more general strategies opponents may be running. These pieces mainly serve the purpose to slow down our opponents' card advantage and ramping possibilities, giving our deck more time to set up our explosives.

Card by Card

Blood Moon / Magus of the Moon - Turning all non-basic lands into mountains is a powerful effect. Although it affects our non-basic lands similarly, we will almost not feel this downside. Furthermore the magus can be searched for with Imperial Recruiter when you need your own lands to produce more red mana for throwing artefacts with Bosh.

Codex Shredder - This little gem has multiple positions in the deck. As a control piece it prevents our opponents from using top-deck tutors such as Vampiric Tutor as well as strategies using Sensei's Divining Top and Scroll Rack. On top of that it can be used to mill ourselves to fix our own top-deck in combination with Mystic Forge or Sensei's Divining Top, or get big artefacts into our graveyard to reanimate.

Soul-Guide Lantern - Many decks have forms of graveyard recursion integrated into them or are actually running a graveyard focussed strategy. For this reason we want to run a graveyard hate piece (which can be tutored up when needed). When not needed for graveyard hate Soul-Guide Lantern can be turned into card draw, making it versatile.

Stranglehold - Preventing our opponents from tutoring for pieces to develop their gameplan, or preventing them from tutoring for answers against our board (Vandalblast / Null Rod) is great. On top of that it prevents extra turns, which is just gravy.

God-Pharaoh's Statue - This artefact slows down opponents a significant amount while not affecting ourselves, can be thrown for 6 damage to any target using our commander, and looking at our ramp package probably comes out relatively early as well.

To finish out the deck we simply add 19 Mountains. This provides the deck with the majority of the red mana needed to activate Bosh, as well as to pay for our other red mana symbols of our red spells.

Final Words

As a final note I want to share with you that the monetary expensive pieces in this deck are definitively not needed to make the deck work. I however, set myself the goal of seeing how for I can push the big man in terms of power level without going infinite and therefore have included these pieces, as they add the last bit of speed that can be squeezed out of the deck.

If you would like to run the deck yet do not want to spend your month's rent on cardboard, you can easily replace them with other mana-rocks, red looting spells and slower wheel effects (Magus of the Wheel / Wheel of Fate), and basic mountains.

This deck will be constantly under construction and if anyone has good ideas or suggestions let me know. If you liked the deck and/or reading this deck tech be sure to hit the upvote button, it is much appreciated!

Cheers, Mortaal

Suggestions

Updates Add

Comments View Archive

Attention! Complete Comment Tutorial! This annoying message will go away once you do!

Hi! Please consider becoming a supporter of TappedOut for $3/mo. Thanks!


Important! Formatting tipsComment Tutorialmarkdown syntax

Please login to comment

Top Ranked
Date added 4 years
Last updated 3 years
Legality

This deck is Commander / EDH legal.

Rarity (main - side)

11 - 0 Mythic Rares

43 - 0 Rares

24 - 0 Uncommons

3 - 0 Commons

Cards 100
Avg. CMC 3.68
Tokens Copy Clone, Emblem Daretti, Scrap Savant, Treasure
Folders m, Decks to Try, EDH Decks
Votes
Ignored suggestions
Shared with
Views