
K’RRIK, LORD OF THE STORM [cEDH Primer]
Commander / EDH Combo Competitive Devotion Mono-Black Phyrexian Primer Reanimator Sacrifice Storm Suicide Black
Discard (2)
Draw (2)
Graveyard Hate (1)
Land (28)
-
1x
Ancient Tomb

-
1x
Blast Zone
- 1x Cavern of Souls
- 1x City of Traitors
-
1x
Crystal Vein
-
1x
Emergence Zone
-
1x
Gemstone Caverns
- 1x Homeward Path
- 1x Lake of the Dead
- 1x Nykthos, Shrine to Nyx
-
1x
Phyrexian Tower
-
15x
Swamp
-
1x
Urborg, Tomb of Yawgmoth
-
1x
Urza's Saga
Protection (1)
Ramp (22)
- 1x Blood Celebrant
- 1x Blood Pet
-
1x
Cabal Ritual
-
1x
Chrome Mox
- 1x Culling the Weak
-
1x
Dark Ritual
- 1x Grim Monolith
- 1x Heartless Summoning
- 1x Jet Medallion
-
1x
Jeweled Lotus
- 1x Lion's Eye Diamond
- 1x Lotus Petal
-
1x
Mana Crypt
- 1x Mana Vault
-
1x
Mox Amber
-
1x
Mox Diamond
- 1x Overeager Apprentice
- 1x Rain of Filth
- 1x Sacrifice
-
1x
Skirge Familiar
-
1x
Sol Ring
- 1x Soldevi Adnate
Recursion (5)
Removal (9)
-
1x
Baleful Mastery
-
1x
Bile Blight
-
1x
Cut Down
- 1x Deadly Rollick
-
1x
Dismember
- 1x Pestilence
- 1x Snuff Out
-
1x
The Meathook Massacre
-
1x
Toxic Deluge
Tutor (14)
-
1x
Beseech the Queen
-
1x
Buried Alive
-
1x
Dark Petition
-
1x
Demonic Tutor
-
1x
Diabolic Tutor
-
1x
Entomb
-
1x
Final Parting
-
1x
Grim Tutor
-
1x
Imperial Seal
-
1x
Mastermind's Acquisition
-
1x
Razaketh's Rite
-
1x
Sidisi, Undead Vizier
-
1x
Vampiric Tutor
-
1x
Wishclaw Talisman
Win-Con: Death by Combo Steal (2)
Win-Con: Death by Fleshy Loop into Asmooze (5)
Win-Con: Death by Gary Loop (3)
Win-Con: Death by Shelly Storm (5)
-
1x
Bolas's Citadel
-
1x
Peer into the Abyss
-
1x
Sensei's Divining Top
-
1x
Sheoldred, the Apocalypse
- 1x Vilis, Broker of Blood
Commander (1)

Maybeboard
Combo (13)
-
1x
Aetherflux Reservoir
- 1x Bitter Ordeal
- 1x Doomsday
- 1x God-Eternal Bontu
- 1x Leshrac's Sigil
- 1x Mikaeus, the Unhallowed
- 1x Mortuary
- 1x Phyrexian Devourer
-
1x
Tendrils of Agony
- 1x Triskelion
- 1x Viscera Seer
- 1x Walking Ballista
-
1x
Zuran Orb
Discard (2)
Draw (10)
- 1x Aphotic Wisps
-
1x
Braids, Arisen Nightmare
- 1x Cremate
-
1x
Duress
- 1x Fade from Memory
- 1x Nighthaze
-
1x
Nihil Spellbomb
- 1x Scarab Feast
- 1x Scroll Rack
-
1x
Sign in Blood
Graveyard Hate (3)
Land (29)
- 1x Barren Moor
-
1x
Boseiju, Who Shelters All
-
1x
Buried Ruin
- 1x Cabal Pit
-
1x
City of Brass
-
1x
Command Beacon
-
1x
Command Tower
- 1x Darksteel Citadel
- 1x Exotic Orchard
- 1x Gemstone Mine
-
1x
Glimmervoid
- 1x Ifnir Deadlands
- 1x Inventors' Fair
- 1x Mana Confluence
- 1x Peat Bog
-
1x
Reliquary Tower
- 1x Scavenger Grounds
- 1x Scorched Ruins
-
1x
Shizo, Death's Storehouse
-
1x
Snow-Covered Swamp
-
1x
Spire of Industry
-
1x
Strip Mine
-
1x
Takenuma, Abandoned Mire
- 1x Tendo Ice Bridge
-
1x
Thran Portal
- 1x Urborg
-
1x
Vault of Whispers
- 1x Volrath's Stronghold
- 1x Wasteland
Protection (6)
- 1x Conqueror's Flail
- 1x Contamination
- 1x Darkness
- 1x Defense Grid
- 1x Infernal Darkness
- 1x Lightning Greaves
Ramp (7)
-
1x
Arcane Signet
- 1x Fellwar Stone
- 1x Helm of Awakening
-
1x
Manifold Key
- 1x Mind Stone
- 1x Mox Opal
- 1x Voltaic Key
Razaketh Package (8)
Reanimator (7)
- 1x Corpse Dance
-
1x
Exhume
-
1x
Goryo's Vengeance
- 1x Soul Exchange
- 1x Victimize
-
1x
Xiahou Dun, the One-Eyed
- 1x Yawgmoth's Will
Removal (15)
-
1x
Damnation
-
1x
Drag to the Underworld
-
1x
Feed the Swarm
-
1x
Font of Agonies
-
1x
Force of Despair
- 1x Gate to Phyrexia
-
1x
Grasp of Darkness
-
1x
Hero's Downfall
-
1x
Infernal Grasp
-
1x
Murderous Rider
-
1x
Oubliette
-
1x
Ratchet Bomb
- 1x Slaughter Pact
-
1x
Ulcerate
-
1x
Victim of Night
Tutor (10)
Top Rank: #1 on T/O - thanks for reading!

“The fools thought me dead. But I built an empire inside my tomb.”
-Kerrick (K’rrik), Sleeper Agent (from Brink of Madness)
OVERVIEW
Behold my K'rrik, Son of Yawgmoth cEDH combo build. Glory to Phyrexia! All will be One!
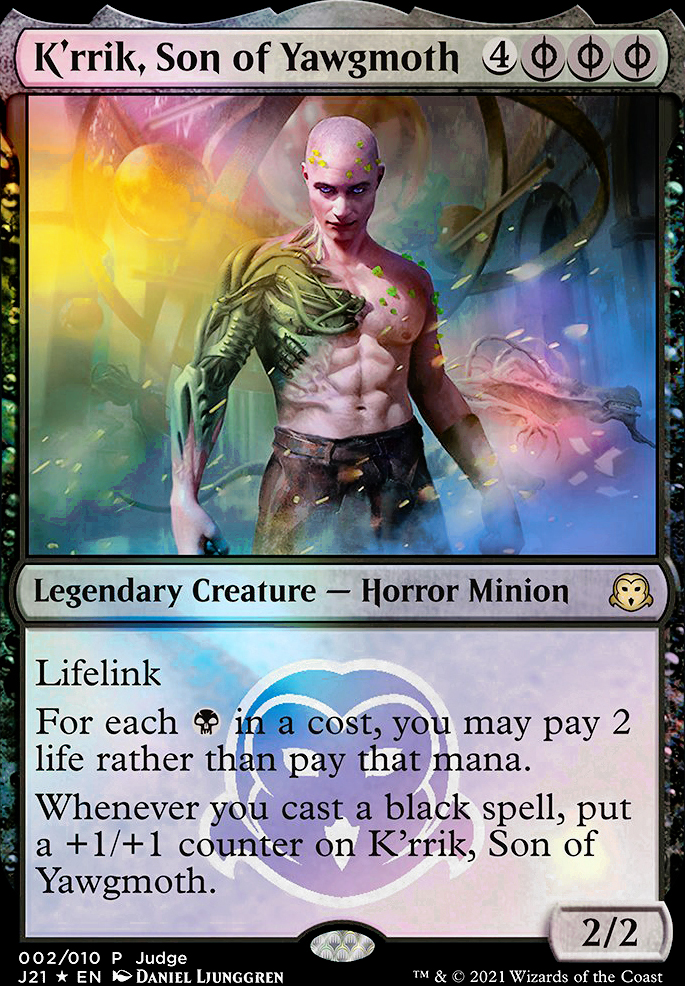
My objective is to summon K’rrik on turns 1-3, then abuse his ability to convert my life into black mana and rapidly assemble a combo to eliminate each opponent simultaneously. To achieve victory, I must carefully monitor my life total as life is my most precious resource.
This deck is designed to maximize ramping and tutoring to explode in a single turn and eliminate each opponent simultaneously. I’ve streamlined this build by cutting redundant or mana-intensive combo lines. It is now more resilient to stax cards like Rule of Law or Null Rod.
WIN-CONS
Gary Loops
Requires K'rrik, Son of Yawgmoth on the battlefield. First I cast Buried Alive targeting Chainer, Dementia Master, Dimir House Guard, and Gray Merchant of Asphodel. Then I reanimate Chainer using a reanimation spell (Animate Dead, Dance of the Dead, Necromancy, Reanimate), or Shallow Grave.
Next I use Chainer’s ability, paying 9 life to return Gary to the Battlefield, draining each opponent of 7 life. Then I use Chainer to return Guard to the battlefield, paying another 9 life. Then I sac Gary with Guard, pay 9 life to return Gary to the battlefield with Chainer, draining 8 more life per opponent, and so on, draining infinite life and killing each opponent.
I can also use Necrotic Ooze + Buried Alive to copy the abilities of Chainer and Guard in my graveyard, allowing me to achieve the infinite Chainer loop without a reanimation spell.
It is important to note that since Chainer’s reanimation ability isn’t a spell, it can bypass stax cards like Rule of Law, and it can be activated at instant speed.
Vile Entomber is an excellent combo enabler. If I only have Chainer on the board and Entomber in my hand or graveyard, I can play/reanimate Entomber to place Guard in my graveyard. Then I reanimate Guard with Chainer and sac Entomber with Guard. Again, I reanimate Entomber with Chainer, and place Gary in my graveyard. In this way, I have assembled the entire Chainer loop at instant speed.
Sidisi, Undead Vizier is a one-card combo generator. Upon casting, I exploit Sid and search for Chainer. Then I cast Chainer and use him to reanimate Sid. Next I exploit Sid to tutor for Entomb, cast it, and place Gary in my graveyard. Next I reanimate Gary with Chainer to gain life, then reanimate Sid with Chainer. I then exploit Sid to tutor for Culling the Weak (sac’ing Gary). Next I reanimate Gary with Chainer again to gain life. Then once again I reanimate Sid with Chainer, exploit her to tutor for Guard, cast Guard using the mana from Culling, then use Guard to sac Gary. I have now completed the loop. This combo requires an initial investment of 6 colorless mana and 24 life (assuming all black mana is paid via K’rrik).
Shelly Storm into Gary Loop or Pestilence
If Vilis, Broker of Blood is in my graveyard and I cast Reanimate on it, Vilis enters the battlefield before I lose 8 life from Reanimate, triggering Vilis’ card draw ability. With these 8 cards, I can try to find mana-generators and spend life to draw more cards.
If I have K’rrik and Sheoldred, the Apocalypse on the board in addition to Vilis, Broker of Blood, Asmodeus the Archfiend, or Necrotic Ooze on the board and Asmo in the graveyard (otherwise known as Asmooze), I can draw my entire deck and net at least 1 life per card draw. With my surplus of life and entire library at my disposal, I can easily generate enough mana to assemble the Gary Loop, or I can kill each other player with Pestilence (and all off their creatures and Planeswalkers for good measure).
If I have Shelly along with Bolas's Citadel and Sensei's Divining Top in play, I can cast the top card of my deck with Citadel, then draw as many cards as I want with Top, recasting Top each time with Citadel, and gaining as much life as I want with Shelly. In this way Shelly has functionally replaced Aetherflux Reservoir.
With Shelly on the board, I can target another player with Peer into the Abyss and eliminate that player. With or without Shelly, if I target myself with PitA, I have a 99% chance of drawing into enough resources to pull off a group combo-kill. K’rrik and Shelly make it easy, but I can potentially win without either if find and cast Skirge Familiar.
Fleshy Loop
Once I cast Fleshwrither, I can then transfigure it into to Necrotic Ooze at instant speed (running total: 3 mana, 8 life). Then I use Ooze to copy Fleshy’s transfigure ability and transfigure it into Balthor the Defiled (4 mana, 12 life). Next I use Balthor to exile himself and reanimate Ooze and Fleshy (4 mana, 18 life). Then I transfigure Fleshy into Vile Entomber (5 mana, 22 life).
Here is where the Fleshy line diverges: I can either use Vile Entomber to entomb Asmodeus the Archfiend, or Razaketh, the Foulblooded (which I am no longer running). If I choose Asmooze, I start with -22 life, then I can spend 6 life per 7 cards and draw through as much of my deck as possible. Odds are I will find a tutor and find Skirge Familiar.
If I choose to entomb Razz, I use Ooze to sac Entomber and tutor for Reanimate (running total: 24 life). Next I cast Reanimate on Entomber (entombing Skirge Familiar) (30 life). Using Razz, I then sac Entomber to tutor for Asmo (32 life). Ooze is still on the board, so I copy Skirge’s mana ability and discard Asmo. The now compleat Asmooze can copy Asmo’s draw ability and Skirge’s mana ability. I draw my entire deck, generate mana by discarding cards, and find any kill combo I want.
The examples above demonstrate why I am on the fence about running Razaketh. These combo lines bring me very close to death, and realistically I will take some damage before I can execute the Fleshy Loop. Although Razz completes the Fleshy Loop, he is a win-more card in this deck otherwise.
If K’rrik is removed, the Fleshy Loop works without him, but the combo is mana-intensive and may require several turns to complete.
Praetor’s Grasp
Praetor's Grasp can be used to steal an opponent’s win-con, especially Underworld Breach. Mana rocks including Lion's Eye Diamond help cover the cost of Breach combo lines and Thassa's Oracle.
STRATEGY
Opening
My first priority is casting K’rrik as soon as possible. I must seek out a combination of Ancient Tomb, Blood Pet, City of Traitors, Cabal Ritual, Crystal Vein, Dark Ritual, Gemstone Caverns, Grim Monolith, Heartless Summoning, Jet Medallion, Jeweled Lotus, Lake of the Dead, Lotus Petal, Mana Crypt, Mana Vault, Mox Diamond, Soldevi Adnate, and Sol Ring in my opening hand. Since I always cast K’rrik for 4 mana and 6 life, I essentially start the game with a handicap of 6 life, which is a small price to pay for Compleation.
I must also start with one or more combo pieces, or a way to draw or tutor for what I need. Aggressive mulligans are critical.
Tutors
Since K’rrik converts black mana into life, even the most janky black tutor spell is playable, so I run every tutor possible, including: Beseech the Queen, Dark Petition, Diabolic Tutor, Demonic Tutor, Grim Tutor, Mastermind's Acquisition, Razaketh's Rite, Sidisi, Undead Vizier, and Wishclaw Talisman. I save Talisman for when victory is guaranteed.
The lesser tutors Imperial Seal and Vampiric Tutor are also useful. I have immediate access to the tutored card via the abilities of Bolas's Citadel, Asmodeus the Archfiend, and Vilis, Broker of Blood.
Urza's Saga is ideally played on turn 1 and eventually tutors for any 0 or 1 cost artifact. I usually choose Mana Crypt or Sensei's Divining Top.
To enable reanimation combos and place creatures in my graveyard, I use Buried Alive, Entomb, Final Parting (choosing Chainer in hand and Gary in the grave, or Reanimate and Vilis, or Ooze and Asmo), and Vile Entomber (usually choosing Chainer).
Dimir House Guard functions both a sacrifice outlet and tutor for Fleshwrither, Pestilence, Sheoldred, the Apocalypse, etc.
Draw
Necropotence is a powerful draw engine and can be abused by timing instants and activated creature abilities (like Chainer’s reanimation ability) after Necro’s exile effect triggers during the End Step, or by activating Emergence Zone.
Night's Whisper is easy to cast with or without K’rrik and provides additional draw support.
Sac-Based Ramp
In prior versions of this build I avoided running Culling the Weak, Phyrexian Tower, and Sacrifice because I ran very few creatures and rarely desired to sac K’rrik. Now I realize that my hesitancy was misplaced, because these cards have multiple uses. I can use a sac ability as a response to a removal spell, to kill Asmo, to release K’rrik from bondage (such as being trapped in an Elk body via Oko, Thief of Crowns), or when I need to generate mana while storming. I can even Sacrifice K’rrik to cast Peer into the Abyss.
In a previous version of this deck with Razaketh, the Foulblooded, I ran man-lands (Blinkmoth Nexus, Inkmoth Nexus, Mishra's Factory, and Mutavault) as potential sac targets for ramping and Razaketh, the Foulblooded, but these lands do not advance my primary objectives and usually take up space.
Protection
I used to run more protection for K’rrik, such as Lightning Greaves, Defense Grid, etc., but I realized that spending resources to defend K’rrik is a waste of time. I would rather play reactively and spend resources on creature removal to protect my life total (and kill an enemy Opposition Agent). I am going for a hyperspeed combo build, as opposed to a more mid-ranged approach.
Opposition Agent steals an opponent’s tutor and blocks their combo. Imp's Mischief redirects counterspells at themselves. Cavern of Souls naming Minion is counterspell protection for K’rrik and Chainer.
I used to run Boseiju, Who Shelters All, but if I draw it during the early turns, the life-loss from its use is too harsh.
Emergence Zone enables me to cast combos at the end of an opponent’s turn once they’ve tapped out and also allows for interesting shenanigans with Necropotence.
Recursion
K’rrik is critical to the deck’s strategy, since it’s very mana-intensive to assemble combos without him. Command Beacon allows me to bypass the commander tax if K’rrik dies one or more times. If K’rrik is stolen, I can tutor for Homeward Path and break the spell.
If Chainer or another creature is killed, I can tutor for a reanimation spell and restore the combo without having to hard-cast the creature.
Removal
I want to prevent my life from being consumed by enemy creatures, so I’m running the most efficient removal spells possible, including Baleful Mastery (lots of Walkers in my meta), Cut Down (costs 0 mana with K’rrik and hits most creatures during the early game), Deadly Rollick (auto-include), Dismember (versatile with or without K’rrik), and Snuff Out (free spell).
I’m on the fence with Ulcerate, since it costs 5 life with K’rrik, which is more life-intensive than the other removal spells. Victim of Night is another good choice, but I sometimes want to kill my own Gary to reanimate him again, and I can’t use VoN to do so. Grasp of Darkness and Infernal Grasp are other options I have tried.
For board wipes, I’m running Bile Blight (costs 0 mana with K’rrik), and Pestilence (instant-speed creature and Planeswalker removal, plus it also serves as a win condition when storming-off). I am on the fence with Toxic Deluge, which is effective but life-intensive. The Meathook Massacre helps with devotion and gaining life when the board is dense with creatures.
Blast Zone is Ratchet Bomb disguised as a land and can sneak up on opponents. It serves as back-up removal for Grafdigger's Cage, Rest in Peace, etc.
Discard
I am running Thoughtseize and Collective Brutality to remove threats before they manifest. They also work as self-discard outlets, since inevitably I encounter a situation where I have Vilis or Asmo in hand along with a reanimation spell, but insufficient mana to hard-cast them.
Graveyard Hate
Other than Dauthi Voidwalker, I am no longer running graveyard hate because my focus is on triggering a combo before my opponents can pull off their own graveyard-based combos. This is primarily a meta call. If more graveyard-based decks are a problem, Leyline of the Void is a good option. I can also target other players’ creatures with Reanimate and throw off their combos.
Flex Spots
Other than key staples like Deadly Rollick and Pestilence, most removal and discard spells (including Collective Brutality and Thoughtseize) can be swapped when necessary to suit the particular meta. Less valuable tutors like Mastermind's Acquisition and Razaketh's Rite can be swapped out as well.
Other lists run Manifold Key and Voltaic Key for a greater chance of an explosive opening with mana rocks like Mana Vault and Grim Monolith, or the occasional extra draw with Sensei's Divining Top.
EXCLUSIONS
Aetherflux Reservoir
I am no longer running Aetherflux Reservoir, since Flux is functionally replaced by Sheoldred, the Apocalypse. Shelly has the added advantage of being cheaper with Heartless Summoning and Jet Medallion, plus I can entomb and reanimate her. In comparison to Shelly, Flux is harder to cast during early turns and impossible to recover once destroyed. Regardless, I have preserved the Flux combos below:
Combo requires K'rrik, Son of Yawgmoth + Aetherflux Reservoir on the battlefield, plus one of the following combos:
Bolas's Citadel + Sensei's Divining Top
I use K’rrik to cast the Citadel for 3 mana and 6 life. Then I play Top from my hand, and tap it to draw a card and place it on top of the deck. Next I spend 1 life to cast Top using Citadel, repeating this process to gain near-infinite life, then kill each opponent with Flux. This combo does not require K’rrik to function and ignores Torpor Orb-type effects.
Xiahou Dun, the One-Eyed + Reanimate
I cast Xiahou, sac him to bring back a black spell, then cast Reanimate on Xiahou. I can then sac Xiahou to bring back Reanimate, creating an infinite recursion loop, then kill each opponent with Flux.
Xiahou Dun, the One-Eyed + Chainer, Dementia Master + cheap black spell
I cast Xiahou and sac him to bring back a cheap black spell I can cast easily with K’rrik (like Dark Ritual). Then I use Chainer to reanimate Xiahou, sac Xiahou to return the same spell, and create an infinite recursion loop. Then I kill each opponent with Flux.
Xiahou Dun, the One-Eyed + Shallow Grave (or other reanimation spell) + Blood Celebrant or Jet Medallion
I cast Xiahou, sac him to bring back Shallow Grave or another reanimation spell, then use that spell on Xiahou, creating an infinite recursion loop. With K’rrik and Celebrant on the board, I can spend 3 life to pay for 1 colorless mana. Medallion reduces the cost of Shallow Grave and also enables the combo. Once I’ve created the infinite loop, I can kill each opponent with Flux.
Xiahou Dun, the One-Eyed + Necrotic Ooze + Heartless Summoning or Blood Celebrant
I cast Ooze with Xiahou in the graveyard, then sac Ooze to return Xiahou to hand. Then I cast Xiahou and sac him to return Ooze to hand, and so on. This creates an infinite recursion loop (if colorless costs can be met by Summoning or Celebrant), then I kill each opponent with Flux.
Corpse Dance + Blood Celebrant
I cast Corpse Dance and pay for its buyback cost via Celebrant, creating an infinite recursion loop (even if no creature target exists, since Dance does not target a creature), then kill each opponent with Flux.
Vilis, Broker of Blood + Blood Celebrant or Skirge Familiar
I use Vilis to convert life loss into card draws, then pay for any card I draw with Celebrant or Familiar, then rack up a high storm count and kill each opponent with Flux.
Asmodeus the Archfiend + Blood Celebrant or Skirge Familiar
I use Asmodeus to draw cards, then pay for any card I draw with Celebrant or Familiar, then rack up a high storm count and kill each opponent with Flux. This approach costs more life than Vilis, but if I have Necrotic Ooze in play and Asmodeus in the graveyard, I can use Ooze to copy Asmodeus’ draw ability while ignoring his restrictive passive ability.
Xiahou-Dun
I used to run Xiahou Dun, the One-Eyed as a utility card, but whenever I drew him, I would have rather drawn something else to advance my board state. I am going for more explosiveness, and Xiahou is better suited for a more mid-range deck.
Razaketh
I am on the fence with Razaketh, the Foulblooded, since he is a win-more card in this build. Some lists run Razz instead or in addition to Dimir House Guard as a sac outlet. Running him to his full potential requires also running Gravecrawler or Nested Shambler, and even extra man-lands like Inkmoth Nexus, which is a more midrange approach than what I want for this build. Razz is still an awesome card.
Tainted Pact
I previously ran a “tainted” manabase of 1 of each card in order to enable Tainted Pact. I love Pact and am partial to it due to years of successful use. But after extensive testing, I determined that a swamp-heavy manabase with Lake of the Dead is more explosive and consistent than a singleton mana base. I save life by playing swamps over City of Brass-type mana abilities and increase mana consistency when K’rrik is not in play.
Leshrac’s Sigil
Leshrac's Sigil can bounce itself to my hand and combos with K’rrik and Flux to generate near-infinite life and zap each player. However, Sigil on its own is completely useless, and the life-loss necessary to get the combo going is too costly when fending off multiple opponents. Plus this combo is neutralized by Rule of Law.
Crawler and Feeder
With K’rrik and Flux on the board, Gravecrawler can be repeatedly fed to Carrion Feeder to generate near-infinite life. Feeder is also a sacrifice outlet for Chainer shenanigans. However, this combo also falls prey to Rule of Law, and both creatures on their own are useless outside of their combos. Neither can block during a critical moment. As much as I am attached to Feeder, Dimir House Guard is a sacrifice outlet, defender, and tutor all-in-one. It’s a shame it isn’t a zombie though.
Conqueror’s Flail and Defense Grid
I used to run Conqueror's Flail and Defense Grid, but both are underwhelming. Flail is too expensive to play and equip at 4 mana and is easily removed. Grid is affordable but easily bypassed, so ultimately it does very little to protect me. I would rather play aggressively than defensively.
Phyrexian Devourer
I am aware of the combo of Necrotic Ooze plus Phyrexian Devourer and Walking Ballista in my graveyard. I can use Ooze to copy Devourer’s exile ability, exiling most of my deck and placing enough +1/+1 counters on Ooze to kill everybody with Ball’s ability. This combo is useful because it bypasses Rule of Law / Null Rod.
I don’t run this combo because Devourer is useless and very difficult to cast on its own, and Ball is also useless unless I generate lots of mana via Celebrant or Skirge. Ball is redundant next to Tendrils of Agony, which is more useful as a life-gainer and win-con.
Doomsday
I am no longer running Doomsday because it was too easy for my opponents to shut me down. Against counterspell-heavy decks, executing Doomsday was almost impossible. And running Doomsday required structuring the deck with as many cantrips as possible, wasting space for other options. Although I love Doomsday, the strategy is too much of a glass canon in today’s hyper-reactive meta. Regardless, I saved this section for posterity:
Playing Doomsday is only possible if K’rrik is on the battlefield, and I have enough mana and life to spend with K’rrik (typically at least 2 lands, 3 mana, and 22 life - the more lands I can sacrifice with Zuran Orb, and the more mana I can generate, the more life I have to execute the combo). K’rrik can also be used to attack or block and generate life via lifelink, but it could be too risky to lose him in combat.
Winning on the same turn I cast Doomsday also requires a way to draw into at least the first card of the pile (Barren Moor (cycled), Cling to Dust, Razaketh's Rite (cycled), Sensei's Divining Top, Scroll Rack, Sign in Blood, Soul-Guide Lantern, or Tainted Pact). This means winning on the same turn as Doomsday costs additional mana and/or life. Before casting Doomsday, the math must check out so I’m guaranteed to win.
The key to each pile is leading with Bolas's Citadel, to enable me to spend life to cast the next four cards in the pile. Next, Zuran Orb is necessary to sac my lands and generate additional life. Alternatively, mana can be generated with Dark Ritual or Rain of Filth instead.
Leshrac Pile:
- Bolas's Citadel (paying 3 mana and 6 life to cast)
- Zuran Orb (to enable me to sacrifice lands and gain 2 life per land)
- Aetherflux Reservoir (paying 4 life to cast - enables infinite life gain once Sigil is bounced)
- Lion's Eye Diamond, Mox Diamond, Chrome Mox, or Lotus Petal (upon casting I gain 4 life due to Flux, plus 1 life if I used cantrip to draw into the pile - the ramp artifact is used pay for Sigil’s casting and/or bounce ability to minimize life loss from K’rrik)
- Leshrac's Sigil (upon casting I net 1 life, or 2 if I used a cantrip to draw into the pile - I then play and bounce Sigil repeatedly (paying 4 life) until I gain infinite life with Flux, then kill each opponent with Flux)
Crawler Pile:
- Bolas's Citadel (paying 3 mana and 6 life to cast)
- Zuran Orb (to enable me to sacrifice lands and gain 2 life per land)
- Aetherflux Reservoir (paying 4 life to cast - used to gain infinite life once Crawler is cast repeatedly)
- Carrion Feeder (upon casting I net 3 life due to Flux, plus 1 life if I used a cantrip to draw into the pile)
- Gravecrawler (upon casting I net 4 life due to Flux, plus 1 life if I used a cantrip to draw into the pile - I sac Crawler to feeder, cast Crawler from the grave repeatedly by paying 2 life, then repeat until I gain infinite life with Flux, then kill each opponent with Flux)
Devotion Pile:
- Bolas's Citadel (paying 3 mana and 6 life to cast)
- Zuran Orb (to enable me to sacrifice lands and gain 2 life per land)
- Gray Merchant of Asphodel (paying 5 life to cast - Gary then drains at least 8 life from each opponent - I play Gary third because often I will need life before casting the next two cards, but the order is flexible)
- Carrion Feeder (paying 1 life to cast - Feeder is used to sac Gary)
- Chainer, Dementia Master (paying 5 life to cast - I use Chainer to return Gary to the battlefield using K’rrik by paying 1-3 mana or 2-6 life, then I drain at least 11 life from each opponent with Gary, then I sac Gary with Feeder, and so on, until I kill each opponent)
Stolen Thassa’s Oracle
If I have Dauthi Voidwalker, Praetor's Grasp, or Opposition Agent (in response to an opponent’s fetchland or tutor) and Tainted Pact in hand, and my opponent is running blue and I suspect Thassa's Oracle (or Laboratory Maniac) as a win-con, I can use Voidwalker/Grasp/Agent to steal it and win the game with Tainted Pact (naming a random card not in my deck and exiling my library). I can also use Grasp along with Doomsday with this pile:
Oracle Pile:
- Bolas's Citadel (paying 3 mana and 6 life to cast)
- Zuran Orb (to enable me to sacrifice lands and gain 2 life per land)
- Lion's Eye Diamond (to pay for Thassa's Oracle later)
- Mox Diamond, Chrome Mox, or Lotus Petal (to pay for the 1 colorless mana in Grasp)
- Praetor's Grasp (cast with a ramp artifact and 4 life, and targeting an opponent’s Thassa's Oracle or Laboratory Maniac. I then cast the Oracle/Maniac with mana from Lion's Eye Diamond for the win, since I have no remaining cards in my library)
Mike and Trike
The old combo of Mike (Mikaeus, the Unhallowed) and Trike (Triskelion or Walking Ballista) plus Victimize is expensive mana-wise (especially Trike, which cannot be cast with life using K’rrik, and eats up a lot of life to cast with Citadel). Without Buried Alive and Victimize or another reanimator spell, both Mike and Trike are hard to cast on their own. Ball also requires a sac outlet like Carrion Feeder to go infinite. Regardless, Mike and Trike are an effective 2-card combo, and can be used in a Doomsday pile like this one:
- Bolas's Citadel (paying 3 mana and 6 life to cast)
- Zuran Orb (to gain 2 life per sac’d land as necessary)
- Buried Alive (paying 3 life to cast - targeting Mikaeus, the Unhallowed and Triskelion.)
- Victimize (paying 3 life to cast, then sac’ing K’rrik to reanimate both Mike and Trike. Next I use Trike to ping an opponent once and itself twice, killing itself. But Trike has undying and returns to the battlefield with an additional +1/+1 counter, so then I ping the opponent twice and itself twice, killing itself. This continues forever until each opponent dies.
- The fifth card is unnecessary.
Ball can replace Trike in a Doomsday pile, but requires a sac outlet like Feeder and costs 4 additional life:
- Bolas's Citadel (paying 3 mana and 6 life to cast)
- Zuran Orb (to gain 2 life per sac’d land as necessary)
- Carrion Feeder (paying 1 life to cast - to sac Ball later)
- Buried Alive (paying 3 life to cast - targeting Mikaeus, the Unhallowed and Walking Ballista.)
- Victimize (paying 3 life to cast, then sac’ing K’rrik to reanimate both Mike and Ball. Next I sac Ball to Feeder. But Ball has undying and returns to the battlefield with an additional +1/+1 counter, so then I ping an opponent once and sac it to Feeder. This continues forever until each opponent dies.
BUDGET OPTIONS
There are several options if someone wants to build a budget-friendlier version of this deck. Lots of cheaper options on the Maybeboard can be substituted for the most expensive cards. While obviously the deck will lose a lot of speed, as long as the core combos are present, the deck will play essentially the same way.
Expensive tutors like Imperial Seal, Demonic Tutor, etc. can be excluded in favor of Profane Tutor, Scheming Symmetry, cheap draw spells like Cling to Dust, etc.
Expensive mana rocks can be swapped with cheaper ones like Fellwar Stone and Mind Stone.
Expensive lands can be swapped for multiple swamps and Cabal Coffers and Cabal Stronghold. There is no need to run only 1 of each land if you aren’t running Tainted Pact.
Sheoldred, the Apocalypse and Xiahou Dun, the One-Eyed can be swapped with the combo of Gravecrawler + Carrion Feeder + Aetherflux Reservoir.
SPECIAL THANKS
I want to give a shout-out to Fonzie(MythicsGamingMTG) on Moxfield. He has independently reached the same conclusions I have, and his deck A Faster K’rrik Storm> has been inspirational.
Any comments or suggestions are welcome. Thanks for reading!
Suggestions
Updates Add
Comments View Archive
Attention! Complete Comment Tutorial! This annoying message will go away once you do!
Important! Formatting tips — Comment Tutorial — markdown syntax
Please login to comment
Casual
100% Competitive
| Top Ranked |
|
| Date added | 3 years |
| Last updated | 1 year |
| Legality | This deck is Commander / EDH legal. |
| Rarity (main - side) | 15 - 0 Mythic Rares 39 - 0 Rares 19 - 0 Uncommons 12 - 0 Commons |
| Cards | 100 |
| Avg. CMC | 2.74 |
| Tokens | Construct 0/0 C |
| Folders | Favorite Builds, Great EDH Ideas, EDH Decks, commander decks, Stuff, EDH, Mono B, CEDH, cEDH, Deckos |
| Votes | |
| Ignored suggestions | |
| Shared with | |
| Views |