


Lands (20)
Artifacts (16)
Sorceries (5)
Instants (11)
Creatures (8)
Sideboard
Other (15)
Maybeboard
Other (4)
The "Invention" shell that I have developed is mono blue. This variant uses black as a secondary color to gain access to Fatal Push, Profane Command, and Tezzeret, Agent of Bolas . Hence, I have grown fond of calling this variant "Invention Black".
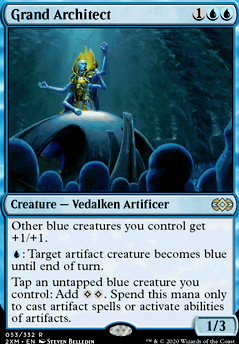
The first thing one must understand about this interaction is that Grand Architect's second active ability which reads "Tap an untapped blue creature you control. Generate colorless mana. Spend this mana only to cast artifacts or activate the abilities of artifacts." is not affected by summoning sickness. There is no tap symbol there. Pili-Pala is affected by summoning sickness though, as you can distinctly see an untap symbol on him.
The way this combo works is that you activate Grand Architect's first active ability for to turn Pili-Pala blue. Pili-Pala is an artifact creature, so he is a legal target. Now Pili-Pala counts as a blue creature, so he can be tapped by Grand Architect to generate colorless mana. Since Pili-Pala still counts as an artifact, he is allowed to spend that to untap himself. This generates a colored mana of the player's choice. Let's say . You now have a floating. Now that Pili-Pala is untapped, you can tap him again to generate another . Spend that to untap him and make... this time, for fun. You now have . This is a repeatable process which generates infinite mana.
A: When you cast Grand Architect (I.E: when he is still on the stack)
B: When you attempt to turn Pili-Pala blue. This is the worse option of the two, as the player of this deck can spend another to attempt to turn Pili-Pala blue and combo off.
T2: Land + Pili-Pala
T3: Land
Attack with Pili-Pala to tap it. Once you have Pili-Pala tapped, play Grand Architect.
Use Grand Architect's second active ability to tap himself. This generates colorless mana. Untap Pili-Pala with that mana to produce . Use that to turn Pili-Pala blue using Grand Architect's first activated ability. You have now gone infinite.
2) You have more than one Grand Architect.
3) As a general rule of thumb, Pili-Pala should be played on your opponent's end step using Aether Vial. When Aether Vial puts a creature into play, that creature does not ever go on the stack. This means it cannot be countered. Aether Vial's active ability can be used at instant speed, effectively giving creatures you "Vial In" both flash and cannot be countered. If you don't have Aether Vial, just cast Pili-Pala whenever you have the spare mana so that you have the option to combo if Pili-Pala survives until your next turn. Just know that the last thing you want to do when playing this deck is to attempt to combo off only to have Pili-Pala get removed, followed by Grand Architect being removed/countered.
2) Equip Pili-Pala with Viridian Longbow . The way this works is that Viridian Longbow allows Pili-Pala to tap itself to deal 1 damage. Now that Pili-Pala is tapped, you can spend to untap him, which generates a mana, meaning the net cost to deal 1 damage with Pili-Pala + Viridian Longbow is mana.
While these are powerful game strategies, pilots of the deck can run out of steam if the opponent has sufficient removal (I.E, is playing Jund).
You have Fatal Push to put up a weak fight for board control, and Muddle the Mixture to try to stop your opponent from removing your creatures and/or pulling off game winning combos. This means your toolkit for getting into grindy midrange fights is severely lacking, and you should never be trying to play the long game pre-board.
Filigree Familiar and Wurmcoil Engine are pretty straight-forward. They're just high value midrange creatures that can be recurred with Academy Ruins. Because this recursion is so critical, they may need to be protected from Path to Exile by Muddle the Mixture in some match-ups, but that's about all the quirk there is to them.
Tezzeret, Agent of Bolas isn't super quirky, but be aware of this: his +1 is often more powerful than his -1, as it provides card advantage to replace Tezzeret if he dies, increases his loyalty making him harder to kill, and immediately opens the option to use his -4 if he isn't removed. Now don't get me wrong, his -1 is still incredibly powerful, and if you have built up a large enough board to protect him then go nuts with it, but be aware that in non-dominant board states, his +1 is usually your best option.
Vedalken Shackles comes in to steal your opponent's creatures to use against them. Because this deck is so blue heavy, you tend to have plenty of islands naturally. If you board in vedalken shackels, you should still prioritize fetching lands that count as islands over aquiring non-island lands.
Post-board you have better midrange tools, and can often afford to play more of a long game. It's still not advisable against decks like Jund and Tron, but is do-able against control decks and slow aggro decks.
I want to preface this description by saying that the current main board and side board setup is that combination which is most capable of combo'ing through removal and light hate. Spellskite is extremely effective at protecting your combo components, or Myr Superion should your draws lend to more of a beat-down plan. It is not the most resilient to heavy hate and is not the sturdiest combo variant.
Examples:
1) Two Lands and any two of the following three cards:Aether Vial, Pili-Pala, and Grand Architect
2) Three Lands, Grand Architect, Muddle the Mixture, Glint-Nest Crane/Pili-Pala/Myr Superion, and Spellskite
3) One land, Aether Vial, Grand Architect, Serum Visions, and either Pili-Pala/Myr Superion.
The general question to ask yourself is "How does this hand win?"
If the answer is "Well... it can FIND a way to win pretty well!" or "Errr... it doesn't," then mulligan it.
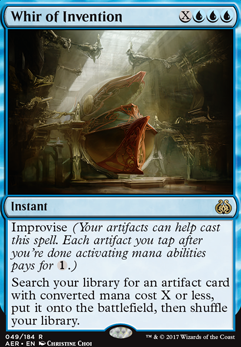
You want at least two lands, along with cards like Aether Vial, Grand Architect, Glint-Nest Crane, Serum Visions, Tezzeret, Agent of Bolas , and Whir of Invention.
Examples of tech cards:
Chalice of the Void, Grafdigger's Cage, Rest in Peace, Spellskite, and Vedalken Shackles
Description is a Work In Progress. Consider the description below this notice to be entirely inaccurate until such a time as this notice is removed.
Against these eldrazi decks, you need to mulligan pretty hard for an extremely fast hand.
How to play against them: If you drew a hand with combo/beat-down potential, pull the trigger and win ASAP. If you didn't draw such a hand, you'd better find that combo right fast. On the bright side, eldrazi aggro usually doesn't pack that much removal. Myr Superions are very good at creating massive board stalls, Wurmcoil Engine often just wins the game if you resolve him, and Engineered Explosives comes in to deal with any scions the eldrazi deck generates, and/or Chalice of the Void if they run that card.
Try to abuse Aether Vial in this match-up to put surprise Myr Superions into play blocking their Thought-Knot Seers and Reality Smashers.
These games are mostly a race which you can win surprisingly often, but the match-up is pretty close to 50/50 (maybe a little in your favor?) and are often decided by "who wins game 1" favoring whomever was on the play.
Game 1 we almost can't lose. Spellskite can eat all of their enchantments, and even still, they have little in the way of removal so your combo is likely to blow them out whenever Spellskite doesn't.
Games 2 and 3 are... sketchy. They often gain 2-3 Stony Silences from the sideboard, and we can't out midrange the kind of 14/10 life link hexproof trample first strike vigilant bastards that boggles is so fond of making. Instead we just try to board into the most resilient combo deck we can be. Anguished Unmaking can answer Stony Silence so we can't get too blown out, and Chalice of the Void on 1 counter can still blow out the Boggles deck post board. Engineered Explosives CAN blow them out, but only if they don't have Stony Silence. We aren't favored post board if they have Stony Silence (mostly because we have so few answers to it), so we really lean on that near guaranteed game 1 win.
Game 3 (if there is a game three) should feature you being on the play, and in such a game it is of the utmost importance that your start hand have the potential for a turn 3/4 win, or two lands and a Chalice of the Void/Engineered Explosives.
Against these decks you just want to go fast. You don't have much in the way of life-gain, your blockers tend to be worse than their attackers, and you have enough protection for your combo components to jam it through. You also have Spellskite to protect your creatures/face, but you have to leave up mana to redirect bolts if you want him to protect your life total. Otherwise, he is more useful protecting Pili-Pala so you can combo.
Game 1 against Burn/Delver decks are slightly favorable. You have the faster clock assuming you can protect your combo components, which you have plenty of ways to do. If you draw into Myr Superion beat-down, your opponent will have a lot of difficulties removing the big guy with Lightning Bolts. Sometimes you'll just get blown out when you go for a combo win and Pili-Pala gets bolted though. It happens.
Games 2 & 3 are closer to even. You can still get "out-drawn" by the Burn/Delver player more often than I would like. Draw or play, your board plan is largely reactive, which isn't where you want to be as a combo deck. The opponent is going to get some artifact hate, probably Ancient Grudge or Kolaghan's Command. We can still win through this kind of hate (beat one burn player through 2 Ancient Grudges, all four instances of which went after one Pili-Pala), but it's not likely. If you have boarded in Chalice of the Void, it goes on 1 charge counter to get rid of those cheap creatures and burn spells. All in all, If you win game 1 you should be able to win the match-up, though Game 1 is most often decided by who is on the play.
Against Affinity/Robots Spellskite is amazing against Arcbound Ravager and modular effects in general, as he can become their target. You can use Aether Vial and bring him in at instant speed when you kill such creatures during combat, which is always a lovely surprise.
Pre-vs post board doesn't matter nearly as much as draw vs play. You want the play.
On the play, if you have an opening hand with Chalice of the Void, that hand is a snap keep and that chalice goes straight into play with 0 charge counters. It gets rid of a third of Affinity's playable artifacts, most notably Mox Opal.
On the draw, you can mulligan as low as 5 for fast combo hands, but you really want those fast combo hands. Engineered Explosives on 0 is nice, but since it can't be used until turn 2 earliest, it is nowhere near as impactful as a 0 mana chalice is when we are on the play.
Oh look, another deck like boggles that just loses to a Chalice of the Void at 1 charge counter. Combo'ing off is your first objective, and getting the chalice is your second objective.
Game 1 is favorable, as we already have our biggest tech card main-boarded against Infect/KFC (kiln-fiend combo): Spellskite. Save Muddle the Mixtures to use as counter-magic to stop OTK's from your opponent, or to block removal which will no doubt be going for your Spellskites.
Games 2 & 3 are still favorable, as Spellskite ruins infect's/KFC's day. Most of the time, they can't even Twisted Image him thanks to Grand Architect, who can turn skite blue and lord him to a 1/5, and neither of those two decks has that great of an answer to skite other than Twisted Image.
Hatebears is a match-up which puts your skill as a player to the test.
Pre-Board they can try to tax you all they want, but this deck isn't overly fond of putting creatures into play the fair way anyway. Leonin Arbiter is a pain in the arse, but games are generally slow enough that you can get through it when you need to tutor up combo pieces.
Post Board they have ways to put us in a lock, using cards like Leonin Arbiter/Aven Mindcensor and Stony Silence. We gain answers to Stony Silence in the form of Anguished Unmaking (which is the only hate card we really care about them having), and shoot for a high level of consistency without the need to search by adding
Tezzeret, Agent of Bolas
. That said this match-up plays out a lot like a coin flip post board, where all that really matters is whether we combo first, or whether they can lock us down first.
Death's Shadow Aggro is kind of like Jund in the deck's construction, but with slightly worse removal and interactive options in general. The difference is that our back up plan of Myr Superion beatdown is an awful one as it just grows the Death's Shadows. Combine this with the fact that they have copious amounts of hand disruption, and you have yourself a bad match-up!
The general game plan against DSA is to remove any overly threatening creatures and hope for a string of good topdecks.
This is currently our absolute worst match-up, as your combo game plan gets picked apart by their hand disruption and removal, and your midrange plan can't overcome Death's Shadow. This means skillful topdecks are your best game plan.
Against a flying deck like Spirits, Spellskite is once again only mildly useful. Combined with the fact that you may have some Stony Silences to deal with, and he's just... not great.
Game 1 you are slightly favored as you simply have a faster clock than the spirits deck does, but it's very close to a 50/50 match-up. The presence of
Spell Queller
and Path to Exile can keep you on your toes.
Games 2 and 3 aren't favorable once they gain access to Stony Silence. This is why we board in Anguished Unmaking, so that we have an answer to such a card.
Defense Grid
should help put a stop to those pesky
Spell Queller
s, and Grafdigger's Cage helps stop Collected Company, but it also hurts Whir of Inventions ability to grab creatures.
Like with boggles, you are really leaning on that Game 1 win, but unlike with boggles you are nowhere near as dramatically favored to win game 1.
Merfolk is a deck that spits out far too many creatures to try to block or contain in the slightest WITH targeted removal, but that doesn't mean we don't board to fight their creatures. Merfolk is so removal light, and our blockers are so useless thanks to islandwalk that we cut Spellskite in favor of Engineered Explosives (which is good to mop up large boards), and Vedalken Shackles, which you can almost use as removal against large threats, taking away lords from the merfolk deck such as Master of Waves and
Master of the Pearl Trident
.
Games against merfolk are a race, and while this deck is relatively comfortable racing, Merfolk is simply more consistent with its draws. This means that both pre and post board you have to get lucky to win. This isn't a favorable match-up (especially because you run a land base built on Islands), but it's winnable...ish.
Junk/Abzan is an annoying match-up, because the midrange version runs so much natural graveyard hate in
Scavenging Ooze
AND they have side-board Stony Silence.
Game 1 isn't favored, as they are likely to have enough removal/hand disruption to stop you from combo'ing. With intelligent play you can manage to win sometimes, but be aware that the combo win is your best shot at winning Game 1. If you take Game 1 you are in great shape.
Games 2 & 3, your goal is no longer to combo off. It is to abuse your "midrange" side-board package, and out-bully the junk deck for control of the board. You can do this because Junk decks run lighter on removal than their Jund cousins, especially in the department of artifact removal. Myr Superion is especially good at dominating the board, and Wurmcoil Engine can single-handedly win games, assuming you can protect him from Path to Exile.
Tezzeret, Agent of Bolas
is the real savior of your post board games though. Chump block for him wherever possible, and try to sink some -4's into the Junk player where possible, as those are where you will likely win the game. You think I'm joking, but in the kind of board stalls that this match-up tends towards, Tezz can nuke a Junk player for 10-14 damage pretty regularly.
Rest in Peace comes in to kill Goyf and Grim Flayer, Vedalken Shackles can steal their creatures from them and (given that junk rarely REMOVES artifacts) use those creatures against the junk deck. Anguished Unmaking is to deal with Liliana of the Veil and Stony Silence.
Overall, you are not favored against Junk decks. It's not as disfavorable as Jund/DSA (which is to say, you can still win often), but it's not a good match up. Your pre-board game is about 70/30 in Junk's favor, which is considerably better than playing against Jund! Post-board games are 50/50, largely hinging on how much hand disruption the Junk deck has, and whether or not they can play a turn 3 Liliana of the Veil. Even though Junk doesn't pack nearly as much artifact hate, Lingering Souls combined with Stony Silence really can do you in. The spirits can whitle away either at your life total or at Tezz's loyalty, and if they can keep tezz off his ultimate, you're in rough shape. Just try to stick a Wurmcoil Engine and protect him with Spellskites.
Jund is... well it's bad as far as match-ups go. They run A LOT of removal, some graveyard hate, and forced discard. They run so much that, despite jund not having access to Stony Silence, we almost entirely give up on trying to combo with Pili-Pala post board. We keep one copy of Pili-Pala for corner case wins and its synergy with
Viridian Longbow
in long games, but the combo takes the back seat.
Game 1 your strategy is to just try to jam that combo through, because you sure as hell cant out grind Jund, and the Myr Superion beatdown game plan is too heavily based on 2 card synergies, which Jund will never let you pull off. You probably won't be able to combo off... but it's all you have. Cards you don't want to see are Thoughtseize, Inquisition of Kozilek, and Liliana of the Veil. On the bright side, if you manage to steal game 1, you're gonna go far kid!
Games 2 & 3 are better, but still not favorable. Jund gains some artifact hate from their sideboard, but little in the way of graveyard hate (
Scavenging Ooze
excluded, but you have ways to deal with scooze).
Your board plan is to become a very consistent artifact deck, utilizing cards which can either protect other cards (Spellskite), are removal (Fatal Push, Vedalken Shackles and Anguished Unmaking), or replace themselves (Glint-Nest Crane,
Tezzeret, Agent of Bolas
, and Wurmcoil Engine). Vedalken Shackles is really an all star in this match-up, as it doesn't die to Liliana of the Veil, and can shut down
Dark Confidant
,
Raging Ravine
, and Huntmaster of the Fells
. Rest in Peace is here mostly just to turn off Tarmogoyf.
Despite having the ability to last quite a while against Jund, you will still get ground out eventually. Your best plan is therefore to ruin the Jund player's life total with a couple of
Tezzeret, Agent of Bolas
-4s and whatever damage can be caused to them over the course of the game (which will usually be damage they inflict on themselves with their lands, Thoughtseize, and Bob.
All in all you tend to lose against Jund just because overcoming the likely Game 1 loss is a very difficult feat. Game 1 favors Jund almost 80/20. If you win Game 1, you have a decent shot of winning the match-up though, as the post board games swing 55/45 in our favor!
Games against Collected Chord decks are like a box of chocolates.
Game 1, you are the faster deck of the two to combo, so this is your game plan. Yes, you may end up out of gas when the coco player Fatal Pushes Pili-Pala and Path to Exiles all your Spellskites, at which point he just beats your face in, but it's on him to have answers, which is inherently more difficult than trying to assemble and jam through our combo.
Games 2 & 3 stay similarly balanced. They get Linvala, Keeper of Silence to shut off Grand Architect, and Stony Silence to turn off our artifacts. We board into our midrange strategy so we don't care that much about Stony Silence. We also gain access to Rest in Peace to turn their infinite combo off, and Grafdigger's Cage to turn off Collected Company (be aware that the cage also stops Whir of Invention from fetching artifact creatures).
Both decks post board become creature based midrange decks, but we are just a little bit more consistent than the CoCo deck is. Not by much mind you, but by just enough to have a competitive edge.
I classify Titan Shift as a midrange deck not because I believe it to be one (it's a combo deck thru and thru), but rather because playing against Titan Shift is only too similar to playing against Jund.
Game 1 is technically a combo race, but you want to be almost constantly holding up mana for Muddle the Mixture (and thus saving one in hand) from the second the Titan Shift deck has five lands in play. You want to be countering Scapeshift and
Summoner's Pact
to keep the Titan Shift deck off their combo, and since their deck is prone to running out of gas with no great source of card draw, this is the method by which you win. Because they run Valakut, the Molten Pinnacle, their land base provides an annoyingly large amount of removal, so you also need to be trying to protect your Pili-Palas from Lightning Bolt effects.
One thing players must know for this match-up is that when the Titan Shift player plays Scapeshift, all of the resulting Valakut triggers go onto the stack at the same time. Because they are separate triggers with different targets, having infinite mana + Spellskite means that one Spellskite can eat all of the valakut triggers before dying.
Games 2 & 3 are more of the same, although we cut Fatal Push as it has no targets against Titan Shift, and gain access to Anguished Unmaking as a way to remove
Primeval Titan
should one resolve. We also pick up Chalice of the Void, which should be getting played with 0 charge counters to get rid of
Summoner's Pact
.
Pre-Board is slightly in Titan Shift's favor as they are simply the more consistent combo deck and have a superior long game plan, but the post-board games favor you slightly since you gain two critical pieces of interaction with the Titan Shift deck, and can cut some literal bricks of a card in Fatal Push from the main deck.
Lantern control is another easy win for The Minefield. Yes, Lantern Control is normally very good against combo decks, but first off we have Academy Ruins. That means we can pull cards out of our graveyard and the opponent can never succeed in decking us. We also have Chalice of the Void, which is to be played at one charge counter. Make this play even if you don't already have an Aether Vial in play, as it shuts down the Lantern deck entirely. Engineered Explosives does much the same thing. Try to hold up mana for Muddle the Mixture to counter Surgical Extraction until you have a chalice at 1 in play.
Post board, having access to Leyline of Sanctity means you shut down most of the lantern deck before the game even gets started, and you should aggressively mulligan for it. Hurkyl's Recall gives you another sweeper to use against the opponent, and the
Tezzeret, Agent of Bolas
is boarded in for consistency.
Yes we board heavily, but this is simply for the sake of optimizations. The fact that our combo does not rely upon attacking, there are too many targets that the opponent has to hit with Pithing Needle for them to reasonably expect to lock us off of the combo, and the Lantern Control deck does not put its opponents on a clock whatsoever. Painter's Servant is boarded in just in case the opponent is smart enough to pith Grand Architect. The only element of the combo which they can stop is Grand Architect turning Pili-Pala blue. Now they can't even stop that.
Tron is a slightly favorable match-up for The Architect of Oz. Chalice of the Void played at one charge counter helps out a lot, as it gets rid of most of Tron's mana fixing and cantrips, alongside Nature's Claim which they will likely board against you. It also gets rid of
Relic of Progenitus
and Pithing Needle, which are annoying. This said, Tron does not have very much in the way of instant speed removal. The only card that have that qualifies as such is oathstone, and they have to play it before-hand so they telegraph that play. This means that using Aether Vial to play Pili-Pala on your opponent's end step followed by a Grand Architect on your main phase takes away the majority of tron's access to removal.
Game 1 you are favored. The match-up plays out a lot like a combo v combo match-up. Tron more consistently assembles theirs, but your combo wins you the game on the spot. Both decks have some relatively dead draws. For example, Ugin, the Spirit Dragon, Spellskite, and Oblivion Stone do very little for the tron deck. Myr Superion does nothing for us though.
Games 2 & 3, Pithing Needle comes in and is pretty useful for getting rid of that blasted Karn Liberated and Oblivion Stone. Chalice of the Void is still very powerful against the tron deck. Neither deck really gains anything too significant from the side-board though, so you are still favored.
We run plenty of basic lands, and on top of that Pili-Pala can provide mana fixing, so Blood Moon decks don't really scare us. Just start fetching up your basic lands instead of those fancy shocklands. Chalice of the Void should be played at 1 charge counter to take care of some of Blue Moons cheap value engines, and then if you aquire a second one, play it with two charge counters so that it can take care of most of the deck's counter spells.
Game 1 you are favored. The blue moon deck does not put you on a fast clock. On top of that, what is normally a dead draw in Pili-Pala is great for blocking
Vendillion Clique
and turns the opponent's Blood Moons into equally lack-luster draws. Just be ready for a painfully slow game. I can't give tips beyond this for game 1 because it is a largely skill dependent game. If one player is less skilled than the other, it will become obvious in this game.
Games 2 & 3 favor The Architect of Oz a little bit more heavily. Despite the fact that blue moon gains access to
Shattering Spree
and
Relic of Progenitus
, all this does is make a Chalice of the Void with one charge counter even more potent. You also gain Spellskite, which is a far more potent tool than you might imagine. I recommend reading the Spellskite section of "On the Proper Use of Quirky Cards"
Grixis Control, despite having access to massive amounts of forced discard and Liliana of the Veil, often runs neither. This means that the vast majority of the deck will consist of counter magics, which is perfectly alright with The Architect of Oz. It makes for slow, grindy games, and this deck takes to slow games like flying squirrel to tall trees.
In Game 1, play Chalice of the Void with one charge counter to cripple the majority of the Grixis deck's efficient value engines. Then just try to jam the combo through as many times as you can. Eventually, the Grixis deck will lose the ability to say no.
Games 2 & 3, play a Chalice of the Void with one charge counter first, and then a second one with two charge counters, so that you shut off the grixis deck's access to cards like Surgical Extraction and the majority of other graveyard hate strategies. Games 2 & 3 are heavily in your favor, as you gain access to Spellskite, and that changes everything in this match-up.
American Control decks have access to a greater amount of removal than their grixis cousins, but the match-up plays very similarly. Chalice of the Void on one counter is your priority in all three games though, as it hits Path to Exile. Most of the CMC threats which American Control runs are creatures, and thus can be taken care of with Engineered Explosives.
Games 2 & 3 you will want to save goglari cahrm for any Stony Silences that your opponent may be using. Pithing Needle is great because it can pith opposing planeswalkers and man-lands.
Game 1 is as close to 50/50 as control decks will come against The Architect of Oz. Having access to Path to Exile and Snapcaster Mage takes away our most powerful tool against control decks: recurssion. That said, we can take away their access to removal via a Chalice of the Void on one.
Games 2 & 3 shift back to being heavily in our favor. Gaining access to a second chalice is huge, Spellskite can eat just enough removal to consistently stick creatures to the board, and intelligent use of
Golgari Charm
combined with Muddle the Mixture back-up will allow you to combo off even through opposing Stony Silences.
8 Rack is just annoying. You can fight them well enough, because Engineered Explosives can take care of The Rack and
Shrieking Affliction
. Chalice of the Void with 1 charge counter can take care of most of the opponent's discard spells. If you get a second chalice, play it with 3 charge counters if possible. That takes care of Liliana of the Veil, Ensnaring Bridge, and all those other pesky 3 mana discard enchantments.
Game 1 you lose a fair bit of your hand. Find Chalice of the Void as quickly as possible, but (if at all possible) try to keep it on top of your deck instead of being in your hand so that you can't be forced to discard it. That always sucks. Game 1 slightly favors you. Your best hate cards for 8-rack are artifacts which you can pull back out of the yard via Academy Ruins, which they cannot force you to discard. This means that even when 8-rack succeeds in keeping you off the combo, you can keep them off of their discard strategy just as easily.
Games 2 & 3 are a dramatically different story. Hard mulligan to 4 if necessary finding Leyline of Sanctity. You have Pithing Needle to take care of Liliana of the Veil and you have a more consistent method of getting rid of your opponent's "punishment" artifacts and enchantments. That and the leyline are really all you need to turn this match-up from being sketchy to insanely favored.
Elves is a match-up which is draw dependant. The Architect of Oz is favored, as Engineered Explosives can save you from a few of Elves nut draws, while Elves have nothing to save them from yours. Both decks are incredibly fast with the right draws, so this match-up plays out remarkably like tron does.
Yes I consider Elves a token deck. The point of the deck is to go wide and just mob the opponent. Sounds like a token deck to me.
Dredge is just a pain in the ass. This deck does not block well in the early turns, so it's just a race between you and the dredge deck (which has little in the way of removal and disruption). Mulligan for fast hands, or post board, for Rest in Peace as it is rather powerful against Dredge.
This match-up is just silly. Living End decks tend to combo off a bit more quickly than you do, but you can counter Living End, and the deck folds if you stick a Chalice of the Void with 0 Charge counters on it, because then they become unable to cast their win-con.
Be careful, as Living end does run
Ricochet Trap
, and nothing sucks worse than losing the game to your own win-con. If you are combo'ing off against Living End, use Staff of Domination to make yourself draw the majority of your deck, and then combo off with
Viridian Longbow
to win in one damage increments.
Living End is a favorable match-up both pre and post board, though it is more favorable post-board than pre-board.
You tend to be the first to combo off against Ad Nauseam, which means you are favored in Game 1. Play Chalice of the Void with 0 charge counters to get rid of the pacts which Ad Nauseam runs and to counter Lotus Bloom. Play a second chalice at one counter to get rid of cards like
Angel's Grace
. The best way to win against Ad Nauseam is to go infinite on life with Staff of Domination because they have access to
Angel's Grace
, but any method will do, given enough time.
Games 2 & 3 you win with Staff of Domination, as they board in Leyline of Sanctity just like we do. This said, your leyline is a lot more impactful than theirs, because they are forced to try to win via Laboratory Maniac and using Staff of Domination you can draw into
Golgari Charm
to get rid of their leylines. You can counter their Laboratory Maniac via Path to Exile, which is where you obtain the advantage.
Storm is a great match-up for us. We can go off about as quickly as they can, they are fairly non-interactive which means they aren't likely to stop us, and if you play a Chalice of the Void with two charge counters, they just up and concede! Your first chalice should probably still be played at 1 charge counter, as shutting down storm's cantrips can cripple the deck just as badly as shutting down their combo. Don't be afraid to play Grand Architect to the field pre-combo in this match-up. You can always use him to help you ramp into a 2 charge counter chalice, and storm has a hard time dealing with creatures with more than 1 hp.
Storm in general just isn't very strong against the kind of hate that The Architect of Oz can dish out. They gain access to post board Empty the Warrens, but you can answer that too with Engineered Explosives.
All in all, storm is a fantastic match-up for The Architect of Oz, both pre and post board.
This match-up is actually really simple, and highly favorable. You race the Reanimator deck to combo off. Yes, he is capable of going off faster than you, but he is not guaranteed to. Chalice of the Void with two charge counters on it also tends to piss them off.
Pithing Needle can name Grislebrand to shut down the deck's primary combo, and the second can name
Borborygmos Enraged
to shut down the deck's second combo. The deck can still win by just smashing your face in with a Worldspine Wurm, but that is why we keep one Engineered Explosives boarded in. It can take care of those 5/5 wurm tokens.
Just race the Tooth and Nail deck. He doesn't like playing interactive games, but that doesn't mean you can't blow up any small mana dorks with Engineered Explosives, Path to Exile his big guys, and Muddle the Mixture his Tooth and Nails. Just another non-interactive combo match-up really, and another favorable one that gets better post board.
Heartless Summoning Combo is another one of those match-ups that is all about the draws. If you draw your combo components, combo off. If you draw Engineered Explosives/ Golgari Charm , blow up his Heartless Summoning when he plays it so he can't combo off. You are favored against them, just like you are favored against literally every combo deck that chooses not to interact with its opponent. Pillow forts can in fact contain explosions.
As a combo deck, Scapeshift is really sturdy all around, as it is very good at controlling the opponent's deck while still combo'ing off. What this means for us is that Aether Vial is going to be crucial. This means that The Architect of Oz needs not try for speed, but instead just needs to be more stable than the Scapeshift deck. Aether Vial with Academy Ruins ensures that this will be the case. Games 2 & 3, mulligan to 5 against Scapeshift for Leyline of Sanctity, as it will shut down their combo. From there, Spellskite should be able to protect your combo creatures from Scapeshift's removal suite. Again, go read up on Spellskite. Knowing how to beat Electrolyze is critical in this match-up.
This deck is a brew which is one of The Architect of Oz's worst match-ups post board due to the sturdy and flexible nature of Chord of Calling.
Game 1 is actually favorable. You can play Chalice of the Void on two charge counters to stop the Chord player from using the majority of his creatures. Engineered Explosives can take care of most of the creatures he manages to sneak through the chalice, and you can combo off much faster than the chord deck can. Chalice of the Void on 3 counters won't even stop chord, because it checks what the CMC of the card was when it was cast, not what its vanilla CMC is, so chord is usually cast as a 6+ CMC spell. Chalice can't fight that.
Games 2 & 3 are where it all goes to crap. The chord deck gains access to Slaughter Games which blows us out and Stony Silence to blow us out. If the chord player is smart, he/she gets rid of most of his 2 cmc creatures to board these in, so Chalice of the Void becomes considerably worse post-board. You just have to race the Chord deck and hope you can kill him before he has the mana to access all of these answers.
One thing which you have going for you is that both Chord Toolbox and The Architect of Oz have powerful long game plans, so it isn't all that uncommon to be able to win a long, grindy game. The chord deck is still favored if it draws well though.
Against Chord, if you lose game 1, you probably are going to lose the match-up.
Pithing Needle is brutal against these decks, as two Pithing Needles can take out every copy of two different Planeswalkers, and can be salvaged when necessary. Spellskite might seem like a good card to board in, but truth is he doesn't make us go any faster, and this deck just isn't threatened by walker decks. There is no REAL need for the needles even because you can just race the Walker decks, making them an easy match-up for The Architect of Oz.
This match-up is about another easy one, because a combo deck like The Architect of Oz doesn't care how high your life gets, and such decks as Soul Sisters sacrifice speed for their life gain. If the Soul Sisters deck actually starts gaining a bit of ground against you, just wipe the board with Engineered Explosives. Regardless, killing the soul sisters deck by going infinite before they can kill you with minions should be a breeze.
Academy Ruins
It is useful to grab Pili-Pala from the yard. Since you don't ever play Grand Architect until it's time to go off, the only way your opponent can stop you is by killing Pili-Pala. Academy Ruins primary purpose in this deck is to ensure that Pili-Pala can -and will- always be played. To this end, Academy Ruins is very fun to use with Aether Vial. What you can do is put Pili-Pala back on top of your deck when your opponent kills it for a grand total of and a tapped Ruins, and then Vial the Pili-Pala back in on your opponent's next end step. If he kills it again, spit rinse repeat. Pretty cheap way to keep threatening to win every single turn if your opponent runs out of removal. Bear in mind, this is only a good game plan against either a board stall or an empty board, as jamming the combo turn after turn only works if your opponent isn't killing you in the meantime.The second purpose of Academy Ruins is synergy based. Glint-Nest Crane allows you to check the top four cards of your library for an artifact, and both reveal and put that artifact into your hand if you find one. What can be done with Academy Ruins + Glint-Nest Crane is that you put an artifact from your graveyard back on top of your deck using Academy Ruins, and then draw it using Glint-Nest Crane. This interaction can be done at instant speed with Aether Vial to really surprise opponents, and if you have two Vials, can even lead to you playing a recurred artifact creature at instant speed. This is an especially important interaction to remember in midrange and control match-ups, as those games are largely value driven.
Aether Vial
Aether Vial is the most powerful card that Invention Black runs, hands down.First and foremost: Aether Vial does not make you pay for the creatures you summon with it. This means you are free to transmute for Pili-Pala/Myr Superion and then vial them in on the same turn that you transmuted for them. Alternatively, you can vial creatures in for free, allowing you to leave your lands open for counter magics or instant speed removal.
Second: Aether Vial does not place creatures on the stack. Vial's cost is to tap. It's ability is to put a creature into play. This means that when you tap Aether Vial, an active ability to place a creature card with CMC equal to the number of counters on the Aether Vial is put into play. If that ability resolves from the stack, the creature is moved from your hand directly onto the battlefield. The creature itself never enters or exits the stack. This means that creatures being put into play with Aether Vial cannot be countered, which is not only extremely useful against any deck that runs counter magics.
Third: This deck is built with a lot of CMC creatures. This is intentional. What you can do is refuse to put charge counters onto the vial once it has two, and then use the vial to play creatures on your opponent's turn, at instant speed no less. A prime example would be playing Pili-Pala on your opponent's end step to see if he is foolish enough to tap out against you. Then, on your upkeep, you can tick the vial up and then play Grand Architect without having to pay for it, allowing you not only to combo off, but to abuse the fact that (once in play) Grand Architects first ability basically provides you with as many Counterspells as your mana base can support.
So the way you use Aether Vial -summatively- is you leave it at 2 charge counters until you combo off, and you use it to play creatures on your opponent's turn like a sneaky little hobbit.
The deck is considerably less threatening if it does not draw Aether Vial, so try to find it as quickly as possible if it isn't in your starting hand. You want to get at least one Aether Vial in play and "stuck" (meaning your opponent can't remove it) by turn 3 latest.
Anguished Unmaking
Anguished Unmaking is used to handle any cards on the board which you wouldn't be able to handle via combat or conventional forms of removal (like Fatal Push). You don't need to save them for specific trouble cards. Whatever your opponent has IN PLAY that you can't remove is guaranteed more dangerous than something he MIGHT be able to put into play later in the game.Chalice of the Void
Chalice of the Void is used to punish decks that have a heavy reliance on spells of any one specific CMC. Examples would be Infect (Reliant on CMC = 1), 8-Rack (Reliant on CMC = 1), etc. Those decks that are weak to Chalice are discussed in the match-up table.Players also should be aware of the rulings on Chalice of the Void, ESPECIALLY: The number of counters on Chalice of the Void matters only at the time the spell is cast. Changing the number of charge counters on Chalice of the Void after a spell has been cast won't change whether the ability counters the spell. If the Chalice had the correct number of counters when the spell was cast, its ability will trigger. If the Chalice had too many or too few counters when the spell was cast, the Chalice's ability won't trigger. (taken from gatherer.wizards.com).Also be aware that Chalice of the Void is considered to have a CMC of when on the battlefield. This is relevant in some match-ups where an Engineered Explosives with 0 charge counters is a powerful play.
Final Comment: You can cast Chalice of the Void for , but doing so will only counter spells with a casting cost of 0 (such as Pact of Negation , Summoner's Pact , and Mox Opal).
Engineered Explosives
Engineered Explosives will not destroy man-lands, even if they have gone man-mode. The card explains this (vaguely), but players still often make the mistake of thinking it will destroy man-lands. It won't.Be aware that when you cast it, the CMC of Engineered Explosives is equal to the amount of mana you spend to cast it. When the explosives are in hand or in play though, it is considered to have a CMC of 0. Just be careful you don't accidentally get your own explosives countered by Chalice of the Void. If you have to, pay an extra mana of a color which you already spent on the Engineered Explosives, or even 2 colorless generated by Grand Architect, to change the CMC of the explosives as it goes onto the stack. Because of the way the sunburst mechanic works, this won't change the number of charge counters the explosives come into play with.
Against decks whose only way to win is by swinging for lethal with creatures, you can assemble a soft lock of Engineered Explosives + Academy Ruins for recursive removal to prevent an opponent's creatures from ever sticking to the board. Be aware that this is an EXTREMELY soft lock, which can be countered by your opponent simply taking a few draw steps to acquire 2-3 creatures of different CMCs and playing them all at once. This combination is there if you absolutely need it, but is not a good idea to use as a "fall-back" game-plan.
Grafdigger's Cage
Not too much quirk here, just be aware that Grafdigger's Cage turns off the ability of Whir of Invention to fetch creatures out of your deck, and the ability of Profane Command to be used as recursion. Use the grafidgger's cage|cage with caution.Grand Architect
Grand Architect has a lot of quirks, so be prepared for an essay here.First: Your first copy of Grand Architect should be saved for your first combo attempt. Exceptions to this rule involve situations where you need him as a blocker AND can use him to play some other artifact creature such as Myr Superion or Spellskite in order to not die.
Second: Be aware that he provides a lord (+1/+1) effect to all blue creatures. This is especially relevant because Grand Architect can turn artifact creatures blue for , which can be used to save them from death by damage, or (in the case of Spellskite) death by Twisted Image. It also lords Glint-Nest Crane to a 2/4, which is especially relevant against Delver of Secrets .
Third: Be aware that Grand Architect can tap ANY blue creature under your control to generate . This is especially relevant because you can leave blue creatures like Glint-Nest Crane up as blockers, or choose to use them to help pay for something like a Wurmcoil Engine.
Muddle the Mixture
Muddle the Mixture's usefulness changes based on different match-ups. Against aggressive decks it is typically most useful to fetch powerful creatures such as Myr Superion. Against decks that run Collected Company/Chord of Calling, it is critical to save Muddle the Mixture to counter those cards. In control match-ups, it tends to be used as a counter-spell to protect your creatures from removal. In combo match-ups, Muddle the Mixture is most often used as a counter-spell to disrupt some critical combo component/enabler. In any match-up though, Muddle the Mixture is extremely useful to fetch Pili-Pala to guarantee the win, or to fetch a tech-card such as Rest in Peace or Defense Grid .Myr Superion
He's as quirky as goyf, come on guys! Your three methods of playing him are Grand Architect, Aether Vial on 2, and Whir of Invention. You may also end up cheesing him out using 2 Pili-Palas and 4 mana, but that's a corner case-scenario, and has never once come up in all my time playing Pili-Pala combo decks.Profane Command
Profane Command is a rather obvious win-con. The quirkiness of this card comes from its two alternate uses though. You can choose to use the -x/-x mode in conjunction with the return to battlefield mode to effectively 2 for 1 an opponent, both killing off their creature and returning, say, a Myr Superion to the field.Profane Command is great as a non combo finisher too. You can name the "x creatures gain fear" in conjunction with the "target opponent loses x life" mode to effectively grant two or more creatures unblockable, and deal a bit of damage to the opponent. You would be surprised just how much reach this can give the deck. (My record is 18 damage with Profane Command; fearing 3 superions and dealing 3 damage).
While Profane Command is useful outside of combo, be aware that it is your only CMC = 2 wincon. Using it for value means you are no longer on the combo game-plan, but have shifted to midrange. I've lost a few games using Profane Command for value a little too hastily when I should have saved it for a combo win.
Spellskite
Spellskite should be used to protect Grand Architect/Pili-Pala/Myr Superion to ensure that you can get off an infinite combo, or get in those sick beats. It receives support from Muddle the Mixture once you have a copy of both Grand Architect + Pili-Pala either in hand or on the field.Spellskite also combo's very nicely with Aether Vial. Take the following scenario: You have Pili-Pala and Spellskite in hand, it is your turn, and you have an Aether Vial with two charge counters. You also either have Grand Architect. Hard cast Pili-Pala that turn. The reasoning for this is: If your opponent has some spell like Electrolyze and you play the Spellskite first, the second that you try to vial in Pili-Pala on their end step, they will simply Electrolyze both the Spellskite and Pili-Pala, and since Spellskite is already a target of Electrolyze, he won't be able to redirect the 1 damage going at Pili-Pala. However, if you play the Pili-Pala first, your opponent is forced to try to remove him, or you just win next turn. So he uses Electrolyze and targets Pili-Pala and something else. Maybe your face, it doesn't matter. In response to the Electrolyze, you vial in Spellskite and then activate his ability to change the 1 damage headed at Pili-Pala to Spellskite, since Spellskite was not a legal target when Electrolyze was first cast. You can do this same thing with Forked Bolt . Against all other removal spells, it doesn't matter which you play first as they only target one thing, or use multiple instances of the word target (hello Kolaghan's Command), but for the sake of proper sequencing, in a scenario like the aforementioned one, you should always play the Pili-Pala first and leave the Spellskite as back-up to be Vial'd in.
Tezzeret, Agent of Bolas
The big quirk here is realizing the power of Tezzeret's +1. It puts tezzeret onto 4 which allows him to utilize his finisher, and will more often than not allow you to draw into either a Pili-Pala to combo, or Myr Superion. If you draw a Myr Superion, note that his +1 just gained a loyalty and gave you a 5/6, where his -1 would have only given you a 5/5.While it can be quite tempting to use his -1 and just turn Tezzeret into a 5/5 factory, 5/5's die to removal. Card advantage does not, and it is VERY important to remember this. His -1 is still extrememly powerful, and in dominant board states where you know your opponent has run out of removal, feel free to turn Tezz into a 5/5 factory to turn a winning game state into an unlosable one. In non-dominant board states, his +1 is almost always the better choice.
Muddle the Mixture
When muddle is transmuted, it counts as an activated ability being placed on the stack. This means that only a card such as Disallow can stop a transmute, and regular counter magic cannot. Good thing nobody plays Disallow!Vedalken Shackles
There isn't much quirk to HOW to use the shackles, but players should be aware of the rulings on Vedalken Shackles. Specifically:"The creature's power and the number of islands you control matter only when the ability is activated and when it resolves. After that, it only matters that the Shackles remain tapped." (Taken from gatherer)
What this means is that your opponent CAN respond to a Shackles activation by either pumping their creature or destroying one of your islands in order to "counter" the activated ability. This usually only matters vs Goyf, but be aware of it for all match-ups where you use the Shackles.
Viridian Longbow
Viridian Longbow can be combined with Pili-Pala outside of the combo. What this does is create what is basically the most beautiful combination of Pyrotechnics and Fireball; a "spend X, deal X damage divided as you choose among any number of permanents in 1 damage increments" combo. This synergy has won me so many control games I cannot even begin to count them.Once you have assembled this gattling gun, don't ever attack with Pili-Pala. You can just tap him to deal that 1 damage instead, so there is no point.

Suggestions
Updates Add
Comments View Archive
Attention! Complete Comment Tutorial! This annoying message will go away once you do!
Important! Formatting tips — Comment Tutorial — markdown syntax
Please login to comment
| Top Ranked |
|
| Date added | 7 years |
| Last updated | 2 years |
| Splash colors | W |
| Key combos | |
| Legality | This deck is Modern legal. |
| Rarity (main - side) | 13 - 8 Mythic Rares 20 - 5 Rares 8 - 2 Uncommons 13 - 0 Commons |
| Cards | 60 |
| Avg. CMC | 1.85 |
| Tokens | Wurm 3/3 C w/ Deathtouch, Wurm 3/3 C w/ Lifelink |
| Folders | modern, Modern Want/Edit, Combo References |
| Votes | |
| Ignored suggestions | |
| Shared with | |
| Based on | |
| Views |
