Introduction

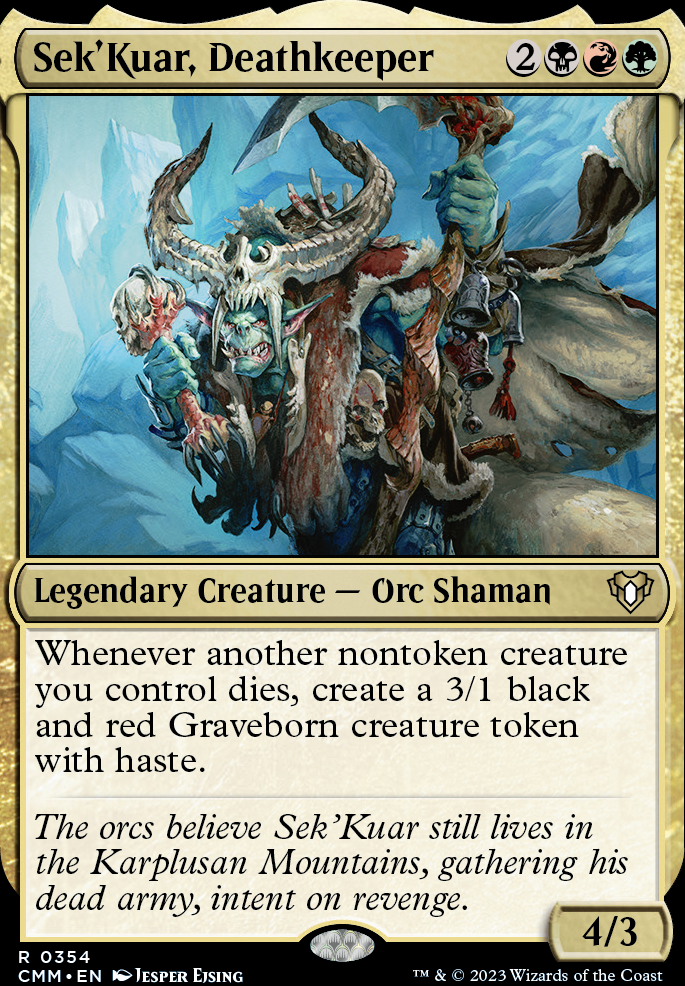
When I began playing Commander seven years ago, the third deck I ever built was Sek'Kuar, Deathkeeper. The Jund legend was my first foray into three colors, and the EDH format provided a perfect home for him that I couldn't find in my 60 card decks. The deck has evolved tremendously over the seven years I've had him. The focus has shifted as much as the card choices, and ultimately I've found a perfect strategy that I've stuck with for the past few years: Aristocrats.

Aristocrats is a community name for the playstyle of continuously sacrificing creatures to gain some sort of value or effect. Named so after a popular Standard deck in 2013 running cards like Cartel Aristocrat and Falkenrath Aristocrat, in conjunction with creatures that replaced themselves upon death like Doomed Traveler or Thragtusk, this commander deck aims to achieve the same effect. With Sek'Kuar, every creature card in the deck is perfect "Aristocrat" fodder, as we get a 3/1 token every time a nontoken creature of ours dies.

Are you interested in a graveyard-matters style of play, where you are more focused on amassing immense card advantage through sacrificing creatures repeatedly than simply reanimating some huge beater? Do you enjoy the Jund color combination and want to grind out the war of attrition with your opponent, much like the iteration of these colors in Modern? Does killing your opponent with a thousand stings sound like your cup of tea? This is the deck for you.

You might want to stay away from this deck if you enjoy playing a more voltron or battlecruiser strategy in your commander games, or if you are worried your playgroup hates out graveyard-based decks too much due to the popularization of the archetype with commanders like Meren of Clan Nel Toth and Muldothra, the Gravetide popping up.

Before we dive into the decklist, let's discuss what we're planning on doing through the course of the game, eventually arriving at a win condition.

Our primary win condition is to "pop off" and amass a large army of Graveborn tokens. While they can be sacrificed for incremental value along with the creature they were born from, they are perfectly serviceable beaters as 3/1s with haste.

We don't get a ton of these without some setup, however. We must survive to the long game, playing more of a control deck and policing the early game with removal. Abrupt Decay, Caustic Caterpillar, and Shriekmaw/Ingot Chewer are great ways to keep decks that are more low to the ground under check. Krosan Grip, Kolaghan's Command, and Assassin's Trophy are great answers to a lot of threats that show up in the first few turns of the game. Goblin Sharpshooter keeps those pesky x/1 utility creatures off the board. Scavenging Ooze and Withered Wretch undermine the other graveyard decks at the table while setting yourself up for a one-sided Living Death. Living Death is our marquee card, and resolving one with a stacked graveyard while our opponents' boards are bigger than their own graves wins the game pretty quickly.

The standard starting hand should include at least three lands, an early play, some ramp, at least one answer, and most importantly, some piece of card draw. Obviously, it's a tall order to have all of these things, but as long as you can draw into some of the other parts, the game should go smoothly. One- or two-land hands are always a no-go, even if Farseek or Sakura-Tribe Elder are present.

This deck has explosive potential if you get your engine running. An early sac outlet can make all the difference in how the rest of the game plays out. Answering an opponent's early game also makes the rest of your mid to late game that much more comfortable. You're also often able to make political allies pretty easily to help tag team a much more threatening player, then break those deals just as easy to pull yourself ahead.

One of this deck's biggest strengths is a resiliency to board wipes. An important rule to learn while piloting this deck is that if all your creatures die and Sek'Kuar was one of them, his effect will see all those creatures dying and replace them with Graveborns, even though the source of this effect died as well. Often a traditional board wipe that simply destroys all creatures will put you with an even or sometimes bigger board state than you had before, which might make your opponent hesitate to play the spell in the first place.

As for weaknesses, the most obvious one is graveyard hate. An early Rest in Peace or Bojuka Bog will hurt, but it's not the end of the world. The deck runs answers to such cards and will often still operate just fine if the graveyard is turned off for a while. During a time when you can't access your graveyard, you can play this to your advantage to gain allies, as your threat level will be sufficiently lower.

Another weakness is decks that like to muddle the efficiency of combat, such as turbo fog commanders like Angus Mackenzie, or decks that build up a pillow fort behind Sphere of Safety and Propaganda (Bant decks in general). The game plan is to pick apart their defenses while finding an opportune moment to strike while shields are down.

There is a second win condition that only comes up a few times, and it's our very own infinite combo that was made possible with the release of Pitiless Plunderer. While a very good way to generate mana during our normal sacrificing, the Plunderer has a very important piece of text missing--"nontoken." This guy makes a Treasure token whether the creature that died was real or not. From here, there's plenty of options that we can mix and match.
  • First, we need a creature that recurs itself for mana. The main one is Reassembling Skeleton, but Nether Traitor and Bloodsoaked Champion also work.

  • Second, a token-upon-death generator is required. Our commander fills this role quite well, but cards like Pawn of Ulamog work as well. Phyrexian Altar can get the loop going, but won't net any mana or creatures, so a Blood Artist-type effect is needed. Parallel Lives is a replacement as we will get two treasure tokens per death; however, if using the Nether Traitor a token generator is needed, and if you have the generator and the Parallel Lives, this results in infinite mana, as we only need 1-2 Treasure tokens per loop, but we get twice that many.

  • Lastly, of course, a sacrifice outlet of any kind will do. Goblin Bombardment and Blasting Station spells infinite damage, and Ashnod's Altar makes infinite colorless mana.

The loop works as follows: with the Plunderer and the Skeleton out, sacrificing the Skeleton will give us some tokens, one of which is a treasure and the other is a creature. We can now sacrifice the token creature, giving another treasure token. The two treasure tokens give us the mana to recur the Skeleton, starting all over again. In the case of the Traitor, you can use the treasure given from the Traitor to recur itself when the creature token gets sacrificed.

Let's talk about some key players in this deck.
  • Living Death: This mass reanimation spell/board wipe should be no surprise inclusion if you're familiar with black decks in EDH. If you set it up, it will win the game on the spot, almost guaranteed. However, you shouldn't hold onto it if you're behind, and it's just as effective as a board wipe as it is a wincon. Thrilling Encore is fresh off the presses as of the time of this primer, and only time will tell how powerful it proves to be. In this deck, it seems like a shoe-in. I will update this notion as I get the opportunity to cast it more.

  • Whisperwood Elemental: Now, this is my personal spice that I don't see too often in other Sek'Kuar decks. This guy is good. Like, stupid good. In most cases, he just sits there an turns any card in your deck (whatever happens to be on top) into a nontoken creature, whether it originally was one or not. This means you can just throw face-down lands or sorceries at your opponent and reap the benefits of a creature dying. In the best case, you have a nice full board of creatures, and you sacrifice this guy to his ability. Now, in addition to the normal Graveborn/Ooze/Eldrazi Spawn/whatever that you will get when a creature you control dies, you get another nontoken creature with that. That means you get an additional token off of your original face-up, nontoken guy dying. If you're worried about losing valuable spells, think of it as milling yourself, which is a pretty powerful way to access your deck in a graveyard strategy. You can always get those cards back with Eternal Witness or Nyx Weaver.

  • Din of the Fireherd: Another notable exception from Sek'Kuar lists I see. This card would obviously be busted in multiplayer if it hit every opponent, but in 1v1 this is a hidden wincon and in multiplayer it sets the player who is furthest ahead to furthest behind. The best time to cast this is after making a bunch of Graveborns. Usually, with 5-6 of them, this card is pretty good but get it up to 12+ Graveborns and that opponent is gone. Eight mana is a lot of course, but like with Living Death if you set it up you will win the game you successfully cast it in.

  • Reassembling Skeleton: An absolute must have for any aristocrat deck. If you ever just need a body to sacrifice, the low cost of is all you need to pay. With Skullclamp, this effectively becomes ": Draw two cards."

  • Void: This card has been in the deck since the very beginning. The versatility of this board wipe with the added benefit of incidental discard is incredible. In some games, it blows out one person completely, and in other games, it just removes one or two threats, while maybe getting rid of a bomb in someone's hand.

  • Gaze of Granite: In the same vein as Void, this is a very adaptable board wipe. It's like a sorcery version of Pernicious Deed, and it can help you crawl out of being way behind if you have all the mana to put into this and nothing to lose.

  • Tombstone Stairwell: Another card from the deck's origins, this world enchantment can get absurd if you stack it in your favor. Here's a synopsis of this card:

    	Cumulative Upkeep 1B
    	Each upkeep, each player creates 2/2 Zombie tokens with haste for each creature card in their graveyard. Sacrifice those tokens at the beginning of each end step or if Tombstone Stairwell leaves the battlefield.
    
    Now, this gives you a lot of fodder each turn, and usually you end up with more than each opponent, meaning you can block them if they choose to throw them at you. Every turn you get to deal a little more damage with Goblin Bombardment, drain for an insane amount with Blood Artist, or get a little more value out of Evolutionary Leap. This card pairs extremely well with Pitiless Plunderer. Speaking of which...

  • Pitiless Plunderer: It's not often nowadays Wizards prints an absurd card for an Aristocrat strategy. They'll usually play it safe by adding "nontoken" to the card. However, with Plunderer, they decided not to, making a staple in any sacrifice strategy EDH can come up with for years to come. This guy single-handedly made an infinite combo in this deck where there were none before, which we've covered above.

  • Ramunap Excavator: This guy does a great Crucible of Worlds impression and helps all the fetches in this deck get more lands, and has the added benefit of being able to be sacrificed like any other creature. Even if you're not running fetches, it's worth bringing this guy up for this point: If you're considering an effect for a Sek'Kuar list and that effect is printed on both a creature and a noncreature card, opt for the creature if it's less or equal mana cost. Being able to sacrifice it and bring it back over and over is crucial.

  • Ashenmoor Liege: Not much needs to be said about this guy beyond the fact that he makes your Graveborns into 5/3s with haste, which will take chunks out of opponents much faster. He also puts your commander out of bolt range, which is a nice bonus.

  • Thragtusk: A member of the aristocrat hall of fame, the life gain on the way in helps sustain us while the additional token on the way out helps our strategy.

  • Birthing Pod: This card singlehandlely made this deck competitive. Being able to tutor into your combo past even past cards like Blood Moon. It's added a lot of utility to this deck even if we're not going for the combo.

Over the course of this deck's lifetime, it has housed some powerful common culprits of these types of decks. They've since left the list in favor of lowering the chances I get a target painted on me.
  • Sheoldred, Whispering One: This praetor finally got cut for the inclusion of a different whispering one. Every time I cast her, she didn't stick around for much longer than a full turn cycle, certainly not long enough for me to get anything back with her.

  • Rise of the Dark Realms: I almost always won when I cast this card, but nine mana is a lot, and the number of triggers from all the creatures coming back ended up being a headache, even if the general consensus was that I won from that point. It was also the biggest kick in the face when I was looking for an early play or land drop in the first few turns of the game. It got cut not too long ago.

  • Emrakul's Evangel: I ran this card for a while after its release, but in the long run I ended up ditching him. This deck is all about setting up but the number of pieces and scenarios in which this guy needed to really shine was a much more than I was willing to do.

  • Qarsi High Priest: Remember all the stuff I said about Whisperwood Elemental? This guy is just as good for your Sek'Kuar strategies. He eventually lost out to Viscera Seer, but that doesn't mean you can't run both. I just ran out of flex spots for him.

  • Generator Servant: This favorite of mine lost a flex spot in this deck eventually, but I think he might find a home in here again one day. Granting haste to an early Sek'Kuar is decent, but getting the early Sek'Kuar is perhaps more important.

  • Death Pit Offering: This card is super cute in this deck, and I tried it out for a while. Turn your board into a bunch of 5/3s with haste? Then all your future creatures are pumped up too? Sounds really good on paper, but like the Evangel, it just required too much setup for what it did.

  • Grave Pact: This card was never in this deck, but I don't discourage its inclusion. I prefer the flashier and less mana-intensive Dictate of Erebos myself. Run both if you want! It's nice to be able to rip the rug out from under our opponents' board states while doing our thing.

  • Smothering Abomination: I used to run Dragon Appeasement a long time ago, which was a more restrictive version of Abomination. I haven't run this card in this deck since I think Grim Haruspex and Elemental Bond do serviceable work on the card draw front, but I think Abomination has a place in Sek'Kuar lists.

  • Cauldron of Souls: I recently cut this for Thrilling Encore, but it was a staple in this deck since its birth. Using it to recur your board after a wipe or just getting double use out of creatures when you're going off makes it a powerful artifact, and one I'd recommend if you have space.

Having had such a long lifespan, this deck has accrued a real optimized mana base. The only land that always enters tapped is Bojuka Bog. Obviously, you don't need to have dual lands or fetches to run this deck well, you can make do with lands like Savage Lands, guildgates, and other taplands. The mana base is easily the most expensive part of this particular list and doesn't need to be replicated. In fact, this deck runs 10 basics, which is perhaps a little less than I'd prefer in a format with Blood Moon, Back to Basics, and Burning Earth showing up often. I would recommend running at least 14 basics if not more depending on your budget. Also, there are some utility lands that are important.
  • Bojuka Bog: There's a reason we run this. Getting to blank an entire graveyard for the cost of a land drop is bonkers. It helps set up Living Death and keeps other graveyard decks from going off before us. In very niche cases, you might even have to Bojuka Bog yourself, just to keep errant reanimation spells from getting your things before you.

  • High Market: While not a repeatable sac outlet, having it available is important. The life gain is negligible but there are times where it might keep you persevering in the last stages of the game.

  • Westvale Abbey  : With the number of tokens you have lying about, having the option to cash a few in for a 9/7 beatstick is pretty good. The lifegain on Ormendahl is quite a bit better than High Market, as it turns out, and will keep you going for much longer.

  • Svogthos, the Restless Tomb: This manland that used to be in this list, and I was always impressed with its performance as a Lhurgoyf out of nowhere. It lost its spot due to color restrictions getting tighter and requiring less colorless lands as a result, but it could easily find a spot in your deck.

Suggestions

Updates Add

Comments

Attention! Complete Comment Tutorial! This annoying message will go away once you do!

Hi! Please consider becoming a supporter of TappedOut for $3/mo. Thanks!


Important! Formatting tipsComment Tutorialmarkdown syntax

Please login to comment

Revision 1 See all

(5 years ago)

-1 Doom Whisperer main
+1 Imperial Recruiter main
Date added 5 years
Last updated 5 years
Legality

This deck is Commander / EDH legal.

Rarity (main - side)

6 - 0 Mythic Rares

55 - 0 Rares

18 - 0 Uncommons

11 - 0 Commons

Cards 100
Avg. CMC 3.37
Tokens Bear 2/2 G, Beast 3/3 G, Dragon 2/2 R, Dragon Egg 0/2 R, Eldrazi Spawn 0/1 C, Elemental 5/5 BR, Emblem Liliana, Defiant Necromancer, Graveborn 3/1 BR, Human Cleric 1/1 BW, Manifest 2/2 C, Treasure, Zombie 2/2 B, Zombie 2/2 B w/ Haste
Folders VaevictisAndTheAristocrats, decks i like, Ideas
Votes
Ignored suggestions
Shared with
Views