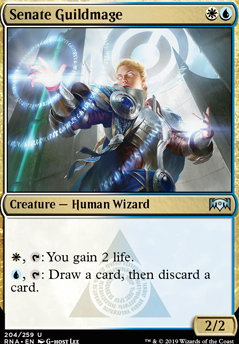
This is my attempt to make a white Pauper EDH reanimator deck, with eventual combo win conditions. I would love to use black and white together, but not a single Orzhov, Esper, Mardu, Abzan, or 5-color uncommon creature can put cards into my graveyard from my hand or library. However, Senate Guildmage will do, as it lets us both discard large creatures to reanimate and dig through our deck for potential combo pieces. So, without further ado, I'll outline the three main strategies of the deck:
Reanimator
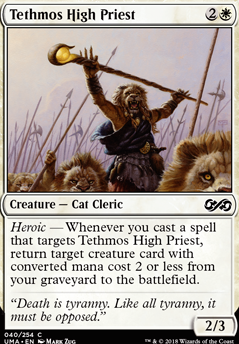
There are four cards that can put creatures from our graveyard back onto the battlefield. Breath of Life, False Defeat, and Resurrection can all put a large threat or a combo piece onto the field for 4 mana. These are primarily for high-CMC creatures like Ulamog's Crusher, Hand of Emrakul, and Eldrazi Devastator. On the other end of the spectrum, Tethmos High Priest can repeatedly resurrect low CMC creatures. The importance of bringing back the low CMC creatures is that they can draw you cards, tap down enemy threats, and chump block, buying time as you work towards a combo. The cheap creatures also play well with your commander by giving you plenty of spells to play early in the game, while continuing to spare mana for drawing and discarding cards.
In addition to creature recursion, the deck has three creatures with spell-recursion enter-the-battlefield effects. These are Archaeomancer, Salvager of Secrets, and Mnemonic Wall. These can either be part of a combo or get back a reanimator spell to reuse removed threats.
Odds are, even a turn 4 reanimated Ulamog's Crusher won't be able to cripple more than one or two players. The main goal is not to win with big beaters, but to buy time, put your opponent on the defensive, preserve your life total, and force your opponents to use removal on non-combo cards.
Priest Combo
The recently downshifted Tethmos High Priest is the central pillar of a 5-piece infinite combo. This is the main win condition of the deck because all of the key pieces can be tutored for by transmute cards like Dizzy Spell, Muddle the Mixture, and Drift of Phantasms, as well as type-specific tutors like Merchant Scroll and Heliod's Pilgrim.
By playing and returning Shimmering Wings to our hand, we can repeatedly reanimate creatures for UU. With High Tide causing islands to tap for an additional blue mana, you can create infinite blue mana by reanimating Cloud of Faeries with a sac outlet that costs 1 or less (like Fanatical Devotion). Once you have infinite blue mana, you can use Cloud of Faeries' untaps on white mana sources while using your infinite blue mana to continue the loop. This allows you to get infinite mana of any color.
As an alternative to High Tide, you can also use Azorius Chancery and a white return-to-hand aura like Conviction to attain infinite mana. Chancery can be tutored up by Expedition Map, which can be tutored up by Trinket Mage. First you use Cloud of Faeries' untap effect on the chancery and an island, giving you WUU. You continue using UU each cycle to continue the loop with Shimmering Wings, getting infinite white mana. Once you have infinite white mana, you can use Conviction to continue the loop instead of Wings, allowing you to convert half of your infinite white mana into blue.
Drake Combo
The most infamous combo in PDH rears its ugly head here as a secondary combo. This combo was chosen because two of the key elements of the combo have good synergy with other elements of the deck. Spell recursion creatures like Mnemonic Wall allow us to reuse our reanimator spells, as well as some of our transmute tutors, while Ghostly Flicker combined with a spell recursion creature gives us a non-infinite way to reuse and abuse Tethmos High Priest's reanimator effect. Drake combo is not the primary win condition of the deck, though, because there is no way to tutor for Peregrin Drake.
Just in case you are not familiar with the combo, the key is to have a spell recurring creature and Peregrine Drake in play, then blink both of them using Ghostly Flicker or Displace. Your spell recurring creature will return Ghostly Flicker to your hand and Peregrine Drake will untap enough lands to replay Ghostly Flicker with mana left over. Once you have infinite mana, you can continue the loop without flickering the drake, allowing you to reuse other enters-the-battlefield effects. You can also replace the drake with Cloud of Faeries together with High Tide.
How to Win with Infinite Mana
Once you have one of your two loops set up and infinite mana at your disposal, there are quite a few ways to put your opponents out of their misery. With infinite mana, you can return all their permanents to their hands with Capsize. With the Priest loop, you can create an infinitely large Unruly Mob or make all their creatures attack each other with Jeering Homunculus. With the Drake loop, you can deal infinite damage by flickering Sunscorched Desert, or return your whole grave to the battlefield with a reanimation spell by flickering a second spell recursion creature like Archaeomancer.
You won't always have one of these in hand when you go off, though. In order to get around that, you need to draw more cards. However, since this is in the context of an infinite mana loop, you can just go ahead and draw your whole deck. You do this with the Priest loop by resurrecting and sacrificing one of the many creatures that lets you draw when it dies. With the Drake combo, you have to be a little pickier and use one of the few cards that allows drawing or card selection upon entering the battlefield, like Thraben Inspector or Whirlpool Rider.
Conclusion
This deck feels like a complex puzzle that I still haven't entirely figure out, with multiple combo lines with shared pieces and tutors. As is true of most combo decks, you could possibly win as early as turn 5, but it is more likely that you will use what interaction you have, like Benalish Trapper or Just the Wind, to buy time until going off somewhere around turn 8 or 9. Thanks to the multiple combo lines, this is a relatively resilient deck. So long as your opponents don't exile all three of your pillars (Tethmos High Priest, Cloud of Faeries, and Peregrine Drank), you can still combo off.
Gravehate is an obvious weakness, as it wipes out our reanimator targets and some of our combo pieces. The other, less obvious weakness of the deck, though is discard effects. While you draw a lot, most of it isn't actually card advantage, but card selection. This means your hand quickly becomes a pile of important things and a single Mind Rot effect can make you discard tutors and combo pieces, setting you back several turns.
For future improvements, I will toy with using the Retraction Helix and Freed from the Real/Animated Bounce Land combos to see if they work better. I am also still unsure about the inclusion of several of the flashback and madness cards currently included. The idea is that they give incidental card advantage and utility by being good to discard, but sometimes I feel like I would rather just have another tutor or more powerful piece of interaction. Beyond that, I'll be praying for a 3-color commander that draws and discards, so I can include better mana sinks, different combo lines, or more tutors. Afterall, it wasn't that long ago that the only draw/discard uncommons were all in mono red or blue.